How to manage my Website Builder tool?
You are looking for the collection of web builder tool resources anywhere? We've got it. This page is your one-stop hub to master your Website Builder with links to guides, tutorials, and support articles. Whether you are a beginner looking to establish a new website or are currently working on an existing one and want to add some improvements, here's the place for you.

If you want to learn the functions of the navigation tabs, please see Website Builder tool overview.
This comprehensive guide is organized into collapsible sections to help you manage your legacy Website Builder. Click any heading below to expand the instructions for that topic.
- Log in to your account via https://www.networksolutions.com/my-account/login.
- Click Websites & Hosting from the left navigation menu.
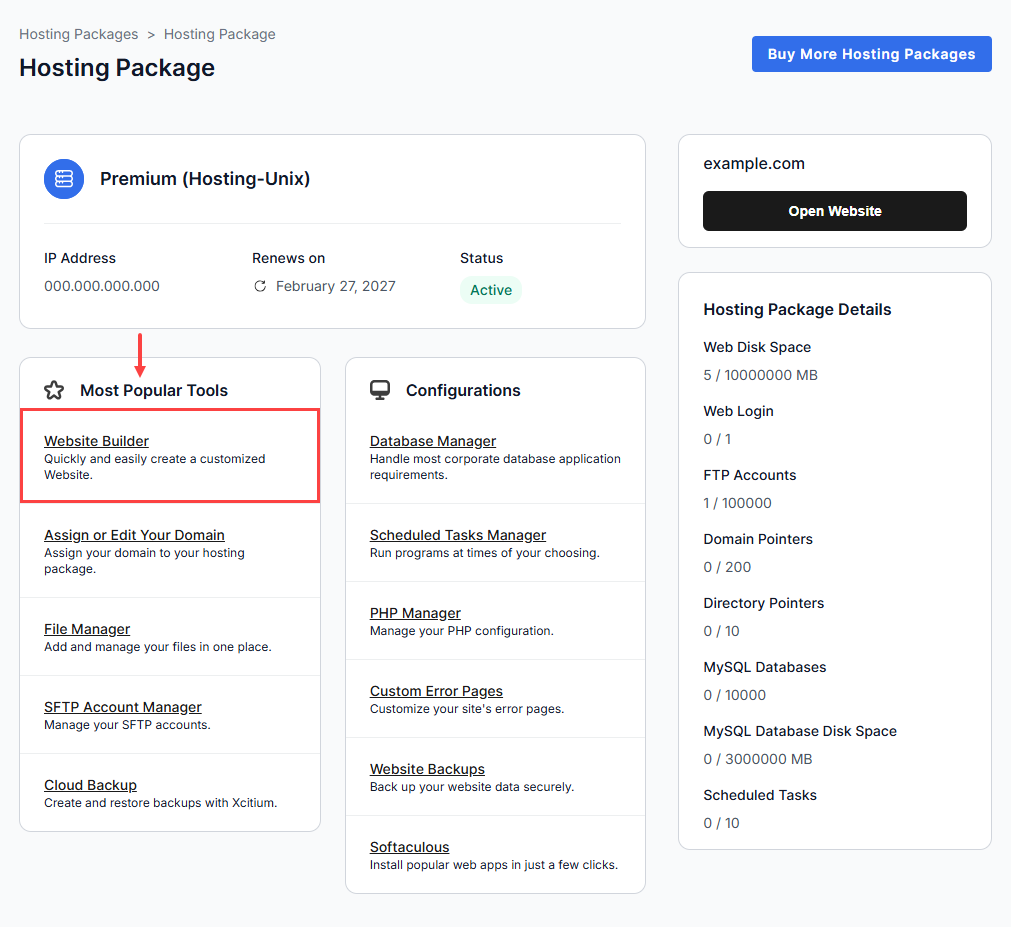
- Navigate to the hosting package that you want to access the Website Builder for, then click Manage to continue.

- Go to Most Popoular Tools and select Website Builder to continue.
In this section, you will learn how to:
If you want to change the colors of your website, please check How do I change site colors using CSS?
Changing your website's design
- In the builder, click the Design & Layout tab, then select the Designs option.

- In the Choose a Design panel, browse or search for a design you like.
- Click a design thumbnail to see a preview with your website's content.

- If it's a free design, click the Select button to apply it. For premium designs, you will need to purchase it before applying. You can try a premium design with your website contents using the Preview It with Your Site option on the Design Preview window.
To customize your website design, use the options available in the Design & Layout area of the Website Builder tool.

As always, you can preview your new design the way it would appear on your live website using the Preview option on the top right corner of the page. Make sure to publish your website for your new design to appear live to your website visitors.
Changing your website's background
To change the background color:
- Go to the Design & Layout tab and select the Background option.

- In the Color Preview panel, click the color you want to use, or enter a specific hexadecimal value.

- Click the green checkmark to apply the color.
To change the background image:
- Go to the Design & Layout tab and select the Image option.
- From the Insert your background image panel, choose to upload a new image, select an existing file, or choose from the free image library.
- Upload an image file from your computer.
- Select from the files that you have stored in the Website Builder tool.
- Choose from our library of free images.
- Apply the default background image that comes with the design template that you chose for your website.
- Remove the background image using the Do not display a background image option in the drop-down list.

- Follow the prompts to apply the image to your background.
To begin, click the Page Editor tab, select the page you want to work on, and click inside a content block. In this section, you'll find instructions for:
Formatting your page
Creating tables
Click the table icon in the toolbar, select the number of rows and columns, and then click OK.

Using responsive elements layouts
Click the Layouts icon in the Page Editor toolbar to insert pre-formatted, responsive content blocks and then click OK.

Editing content blocks
This builder offers two types of content blocks:
- Pre-formatted blocks
- Custom blocks
Pre-formatted blocks
These are added using the main Add Content Block button in the toolbar. They come with a pre-set structure, and you can only change basic table and cell settings.
Custom blocks
These are added by clicking the + button on an existing block. They give you the flexibility to choose your own layout.


After clicking the OK button, you will see your new content block.
- When adding a Custom Block, always choose the 1 block layout. All other layouts are not mobile-responsive and may break your site's appearance on mobile devices.
- You can choose a layout later by selecting the Layout icon under the Page Editor tab of the Website Builder. After you choose the 1 block layout and press the OK button, leave the Type settings on the next page as Text.
Managing existing blocks
Once a block is on your page, you can manage it using the icons that appear when you select it:
- Click the up and down arrows next to the blocks to reorder them.
Note: This is only posisble if you have multiple content blocks. - Click the x button next to the content block to remove it.
- Click the magnifying glass icon next to the content block to edit its properties.
- Click the + button to add a new custom block below the current one.
Managing images
- The image manager icon will only become active after you click on an image.
- If the image manager window does not open, you may need to disable your browser's pop-up blocker.
Accessing image manager
- Once you have accessed the Website Builder, either select Page Editor or Edit your site now.
- Click the section with the picture you would like to edit.

- Click on the picture so that it is highlighted in blue. You will notice that the Image Manager icon on the top left is no longer greyed out and can be selected.
- The Image Manager should appear once clicked.

Adding an image
To add an image, follow the steps below:
- Once in the builder, open the Page Editor tab.
- Select the page you want to edit.
- Select the content block where you want the image to go.

- Select the cell where you want the image, then open the Image Manager.
- Click the Add button.
- Choose the image you want to add from your local file manager, then click the Open button.
- Select the Upload Files button in the Upload Queue to add the image to the Image Manager.
- Select the image and click the OK button to place the image in the selected cell.

Replacing an image
To replace an image, follow the steps below:
- Click on the existing image to select it.
- Find and select the image you want to replace your current image with. Once selected, the image should be highlighted with a blue box around it.
- Add an ALT tag or description of the image in the Alt Text section.

Note: If you do not add an ALT tag or description of the image, a message will appear asking you to address this step. - Then click the OK button on the bottom right-hand corner.
Managing text
Editing text style
To edit text style, follow the steps below:
- Click inside a text block and highlight the text you want to change.

- Click on Font Family, and a dropdown menu will appear, showing you the available font options.

- Click on Font Sizes, and a dropdown menu will appear, showing you the available font sizes.

- Click on the Text Color icon, and a dropdown menu will appear, showing you the available colors.

Replacing text content
To replace text, please follow the steps below:
- Click the Page Editor tab.

- Find the content block you want to change.
- Click the content block to edit it. The "Please wait…" bar appears.
- Highlight the text you want to change. To keep the style that is currently programmed for the text, highlight all but the first and last characters of the text.

- Enter the new text that you want to put in.

- Delete the first and last characters remaining from the original text.
Review
This guide has provided a comprehensive walkthrough for managing your legacy Website Builder. You can now access the editor, customize your site's overall design and background, and perform detailed content edits, including formatting pages and managing text and images to keep your website up to date.
Get practical tips and product updates on LinkedIn.
Follow Network Solutions