How to get started with an SSL certificate
An SSL (Secure Sockets Layer) certificate shows visitors that your website is secure. It protects online transactions and data transfers by encrypting data. Your SSL certificate will be issued using the domain name you use for your website. The benefits you can get from an SSL certificate are:
- Trust and credibility: Browsers display visual cues like a padlock icon to assure visitors their connection is secure
- Search engine rankings: Google confirmed that secured sites with SSL have an advantage in search rankings
- Data protection: SSL encrypts sensitive information between the website and its visitors
- Professional appearance: SSL certificates create a trusted environment where potential customers feel confident making purchases
Follow the steps below to validate and issue your SSL certificate after purchase.
In this article, we will discuss:
Configuring an SSL certificate
Step 1: Configure the domain name
After you have purchased an SSL certificate, follow the steps below:
- Log in to your account via https://www.networksolutions.com/my-account/login.
- Click Security from the left navigation menu.

- Navigate to SSL Certificate, then tap Manage for the SSL certificate that you want to download.

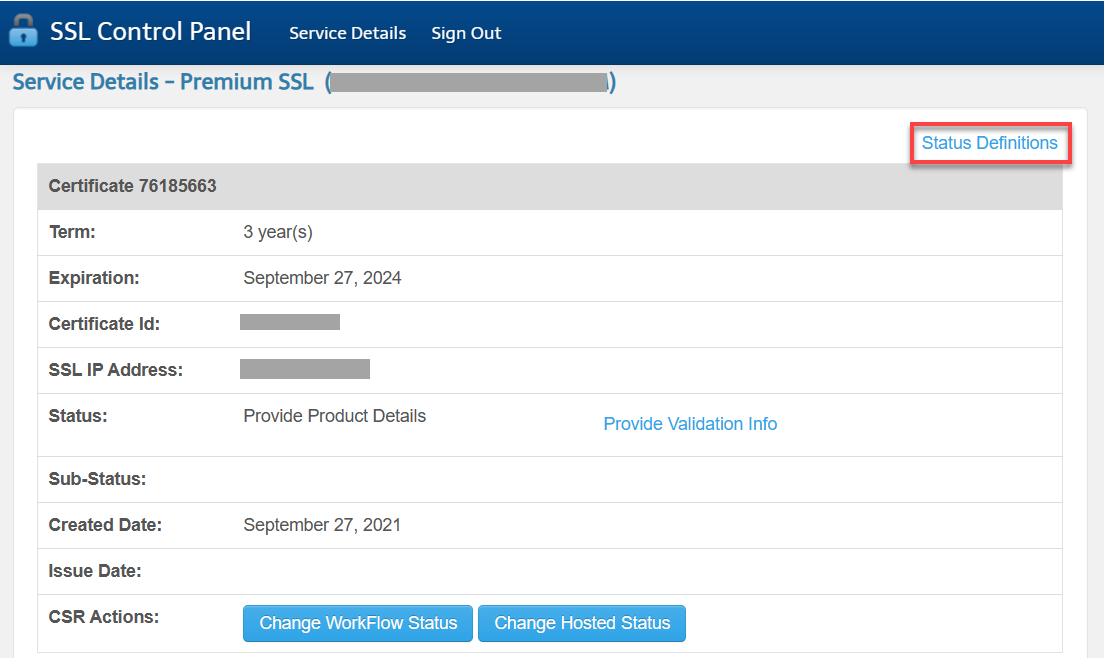
- You will be taken to the SSL Control details page, and then click Launch SSL Control Panel.

Note: If you cannot see the control panel, it may be due to a pop-up blocker on your browser. Please modify your browser settings if you have pop-up blocking activated. - Assign a domain name for your SSL certificate. Once you have entered the domain name, re-enter the domain name one last time, then click Continue.
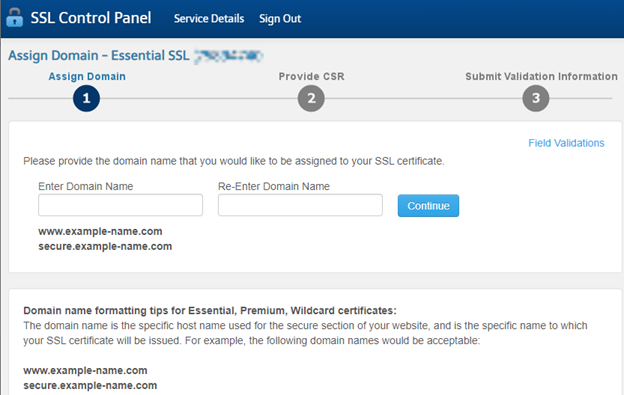
Important:
- Make sure that you issue your SSL to the exact version of the domain or subdomain you want to assign it to (e.g.,
example.com,www.example.com, orstore.example.com). - You will not be able to change the domain once it has been assigned.
- Make sure that you issue your SSL to the exact version of the domain or subdomain you want to assign it to (e.g.,
The system will perform a verification check to see if the domain entered is assigned as a domain pointer to a hosting package managed by Network Solutions. If Network Solutions does not host your website, you will be prompted to choose a server type and input a CSR (Certificate Signing Request).
If the domain is pointed to our hosting, the server type is determined by the package it is assigned to (Windows- IIS or UNIX- Apache). Additionally, the CSR for your shared hosting package is generated automatically on the back end and attached to the validation request so the certificate files can be created post-validation.
A Certificate Signing Request (CSR) is the key to the SSL certificate. It houses everything about the server, organization, domain, private key, and encryption strength related to the SSL. It is the basis for how the SSL installation files are created and what dictates the handshake to make the secure connection through the browser session.
If a third-party hosting provider hosts your website, you are responsible for providing the CSR for validation. If Network Solutions hosts your website, this step is already taken care of on the back end during the configuration process.
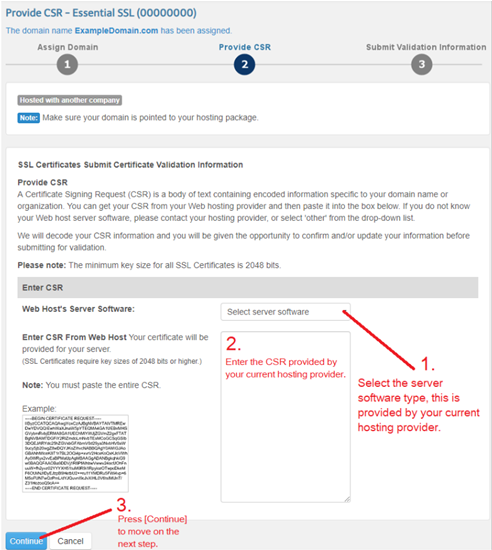
Follow the steps below if your website is not hosted by Network Solutions, but you have purchased our SSL product:
- Select the server software type provided by your current hosting provider.
- Enter the CSR that your current hosting provider provided into the Enter CSR From Web Host field.
- Click the Continue button.
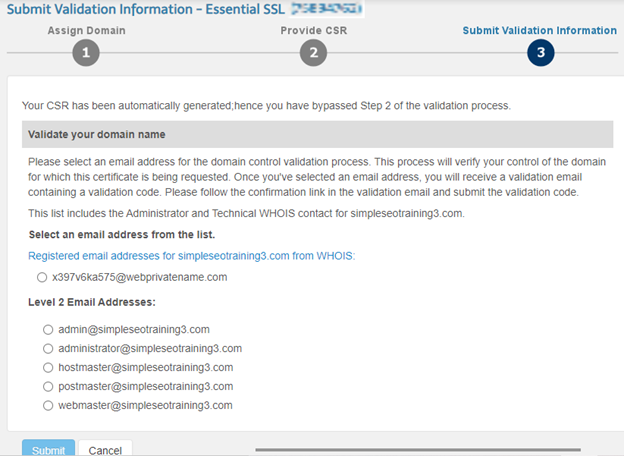
Step 3: Provide validation information
Now that you have assigned your domain and provided your CSR, select an email address to receive the validation code and confirmation URL.
Other validation methods
CNAME: This method is becoming the preferred method due to the challenges with email. We will provide you with a CNAME to be added to your DNS zone provider. Our support agent can assist you in updating your DNS records if Network Solutions hosts your website. You or our support agent can add the CNAME via the account manager for verification and SSL issuance.
HTTP/.txt file: When Network Solutions manages all certificate components (domain, hosting, and SSL), we will automatically create a .txt file based on the MD5hash and SHA3 components of the CSR and upload it to the webspace via FTP. This method allows this file to be verified and expedites SSL issuance (You can also create this manually and upload it).
Completing a domain validation
Validating email
After completing the steps, you will receive an email containing a secure link to activate validation to generate the SSL and issue the files. Clicking the link will notify the Validation team within an hour that the confirmation is complete.
Validating via CNAME
A special, unique CNAME is generated for each SSL validation request. Our support agent will provide you with the CNAME and inform you of the next steps. No email confirmation is needed to validate via CNAME. It may take 1-2 hours for the Validation team to confirm this. Please see How to update CNAME records for validation.
Validating via HTTP TXT file
A special, unique MD5 Hash Code is generated for each SSL validation request. Our support agent will take this information and create a .txt file to upload into your FTP site files. No email confirmation is needed to validate via HTTP. It may take 1-2 hours for the Validation team to confirm this.
Additional steps for Organizational Validation (OV) and Extended Validation (EV)
- If you have Basic, Advanced, Wildcard, or Extended SSLs, you will have either an Organization Validation (OV) or an Extended Validation (EV) in addition to the standard domain validation. In this step, you must complete an additional form including details associated with the business or organization, which will be included in the files issued for the SSL. All fields are required unless specifically noted.
- You will need to respond to an email that will trigger a verification phone callback. This automated call is activated by clicking on a link in the phone verification email. Once you click the link, an autodialer will make a call and provide you with a PIN.
- After completing the configuration and validation steps, the files will be issued and uploaded to your SSL control panel. You will also be notified via email. The timeframe for SSL validation and issuance depends on the SSL type and how quickly you complete the validation steps.
Updating a CNAME record for validation
- The steps below only apply if your website is hosted by Network Solutions. If you are not hosted by Network Solutions, you must contact your current hosting provider to add the CNAME records provided by our support agent.
- Please contact support to get your CNAME records. You can contact support via chat by going to www.networksolutions.com and clicking on the Contact Us icon. Please indicate that you are validating your SSL certificate via CNAME validation.
- Once you receive an email with the CNAME information, enter the records into your DNS manager by following the steps below. If you are not hosted by Network Solutions, you must add the CNAME records at your DNS provider.
To update your CNAME records via the account manager, follow these steps:
- Click Domains from the left navigation menu.

- Select the domain assigned to your SSL certificate, then scroll down to Advanced Tools and click Manage beside Advanced DNS Records.

- Click on the + Add Record button.

- In the Add Advanced DNS Records pop-up:
- Select CNAME as the Type.
- Select Other Host in the Refers to drop-down.
- Add the Host Name (Host) and Alias (Points to) provided by our support agent via email or chat. Please see the screenshot below for an example of a CNAME record sent via email or chat.

Important: Make sure to include the underscore "_" at the beginning of the alias and ensure that there are no extra spaces in both the hostname and alias. - Set the TTL to 2 Hours, which is the recommended value, then click Add to complete the process.
For example:

Note:
- CNAME validation may take 24-48 hours based on DNS propagation.
- If you are re-issuing or revalidating an SSL certificate, replace the old record with the new CNAME record. However, if you are unsure if you should remove your existing CNAME record, consult with your DNS provider to ensure you are not removing your records unnecessarily.
Types of SSL certificates
| XPRESS | BASIC | ADVANCED | WILDCARD | UCC | EXTENDED | |
|---|---|---|---|---|---|---|
| 384-bit encryption | ✔ | ✔ | ✔ | ✔ | ✔ | ✔ |
| Issuance time | Minutes ± | 1 business day ± | 1 business day ± | 1 business day ± | Minutes ± | 4-5 business days ± |
| Domain validation | ✔ | ✔ | ✔ | ✔ | ✔ | ✔ |
| Organizational validation | ✔ | ✔ | ✔ | ✔ | ||
| Extended validation | ✔ |
Review
Understand the next steps after purchasing an SSL certificate to secure your website. This guide outlines how to get started with an SSL certificate, specifically how you can configure your SSL certificate, update your CNAME records for validation, and enable HTTPS. Domain Validation certificates follow a 3-step process. However, Organizational Validation and Extended Validation certificates require you to follow additional steps. Remember to issue your SSL certificate using the correct domain.
Get practical tips and product updates on LinkedIn.
Follow Network Solutions