Getting started with Google Workspace
Google Workspace is a Google applications suite that brings together services to help businesses. This is a hosted service running on Google's backbone and uses various Google products (Email, Google Docs, Google Calendar, and Google Meet) integrated with your domain.
In this article, we will discuss:
How to set up Google Workspace in the account manager
Before you can begin receiving emails, you need to set up Google Workspace. The setup will create the email address you will use to access your email account with Google.
Follow the steps below to set up your Google Workspace plan.
- Sign in to your account manager via https://www.networksolutions.com/my-account/login.
- On the left side of the page, click Google Workspace. You will be taken to the Google Workspace details page in your account.

- Click the blue SetUp button, then click Get Started in the box that pops up.

- Create your primary email address by entering the email address you would like, your first and last name, and your organization name (if applicable). Click Continue once done.

- Set up your recovery email address in case you get locked out of your account and click SetUp.

-
If your domain is registered with another company, please proceed to the How to verify a domain name not registered with Network Solutions section of this article.
If your domain is with Network Solutions and currently configured to a different email service, please proceed to step eight.
If your domain is with Network Solutions and has no existing email service configured, you will be taken back to the Google Workspace Details page while your setup is being processed.
- You will then be asked to reconfigure your DNS for Google Workspace. You will have an option to update DNS or skip this process.
Important: Once you update your DNS (MX records) for Google Workspace, all incoming emails will be routed to Google Workspace. For sending emails, you can still use other providers; however, to ensure proper delivery and authentication, your SPF record must include Google Workspace (and any other sending services you use). Without proper SPF configuration, emails may fail authentication checks or be marked as spam.
If you want to reconfigure your DNS to direct all email services to Google Workspace, click the checkbox to agree and click UPDATE DNS. You will be taken back to the Google Workspace details page, where you will see an alert message saying, “Your domain’s DNS is configured for Google Workspace.”

If you click the SKIP FOR NOW button, you will be taken back to the Google Workspace details page while your setup is being processed. You can update your DNS anytime by clicking the UPDATE DNS button on the Google Workspace details page.

How to verify a domain name not registered with Network Solutions
If your domain name is registered with another company, you will need to verify the domain with Google before you can proceed. Follow the steps below to complete verification.
- Once your setup completes processing, you will see a red x under Domain Assigned. Hovering over the info icon, you will see a note advising you to verify your domain name.

- Scroll down to the Advanced section. You will see an alert that your domain has not been verified. Click the Verify Domain button.

- Copy the verification code by clicking on Copy.

- Next, locate your DNS records and add the code to your TXT record as instructed in steps two and three. Visit the DNS Management article for instructions on how to update this record.
Note: DNS changes can take up to 2 hours to reflect in your account and up to 24-48 hours to update throughout the internet.
- Once you have updated your TXT record, go back to steps one and two and click the Verify My Domain button.

- You will see the status of the verification.
Verification Failed. Please try again.
Your DNS update may still be processing. Wait a little bit longer and try to verify your domain again.

Verification Successful
Your verification is complete. Click Done to close the box.

How to manage Google Workspace admins and users
If you need to manage Google Workspace admins and users outside of the initial account setup, select one of the options below.
Add an admin
Follow these steps to add an admin to Google Workspace.
- Sign in to your account manager via https://www.networksolutions.com/my-account/login.
- On the left side of the page, click Google Workspace. You will be taken to the Google Workspace details page in your account.
- In the Users section, click Setup User.

- Enter the user’s First Name and Last Name in the open box, then create an email address and a password.
- Turn on the option next to Admin Status to make the user an admin.

- Once you have completed all fields, click Setup.
- The new Admin will be added to the Users section.
Add a user
Follow these steps to add a user to Google Workspace.
- Sign in to your account manager via https://www.networksolutions.com/my-account/login.
- On the left side of the page, click Google Workspace. You will be taken to the Google Workspace details page in your account.
- In the Users section, click Setup User.
- Enter the user’s First Name and Last Name in the open box, then create an email address and a password.

- Once you have completed all fields, click Setup.
The new user will be added to the Users section.
Action controls per user
Follow these steps to edit the admin user in Google Workspace.
- Sign in to your account manager via https://www.networksolutions.com/my-account/login.
- On the left side of the page, click Google Workspace. You will be taken to the Google Workspace details page in your account.
- Under the Users section, locate the user you would like to modify. You can sort the list of users by name if you have trouble finding the user.
- Once you have located the user, click on the three dots to the right of the user’s status.
- Once you have completed all fields, click SETUP.
- You will see the options Read Email, Edit User, Change Passwords, Manage Aliases, and Delete User (if applicable).
- Read Email will bring you to the Google login page.
- Edit User will open a box allowing you to change the first name, last name, and Admin status. Once you have made your changes, click Save.

- Change Password will open a box allowing you to enter and confirm your new password.

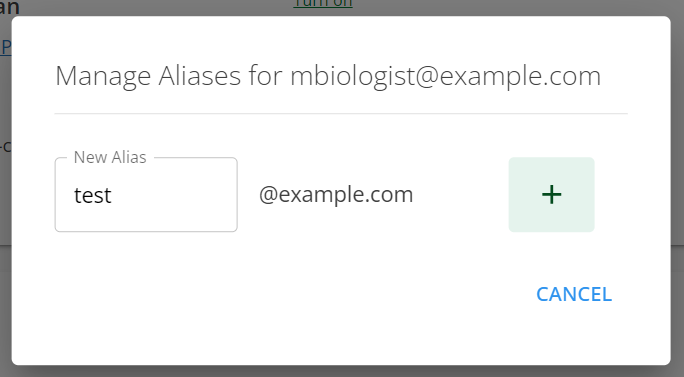
- Manage Aliases will open a box allowing you to add and manage an alias.
- Delete User will permanently remove the user from your list of users. After clicking Delete User, a box will pop up warning you that you will permanently delete the user’s email and comments from your Google Workspace. This cannot be reversed. If you agree, click Delete. If you are unsure, click Cancel to go back to the Google Workspace details page.

How to set up Google Workspace's MX records
- Log in to your account manager via https://www.networksolutions.com/my-account/login.
- On the left side of the page, click Domains.

- In your Domains dashboard, click on the vertical ellipsis beside the domain name associated with your Google Workspace account and select Manage.
Note: If you have only one domain in the account, you will be directed to your domain dashboard immediately.

- Still within your Domains dashboard, scroll down to the very bottom and click on the Advanced Tools section. Once there, click Manage.

- If prompted with the pop-up box, just click the Continue button.

- To add an MX record, click on the + Add Record button.

- Fill in the provided spaces using these values:
If you signed up for Google Workspace on or after April 2023, here is the MX Record you need:
Name/Host/Alias Time to Live (TTL*) Record Type Priority Value/Answer/Destination @ or leave blank 3600 MX 1 SMTP.GOOGLE.COM If you signed up for Google Workspace before April 2023, your MX records should look like these:
Name/Host/Alias Time to Live (TTL*) Record Type Priority Value/Answer/Destination @ or leave blank 3600 MX 1 ASPMX.L.GOOGLE.COM @ or leave blank 3600 MX 5 ALT1.ASPMX.L.GOOGLE.COM @ or leave blank 3600 MX 5 ALT2.ASPMX.L.GOOGLE.COM @ or leave blank 3600 MX 10 ALT3.ASPMX.L.GOOGLE.COM @ or leave blank 3600 MX 10 ALT4.ASPMX.L.GOOGLE.COM Note: If you already have an existing SPF record, do not create a new one. Instead, add include:_spf.google.com to your current SPF record. Make sure ~all is placed at the very end of the record. Example: v=spf1 include:spf.protection.outlook.com include:_spf.google.com ~all
Name/Host/Alias Time to Live (TTL*) Record Type Value/Answer/Destination @ or leave blank 3600 TXT v=spf1 include:_spf.google.com ~all - Once done, click the Add button to save the record/s.

Note: Advanced DNS updates will take up to two hours to take effect. Updates may resolve faster at some locations than others because many name servers on the Internet retrieve updates at different times.
How to set up Gmail in Outlook or Apple Mail
For instructions on setting up Gmail, please see the following:
Related articles
Google has prepared an online learning center and online knowledge base to get you started.
- Visit Google Workspace's Learning Center to learn about the products and get valuable tips that will help you get the most out of Google Workspace.
- Visit Google Workspace's Knowledge Base to help you understand specific features regarding Google Workspace and learn how to troubleshoot any issues you might run into.
Review
By leveraging Google Workspace, businesses can improve communication, streamline workflows, and enhance collaboration. This guide has equipped you with the essential information to start with Google Workspace and unlock its potential for your organization.
Get practical tips and product updates on LinkedIn. Follow Network Solutions