Knowledge Base
Categories: Powered by Network Solutions
Powered by Network Solutions: Email management - How to manage your spam filter
Important: This article applies to customers who have Roundcube webmail. If you are using Cloud Mail, please refer to How to filter spam emails in Cloud Mail and How to whitelist and blacklist email addresses in Cloud Mail.
We no longer offer Roundcube webmail as an email solution. If you require a professional email solution, we recommend Google Workspace, which provides a complete range of productivity and communication tools.
Enabling the default spam filter
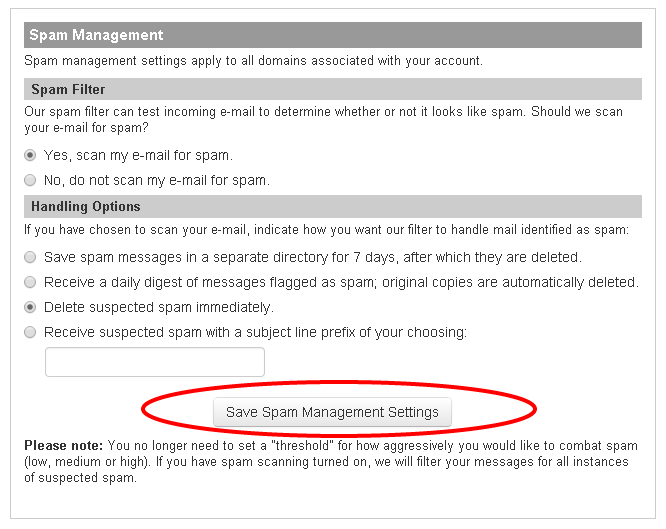
The default spam filter protects you against most incoming spam messages.
- Log in to your account via https://www.networksolutions.com/my-account/login.
- Click Standard Email from the left navigation menu.

- On your EMAIL MANAGEMENT, click on Click here to access spam filter management tool.
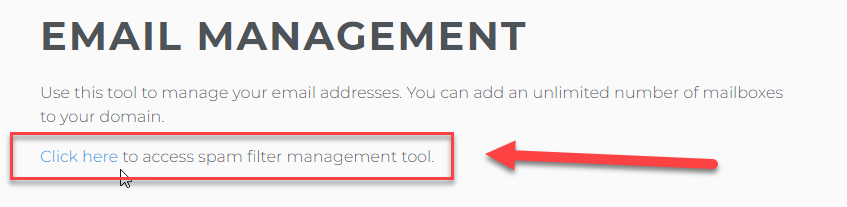
Note: The location of the Manage Spam Filter application may differ from one account to another. Please browse through the Advanced tools to see the Manage Spam Filter. - Save spam messages in a separate directory for 7 days, after which they are deleted.
- Receive a daily digest of messages flagged as spam; original copies are automatically deleted.
- Delete suspected spam immediately.
- Receive suspected spam with a subject line prefix of your choosing:
- Click Save Spam Management Settings.
Creating a whitelist or blacklist entry
The whitelist allows you to choose who you always want to receive email from. The blacklist will enable you to choose whom you want to never receive email from. Follow the steps below to create a single whitelist or blacklist entry.
- Log in to your account via https://www.networksolutions.com/my-account/login.
- Click Standard Email from the left navigation menu.
- On your EMAIL MANAGEMENT, click on Click here to access spam filter management tool.
- Locate the Whitelist / Blacklist section.
- Use the Settings for drop-down to select which domain you want to manage whitelist and blacklist entries for.
- Click Go.
- Select Whitelist or Blacklist.
- Use the Recipient drop-down to select which of your mailboxes you want to apply the list entry to.
- Use the Sender text field to specify a sender address.
- Use the Sender IP text fields to specify a sender IP address.
- Click Save Entry To List.
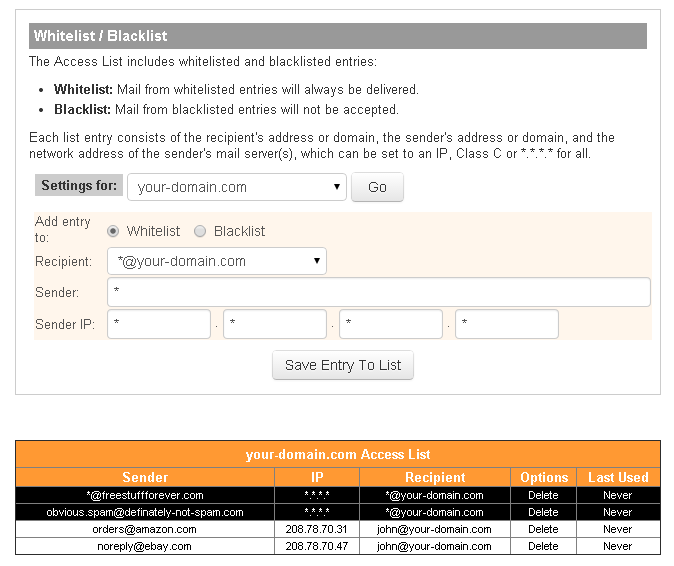
You can delete an unwanted entry at any time by clicking Delete under the Options column.
Get practical tips and product updates on LinkedIn.
Follow Network Solutions
Did you find this article helpful?