Powered By Network Solutions: WordPress - How to Manually Install Using File Manager on Foundation Interface
This article will cover the steps needed to install WordPress manually.
- Step 1: Download WordPress
- Step 2: Create MySQL Database and User
- Step 3: Upload WordPress to Your Hosting Account
- Step 4: Configure the wp-config.php file
- Step 5: Run the Installation
- Step 6: Complete the Installation
Step 1: Download WordPress
- Download the WordPress package to your computer from https://wordpress.org/download/.
- Unzip the downloaded file to your computer.
Step 2. Create MySQL Database and User
- Log in to your Account Manager via https://www.networksolutions.com/my-account/login.
- On the left side of the page, click Hosting.

- If you only have one hosting package, you will be taken directly to the Hosting control panel.
- If you have multiple hosting packages, you will need to select a package name and then click the MANAGE button to access the Hosting control panel.

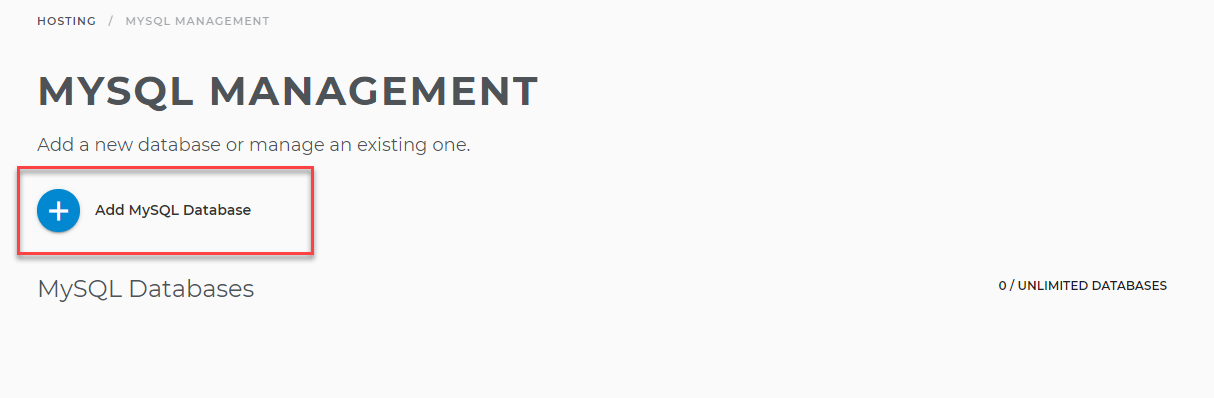
- In the Hosting control panel, click MySQL Management.

- On the MySQL Management page, click + Add MySQL Database.
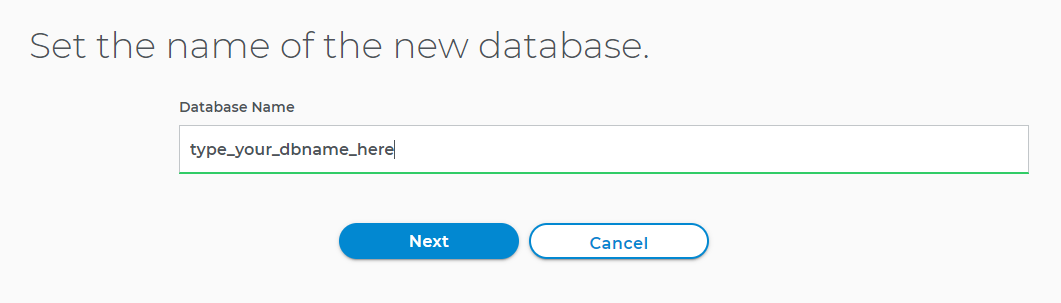
- Enter a name for your database, then click Next.
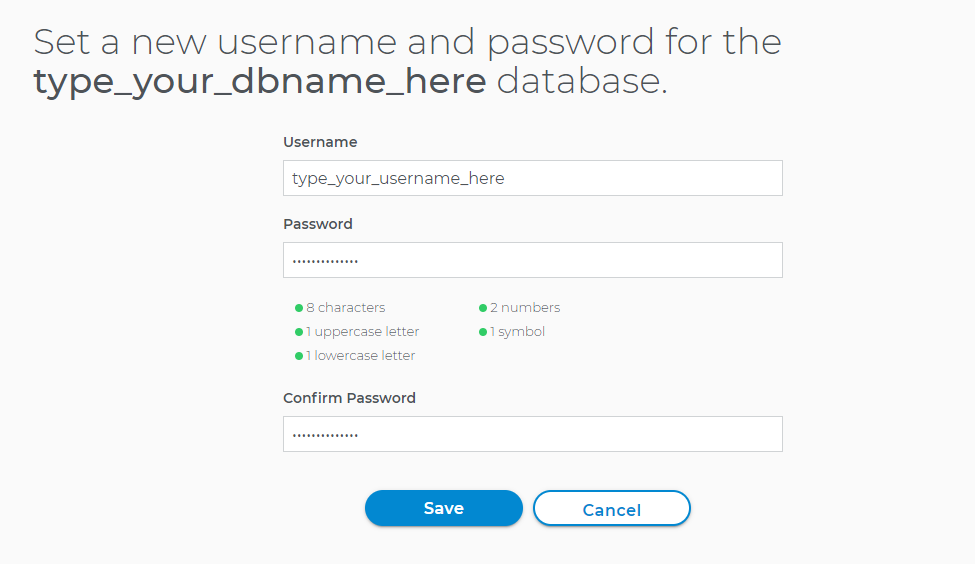
- Type your database username and password, then click on Save.
- In the next pop-up, set the database privileges.
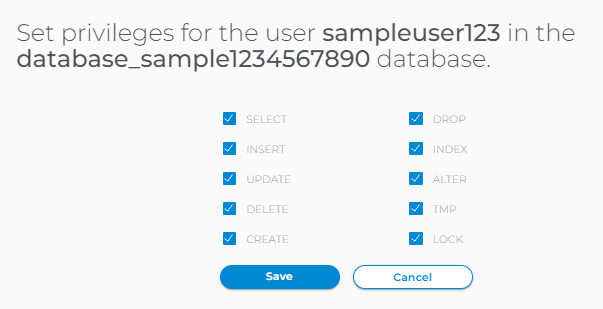
- Copy the database name, username, and password to Notepad. You will need them in Step 4 below.
Step 3: Upload WordPress to Your Hosting Account
When you unzipped the file in Step 1, you should have found a folder named "wordpress." The contents of this folder need to be uploaded to your hosting server. Upload the WordPress core files to your server via FTP or File Manager. Visit the following articles to learn how to connect, navigate, and upload files to your hosting server using FTP (FileZilla) or your File Manager.
Make sure to upload the WordPress core files to your domain's folder (directory/document root). For the primary domain, that will be the 'public_html' folder.
Step 4: Configure the wp-config.php
The wp-config-sample.php file will contain the database information and will tell the WordPress application from which database to pull data. This step must be completed to ensure the correct database information is associated with the WordPress installation.
The wp-config-sample.php file can be found in File Manager within the folder where you uploaded WordPress.
- In the Hosting control panel, click File Manager.

- On the left pane of your File Manager, click on your domain's folder (for the primary domain, that will be the 'public_html' folder). All files within your domain's folder will be displayed on the right pane.
- Look for the wp-config-sample.php file. Select the file, click the vertical ellipsis icon on the right, and then select Rename.
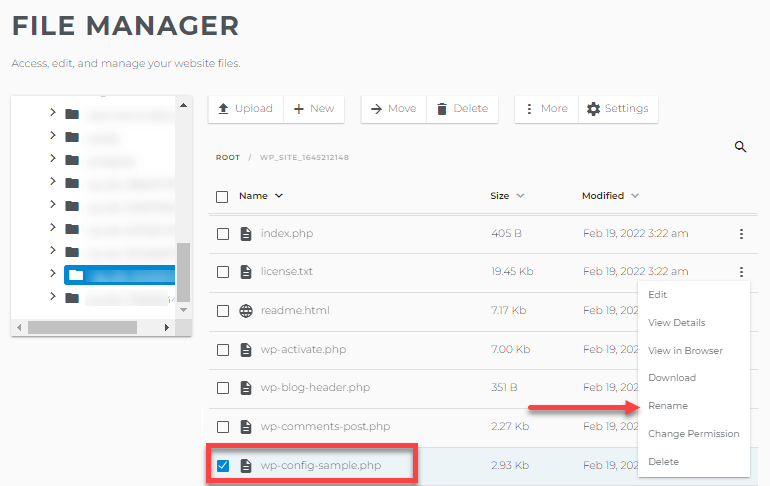
- Rename the file to wp-config.php.
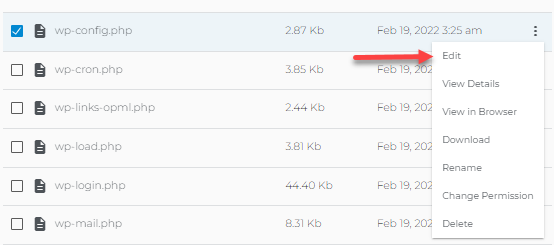
- Select the wp-config.php file, click its vertical ellipsis on the right, and then select Edit.
- On the Edit File page, look for the following lines:
define('DB_NAME', 'database_name_here');

	/** MySQL database username */
	define('DB_USER', 'username_here');

	/** MySQL database password */
	define('DB_PASSWORD', 'password_here');

     /** MySQL hostname */
     define('DB_HOST', 'localhost_here');
Complete the following actions:- Replace database_name_here with the name of the database you created (above in Step 2).
- Replace username_here with the username of the database you created.
- Replace password_here with the password of the database that you created.
- Replace localhost_here with 'localhost'.
Make sure there are no spaces before or after your database name, username, and password.
- Once done, click the Save button.
Step 5: Run the Installation
Open a new browser window and enter your domain to run the installation script. Depending on where you installed the script, you will be automatically redirected to either of the following URLs:
- If you uploaded WordPress to the domain's root folder, you should be redirected to:
https://example.com/wp-admin/install.php - If you uploaded WordPress to a subfolder of your domain's directory, then the URL will be in this format:
https://example.com/yoursubfolder/wp-admin/install.php
Step 6: Complete the Installation
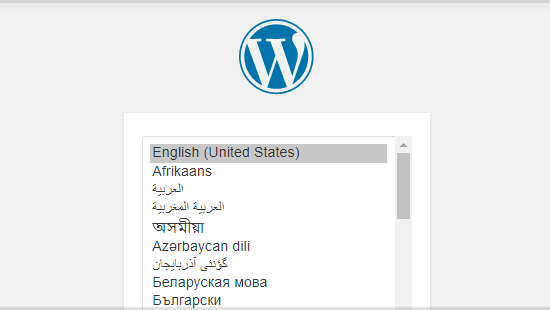
- Once you access your correct WordPress URL in a browser, you will see a WordPress setup page prompting you to select your preferred language. Select your preferred language and click the Continue button.
- You should now see a Welcome page. Under the Information needed section, you'll need to fill out the following fields:
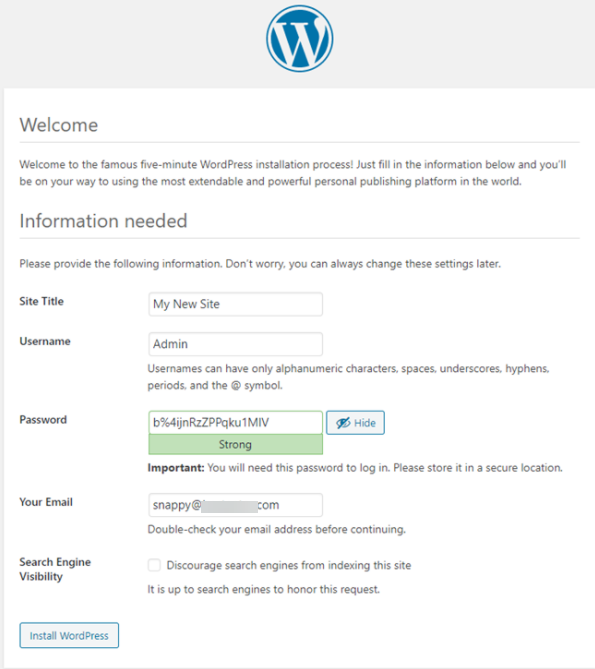
- Site Title - This can be changed at a later time.
- Username - This is the site's admin username. We highly recommend using something other than 'admin' since using it can pose a security risk.
- Password - A strong password will be automatically generated for you, but you can choose your own. The strength indicator will let you know how secure your password is.
- Your Email - Login information will be sent to this email address, so make sure it is an email address you have access to.
- Search Engine Visibility - If you want your website to show up in search engine results, leave this unchecked. If you do not want your site indexed, then you can check this box.
- Click the Install WordPress button, and you should be taken to the final screen, which says, "WordPress has been installed. Thank you, and enjoy!". It will display the username you chose on the previous page and a placeholder for your password.
- Click the Log In button to go to your WordPress Admin Dashboard so you can begin building your website.