Powered By Network Solutions: UpdraftPlus WordPress Plugin
There are many backup and restore solutions available to protect your website. UpdraftPlus is considered one of the most popular backup plugins available for WordPress. This article provides information on the importance of having a backup of your WordPress site and how to use UpdraftPlus.
- Why Backup & Restore Solutions are Important
- Features and Benefits
- How to Back Up Your WordPress Site with UpdraftPlus
- How to Restore Your WordPress Site with UpdraftPlus
- How to Back Up Your WordPress Database with UpdraftPlus
Why Back Up & Restore Solutions are Important
Hacking, dodgy updates, server crashes, or simple user error can ruin your WordPress site. Without good backups, you lose everything. That’s why you can use a restore solution such as UpdraftPlus to keep your WordPress site safe.
Features and Benefits
UpdraftPlus' free version allows you to back up all your WordPress files, databases, plugins, and themes. You can do full, manual, or scheduled backups and restore them directly from your WordPress dashboard.
It also:
- Backs up to multiple cloud storage options: Amazon S3 (or compatible, e.g., DigitalOcean Spaces), DreamObjects, Dropbox, Google Drive, UpdraftPlus Vault, Rackspace Cloud, FTP, OpenStack Swift, and emails.
- Can create multiple archives.
- Downloads backup archives directly from your WordPress dashboard.
- Automatically resumes and retries failed uploads.
- UpdraftPlus is compatible with all current versions of PHP and is translated into over 16 languages.
Additional features, including full guaranteed support, can be purchased through the UpdraftPlus website.
How to Back Up Your WordPress Site with UpdraftPlus
- Install and activate the UpdraftPlus plugin. For more information, see How to Install a WordPress Plugin – Step by Step for Beginners.
- Upon activation, go to the Settings » UpdraftPlus Backups page to configure the plugin settings.
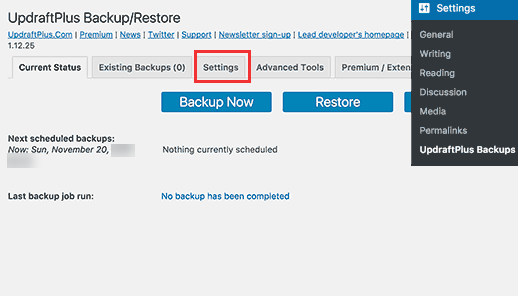
- Click the Settings tab.
This is where you will set up an automatic back up schedule and designate a remote location to store your backups.
- Schedule a back up for your files. Files include your WordPress images, plugins, themes, and other uploads.
- After that, select a backup schedule for your WordPress database. WordPress is a database-driven software. All your website settings, comments, posts, and pages are stored in the database. Your back up schedule should be based on how often you update your website.
- Choose where to store your backup files.
Note: Avoid saving your backups in the same location as your website. Losing your website means losing access to your website files and database. Also, too many backups stored on one's server will result in a TOS violation. This is the reason why you need to use a remote cloud storage service to store your backups. UpdraftPlus lets you to save your backups to different cloud storage services, including Dropbox, Google Drive, Microsoft OneDrive, and many more. You can also email your backups to an email address. - Click on a remote service to select, and you will see setup instructions below. Follow the instructions provided according to the cloud storage service you selected.
- UpdraftPlus will only have permission to its own folder in the "Apps » UpdraftPlus" folder. Click the Allow button to continue.
- You will be taken to the UpdraftPlus website, where you should click on the Complete Setup button to finish the setup.

How to Restore Your WordPress Site with UpdraftPlus
Follow the steps below if your WordPress website was hacked or if you want to start fresh.
- It is recommended that you install WordPress in a different folder/subdirectory.
- Once your new WordPress site is installed, configure the wp-config.php file to connect it to your Database.
- Install and activate the UpdraftPlus plugin again on your new WordPress site.
- Upon activation, go to the Settings » UpdraftPlus Backups page and click the Restore button.
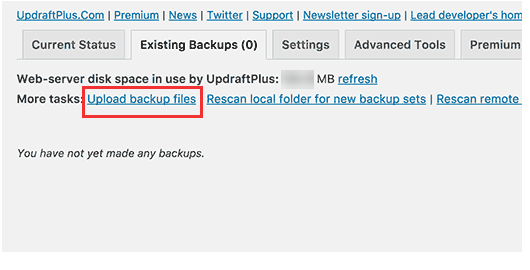
This will direct you to the backups page. UpdraftPlus will scan your server for any available backup in the /wp-content/updraft/ folder on your website. - If you saved the backup files on your computer, you could click on the Upload backup files link to manually upload and restore them.
- Click the Settings tab, then choose the remote server you used earlier to store your backups.
You can connect UpdraftPlus to a remote location like Dropbox, Google Drive, etc. UpdraftPlus will be able to scan remote locations and use your previously-stored backups.
- Follow the instructions to verify your website with the remote storage service.
- Click the Save Changes button at the bottom of the page to restore your settings.
- Return to the Existing Backups tab and click on the Rescan remote location link.
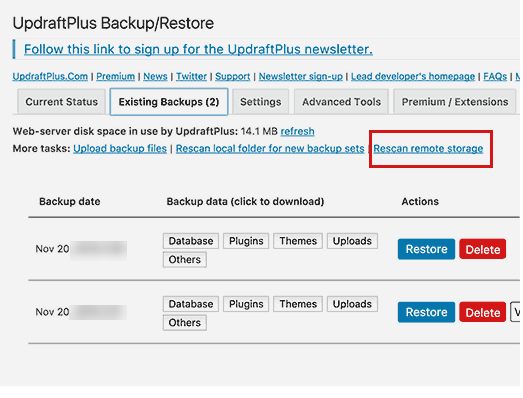
- UpdraftPlus will look for backups in the remote storage location and display them below. Click the Restore button next to a backup.
- UpdraftPlus will ask you what you would like to restore. Select all options and then click the Restore button.
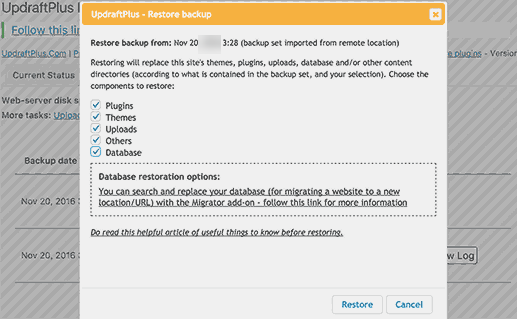
- UpdraftPlus will now retrieve your backup files from the remote server and start restoring your site from the backup.
How to Back Up Your WordPress Database with UpdraftPlus
Follow the instructions below to back up your database.
- Install the UpdraftPlus WordPress backup plugin.
- Modify your database backup settings.
- Choose where you’d like your backups to be stored.
- Backup your WordPress root database.
Get practical tips and product updates on LinkedIn.
Follow Network Solutions