Powered By Network Solutions: How to Manually Install WordPress Using FTP
In this article, we will discuss:
- Before You Begin
- WordPress Manual Installation Process
- Want to learn more about WordPress?
- Related Articles
Before You Begin
Before we proceed, let's review a few requirements below:
- Check the DNS records of the domain on which you will be installing WordPress.
To be sure that you will be able to access the WordPress installation under the domain at any time, check its DNS records to see if it is resolving to your hosting account.
- Need to update your DNS records? See How to Manage DNS and Advanced DNS Records.
- Need to update your DNS records? See How to Manage DNS and Advanced DNS Records.
- Double-check where you will upload your WordPress files.
Since you will be essentially using FTP to upload the needed files, you must ascertain the domain's directory to have WordPress transferred to the correct path.
- Unsure what directory your domain belongs to? See How To Update Domain Pointers.
- Need to create a subdirectory? See How to Create New Files and Folders Using File Manager.
- Clear out any other pre-existing website files.
If you already have content in the directory where you want to install WordPress, it could cause issues with your installation. Whether this is a different site builder's file or an old WordPress installation, you will need to remove this from the folder to prevent issues starting with WordPress.
- Not sure how to remove files? See How to Delete Files and Folders Using File Manager.
- Want to know how to view hidden files? See Navigating File Manager.
If you are done with all the conditions mentioned above, then you are now ready to install WordPress manually!
WordPress Manual Installation Process
The WordPress Manual Installation process has many advantages over the easy installation process. For example, the easy installation process does not give you control over having a secure MySQL database password since it's automatically generated. It doesn't automatically configure PHP error logging, nor does it create a temporary directory for PHP sessions, a personalized .htaccess file, and many more. Of course, all of this is possible with the manual installation route.
Please watch this video, and we will show you, step-by-step, how to manually install WordPress.
- Part 1: Prepare a Blank Database
- Part 2: Upload the WordPress files
- Part 3: Configure the wp-config.php file
- Part 4: Initiate the WordPress Installation Script
Part 1: Prepare a Blank Database
WordPress will need a blank database to populate the data. You can easily create a blank database by using the MySQL Database tool.
- Log in to your Account Manager via https://www.networksolutions.com/my-account/login.
- Click the Hosting tab on the left-hand side.
- Navigate to the Configurations section.
- Click the Database Manager link.
- Click on the Add button to add a MySQL Database.
- Type in your preferred username, password, and Database Name. Click the OK button once done.
Part 2: Download and Upload the WordPress files
Unlike the auto-installation method, you will be sourcing your WordPress files from the site itself and uploading them from your local computer.
- Download WordPress from WordPress.org.
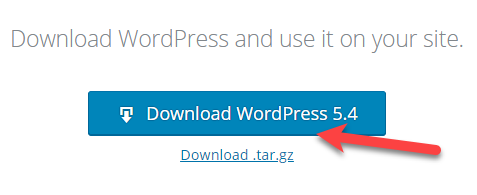
- Unzip the wordpress.zip file using a decompression program (such as 7zip, WinRar, or Winzip).
- Connect to your hosting account using an FTP Client.
- Upload the unzipped WordPress files into the domain's directory.
Part 3: Configure the wp-config.php file
The following steps are crucial for your WordPress files to be synced with the database initially created. To connect the two, all the necessary changes will be applied to the wp-config.php or wp-config-sample.php file, which is one of the files that were uploaded to the directory.
To modify the file:
- Access your File Manager.
- Locate and open the folder containing the WordPress installation.
- On the right-hand side, locate the wp-config-sample.php file.

- Click the 3-dotted icon on the far right of the file, select Rename, and change the name of the file to wp-config.php. Click the checkmark to save the change.
- Click the 3-dotted icon once more on the now wp-config.php file and select Edit. Once the file opens, scroll down to locate the following lines below:
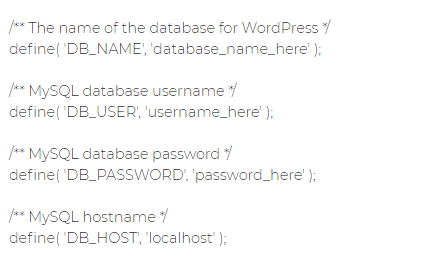
- Replace the term ‘database_name_here’ with the MySQL database name that you have previously created, ‘username_here’ with the MySQL database username, and ‘password_here’ with the MySQL database password. Additionally, change the ‘localhost’ to the MySQL Server Name. To learn what your MySQL server name is, simply go to MySQL Management and click Manage next to your database. The next window will show you the needed information.
Part 4: Initiate the WordPress Installation Script
Open a new browser window and go to the installation page. To do so, simply type the URL http://example.com/wp-admin in the address bar and hit enter. In doing so, a welcome page with an installation form should appear.
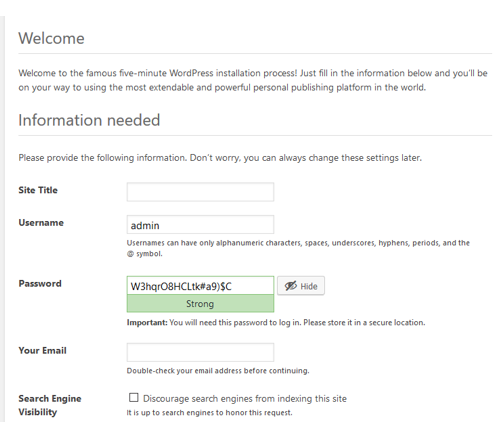
Fill in all the needed information in the form. Once done, click Install Now.
Congratulations! You have just successfully installed WordPress and may start building your website.
Want to learn more about WordPress?
WordPress: Tutorial Videos: To help you easily grasp the basics of creating a WordPress website, you have created several free tutorial videos. These videos were designed to be followed in order, but you are welcome to view whichever one best suits your needs.
You can always check out WordPress.org and browse their codex or online help forums.
Related Articles
- How to Update PHP for WordPress
- How to Keep WordPress Up-to-Date
- WordPress: How to Update Database Connection Strings
- How to Access Your WordPress Dashboard
- WordPress: SSL Certificates
Get practical tips and product updates on LinkedIn.
Follow Network Solutions