How to reissue an SSL certificate
You must reissue your SSL certificate if certain information changes, such as moving to a new location, changing server types, or changing hosting providers. You can reissue your SSL certificate at any time and as many times as you need. For SSL certificates with a 2-year term, you must reissue the certificate after one year.
Reissuing an SSL certificate
You can manage the validation and installation process for your SSL certificate through your Network Solutions account manager. Once you have validated the SSL certificate, be sure to check out the SSL certificate validation process for further assistance.
- Log in to your account via https://www.networksolutions.com/my-account/login.
- Click Security from the left navigation menu.

- Navigate to SSL Certificate, then tap Manage for the SSL certificate that you want to reissue.

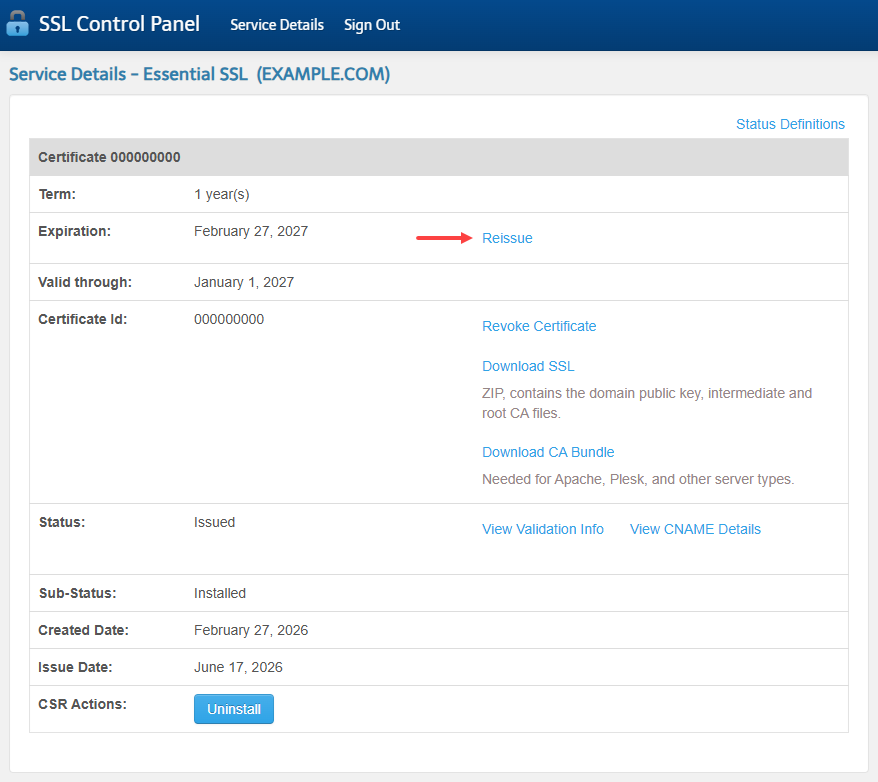
- You will be taken to the SSL Control details page, and then click Launch SSL Control Panel.

Note: If you cannot see the control panel, it may be due to a pop-up blocker on your browser. Please modify your browser settings if you have pop-up blocking activated. - In the SSL Control Panel, click on Reissue.
- If a domain needs to be provided, you will be prompted to type in your domain name. Enter the domain name in both fields, then click Continue.
Important: The domain name is the specific hostname used for the secure section of your website and the specific name to which your SSL certificate will be issued. To configure your SSL certificate with a subdomain other than www, type over the www with your desired subdomain. You must ensure that the domain name is accurate. If not, your website visitors will receive an error indicating that your certificate does not match the domain name. Providing an inaccurate name may require that you repeat the order process. - If the website is hosted by Network Solutions, a Certificate Signing Request (CSR) will be generated and submitted for you.
- If the website is not hosted with Network Solutions, you will need to generate a CSR. A CSR is the unique identifier from which your SSL certificate is created for your website. It is generated from the software platform used by your website. Contact your Web hosting network administrator and ask them to generate a CSR for you.
- Enter the CSR generated and click Continue.
- On the Submit Validation Information page, review the fields to ensure they are correct, then click Continue.
- You will receive an email with a confirmation link.
- Click the link in the email and submit the validation code provided.
- You will receive an email once the certificate has been issued.
- You have reissued your SSL certificate.
Review
The ongoing safety and credibility of your site can be maintained by carrying out the steps provided in this article and knowing the special details of your SSL certificate type. Remember that reissuing your certificate is not only best practice but also essential for maintaining a safe and reliable online presence. If you encounter any challenges during the process, don't hesitate to reach out to your hosting provider or SSL certificate issuer for assistance.
Get practical tips and product updates on LinkedIn.
Follow Network Solutions