Key takeaways:
- Creating an educational website starts with choosing the type to focus on. This gives you direction for research, content, features, and structure.
- Educational websites are often more complex than other site types, but AI site builders and integrations make it easier to launch a professional site.
- For information-dense educational sites, a clear, well-organized layout is as important as the content, helping visitors find what they need.
The internet has reshaped the need for education. Online learning has created a highly competitive environment where continuous learning is vital.
For educators, there has never been a better time to leverage this trend. However, to truly stand out, you’ll need a dedicated space to share your voice, knowledge, and build a professional identity you own and control.
In this guide, we’ll walk you through every step, from defining your goals to launching and marketing your own website, so you can turn your knowledge into a successful online resource.
How to create an educational website: Step-by-step guide
Building an educational website can seem complex, but with a strong vision and a clear guide, you can simplify the process. The following steps will walk you through every key decision and action needed to move from concept to launch.
- Define your educational site’s purpose and type
- Secure your domain name
- Choose your website builder
- Find a web host that supports your mission
- Lay out a user-focused educational site structure
- Design for your audience
- Plan, organize, and create engaging content
- Optimize your site for search engines
- Test, refine, and launch your educational website
- Market, promote, and grow your online presence
Let’s go through each step in detail in the next sections.
Step 1. Define your educational site’s purpose and type
Start by listing your site’s goals. This will guide all your actions moving forward, so your content stays focused and consistent. It’s especially important for educational websites, as education is a very broad niche filled with all types of audiences, subjects, and learning styles.
To define your site’s purpose, ask yourself these questions:
- Who is this educational website for? Is it for teachers, students, or parents, or a combination of these?
- If it’s for learners, which age group will you focus on? Will you be educating kindergarteners, college students, or adult learners?
- Will you be covering multiple subjects? Or covering niche topics at a deeper level?
- What kind of educational content will you focus on? Will it be learning materials, academic resources, games, video tutorials, or something else?
- Is this for an institution or a service? If so, is it for you alone or a collective?
- Do you plan to generate income from your website? If so, what kind of services will you provide?
Once you have answered these questions, you will have a clear image of the type of educational website you are creating.
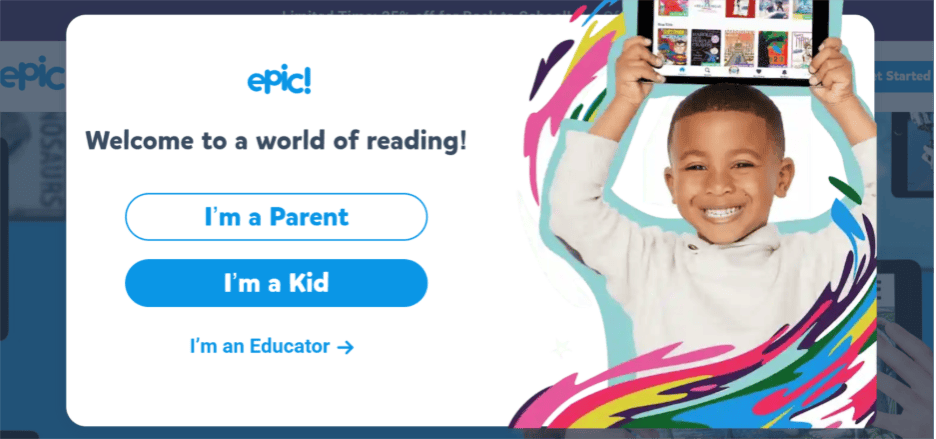
Note: While a website often serves a single brand, you can personalize the experience so different users (e.g., parents, educators, or children) see content tailored to them. A good example is get.epic.com, which immediately prompts visitors to select their role to provide a more relevant experience.
Types of educational websites
If you can’t put a name to the type of educational website you’re creating, we’ve listed the most common sites you’ll find online.
- Institutional websites
- Online course platforms
- Educational resource hubs
- Digital libraries
- Digital libraries
- Language learning sites
- Skills-based tutorial sites
- Educational gaming sites
- Cultural websites
Institutional websites
These sites represent schools, colleges, universities, and other educational facilities like learning centers and special education facilities. They provide students, faculty, and parents with essential information, including school procedures, organizational charts, professor availability, and admissions.
Online course platforms
This type of educational website is where educators, entrepreneurs, and experts offer structured courses on a specific topic. Their courses are designed to be concise and focused, allowing adult learners to quickly acquire a new skill or advance their career without a long-term commitment.
While some courses are offered as free content, these educational websites often provide access to more on-demand courses through either a membership site or a pay-per-course basis.
Educational resource hubs
These sites are an all-around learning hub for classroom resources, such as lesson plans, quizzes, and digital worksheets. Examples include Khan Academy and Teachers Pay Teachers.
Digital libraries
These sites are built to store officially published materials, including digitized books, journals, and historical documents. They’re different from resource hubs, as their main purpose is to preserve and provide a structured resource for academic and scholarly research.
Unlike resource hubs, access to many of these sites is limited to students or a select few. One example that is open to the public is Project Gutenberg, which offers a vast collection of free eBooks.
Language learning sites
These sites use structured lessons and interactive exercises to teach specific languages. They often incorporate a variety of tools like flashcards, quizzes, and community features to help users practice reading, writing, speaking, and listening skills.
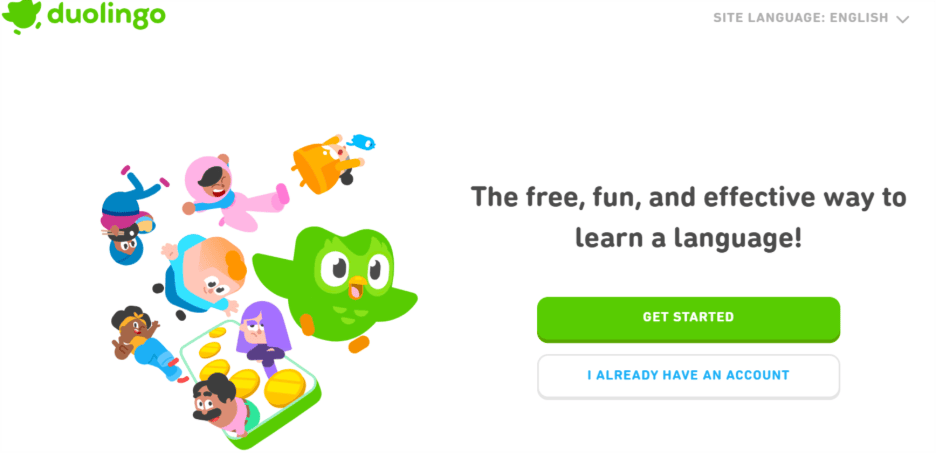
Duolingo is a popular example of a language learning site.
Skills-based tutorial sites
These sites provide a series of lessons and content to teach specific skills, such as coding, graphic design, and photography. They are often created and managed by an individual or a small group of experts and feature a mix of blog posts, video tutorials, and sometimes even downloadable coursework. Beyond content, many of these sites also offer services such as online tutoring, paid courses, or access to eBooks.
Educational gaming sites
Designed to make learning fun, these sites teach concepts through interactive play. They are often used to make learning more interesting and keep learners invested in subjects like math and science, with a primary focus on children. Prodigy is an example of an educational gaming site.
Cultural websites
Cultural websites are created by museums, other cultural organizations, historians, and cultural enthusiasts to bring historical and cultural exhibits to life.
They do this by providing educational content and a deeper look at a specific institution or historical topic through features such as virtual exhibits, digitized collections, and scholarly articles.
Step 2. Secure your domain name
Your domain name is how people find your website online. If you’re choosing one for an existing business or educational institution, it’s best to use the name directly. Otherwise, you’ll need to create a unique domain name of your own.

Here are a few tips to help you brainstorm and secure the right domain name:
- Combine your name with your subject/niche. This is a simple way to create a personal, branded domain. For example, janedoefinance.com.
- Use a play on words. Alliteration or puns can make your domain more memorable and catchier. For example, thesavvyteacher.com or wordywisdom.com.
- Use a domain name generator. An AI domain name generator can help you come up with domain names relevant to the words or phrases you put in.
- Choose an education-related TLD if your .com is taken. A .com domain extension/TLD is the most common, so you may find your chosen domain is already taken. If you’ve already established yourself as a specialized educator online, you can look into other education-related TLDs. Here are a few of the most common ones.
- .edu. This is the most trusted TLD in education, but it is highly restricted and only available to accredited, postsecondary institutions in the United States.
- .org. Originally intended for non-profit organizations, this TLD is now open to anyone, but it still carries an association of being a non-commercial or community-based website.
- .school, .academy, .college, .university, and .study. These TLDs are not restricted and are excellent for online courses, personal portfolios, and educational resource sites. They are great alternatives for building a recognizable brand in the education space.
- Keep your domain name short and memorable. Avoid hyphens, numbers, or complex words that can be easily misspelled. Try to keep the name under 15 characters so it’s easy to remember and type on any device.
Step 3. Choose your website builder
Prioritize a website builder that supports the key features your educational site needs. Focus on building a solid platform, not just getting online quickly. You can add pages later, but the builder should support long-term goals like student management and content delivery.
These are a few educational website functions your builder should support:
- LMS integration
- Easy content customization
- Gamification & interactive elements
- Appointment setting tools
- eCommerce capabilities
Learning management system (LMS) software
An LMS is a must-have for educators who provide formal courses or structured lessons. It is an external platform that helps you manage users, track student progress, and organize course content. You will need an LMS plugin to connect the software to your website. Check your builder’s app marketplace or consult with their support team.
Easy content customization
Educational websites require constant updates and new content. Choose a builder that is user-friendly, responsive, and makes it easy to add rich media elements, such as images and videos, to create engaging learning experiences for different types of learners.
Gamification and interactive elements
Gamification is when you add games, give badges, and use leaderboards to motivate and engage your students. If you want to incorporate this into your own educational site, you’ll need to check if your builder can accommodate the following.

- A gamified LMS. If you decide to use a gamified Learning Management System directly, make sure your builder supports seamless integration.
- Gamification plugins and add-ons. These allow you to give users points, badges, and leaderboards, which are not necessarily tied to a game, but instead a user’s activity.
- The use of third-party tools. This is for when you want to embed interactive quizzes, games, or videos directly into your website.
Appointment setting tools
If you plan to offer one-on-one sessions or consultations, your website builder must have a scheduling feature. Users can book time directly on your site, and the tool syncs with your calendar so you avoid double-booking.
eCommerce capabilities
If you plan to monetize your courses, your website builder must have eCommerce capabilities. Look for features that allow you to set up a secure storefront and accept various payment methods.
Step 4. Find a web host that supports your mission
You’ll need a web host to keep your website online 24/7. Most platforms bundle hosting with your website builder plan, so there’s nothing extra to set up.
However, if you’re building with WordPress.org, you’ll need to choose a separate hosting provider. We recommend using WordPress hosting, as it’s optimized for speed, security, and automatic updates specifically.
Step 5. Lay out a user-focused educational site structure
A user-focused site structure is very important for an educational website. Your layout must not only be intuitive but also support the learning journey. A confusing or disorganized site can lead to user frustration and disengagement.
To layout a user-focused educational website:
- Choose which pages you’ll add.
- Create a sitemap.
- Make a wireframe for each page.
1. Choose which pages you’ll add
To get started, look at competitor sites in your niche and analyze their content. Check what pages they used, how they labeled them, and try to imagine what pages your own site would have. To guide you, we have listed some of the essential pages/content you’ll need to incorporate.
- Homepage. This is the front door to your site. It offers a quick overview of what you do and provides easy access to your main sections.
- About Us. This is where you introduce your institution, share your mission, and showcase the team behind your courses and content.
- Contact Us. This page provides clear contact information so visitors can easily get in touch with you.
- Legal Pages. These are non-negotiable pages of your website. They are designed to protect you and users from any legal issues and disputes. You can add these separately or on a single page.
- Privacy Policy. This document explains how your site collects and uses user data.
- Terms of Service. This acts as a legal contract between you and your users, outlining the rules for your site.
- Accessibility Statement. This shows your commitment to making your site usable for everyone.
- Copyright and IP. This states that your original content is your intellectual property.
- Academics/Programs. This section details the various courses, degrees, and learning opportunities you offer.
- Course-Specific Landing Pages. These pages are where you create deep dives into individual courses, including details on entry requirements, fees, and testimonials.
- News and Events. This section is where you can keep your community updated on what’s happening in your niche or on campus.
- Testimonials. This is where you can use user testimonials to add credibility and share positive experiences.
- Faculty Profile Page. This page is where you can showcase your educators’ credentials, expertise, and teaching philosophy. It builds trust and helps students feel connected to your team.
Pro-tip: While each page may have a dedicated purpose, websites are far more flexible. You are not required to create a separate page for each type of content; what matters most is an organized and intuitive user experience.
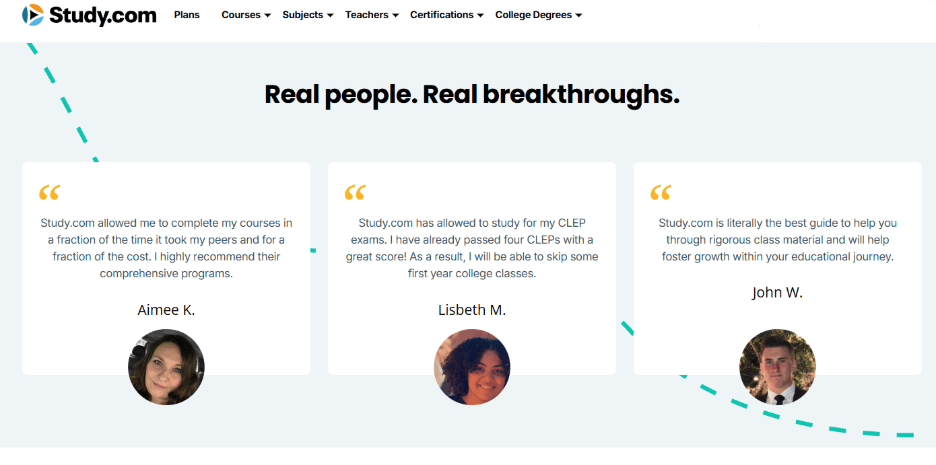
You can group pages into categories or merge different page content into a single page. For example, Study.com‘s homepage features a variety of content, including testimonials from users.
2. Create a sitemap
A sitemap is the outline of your website. It lists all the pages and shows how they connect to one another. For an educational site, this helps keep everything organized and easy to navigate. Your website’s purpose should determine which pages you include.
3. Make a wireframe for each page
A wireframe is a simplified sketch of your pages. This step is especially important for an educational website, as it is often filled with numerous functional elements. Creating a wireframe helps you build a well-organized site and creates a smooth user experience throughout the learning journey.
Here are a few of the elements you need to consider when creating your wireframe.
- Videos. A great way to deliver lessons and tutorials directly to your audience. Ensure videos have a dedicated space on core pages. Consider their size and placement to make sure they do not overwhelm the layout.
- Gamification. Integrate elements like badges, points, and leaderboards to motivate and reward students for their progress. Place these elements strategically within the wireframe, such as on a user profile or a lesson completion page.
- Search functions. This is an essential feature for larger sites that have a lot of content, as it helps users quickly find what they are looking for.
- Call-to-Action (CTA) buttons. Use clear, concise CTA buttons to guide users toward your most important pages, such as a course sign-up or a contact form.
- Social media links. These links are a great way to build your community and share your content across different platforms.
- Comments section. A comment section allows for open dialogue and creates a sense of community among your users.
Pro-tip. When you’re plotting out your layout, space out your images, videos, and functional features where they are needed. Always account for mobile devices and how these elements will adapt to smaller screens.
Step 6. Design for your audience
Now that you have your sitemap and wireframe, it’s time to bring your educational website to life with a strong visual identity. This is the stage where you fill in the details with a strategic design that resonates with your audience.
If you are building a website for an existing school or institution, you likely already have branding guidelines to follow. However, if your brand is new, you’ll need to build your visual identity from the ground up.
Here are the key elements for building a professional and memorable visual identity.
- Color scheme
- Imagery
- Typography
- Logo
Color scheme
Colors evoke emotions, so be mindful of the palette you choose. For an educational brand, it’s best to choose a color scheme that promotes a sense of calm, trust, or creativity. Consider colors like blues, greens, or warm earth tones.
A good palette often features three major colors that follow the 60/30/10 rule. These are your:
- 60% Primary color. This is your main color and is used for backgrounds and most elements.
- 30% Secondary Color. This provides contrast and is often used in navigation menus and subheadings.
- 10% Accent Color. This is used for important elements like buttons or calls-to-action to draw the user’s attention.
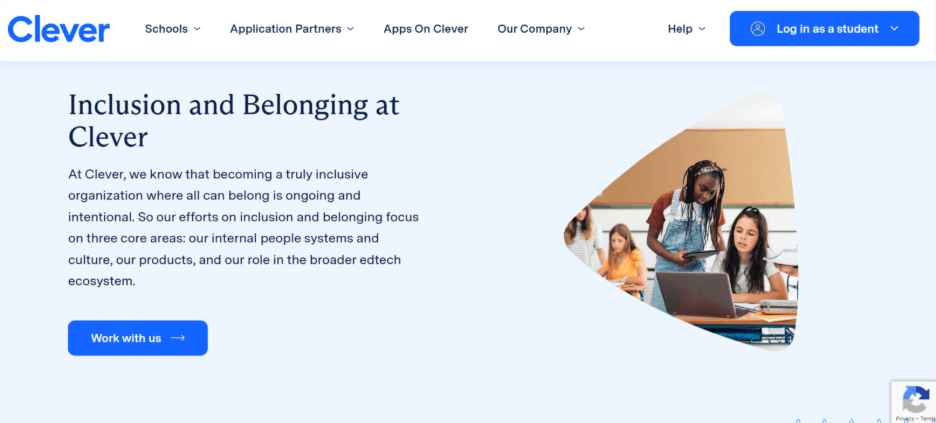
You can see this principle in action on Clever.com. Unlike many educational websites that are packed with content, their minimalist approach uses simple hues of blue against a white background to create a visually dynamic appearance.
Imagery
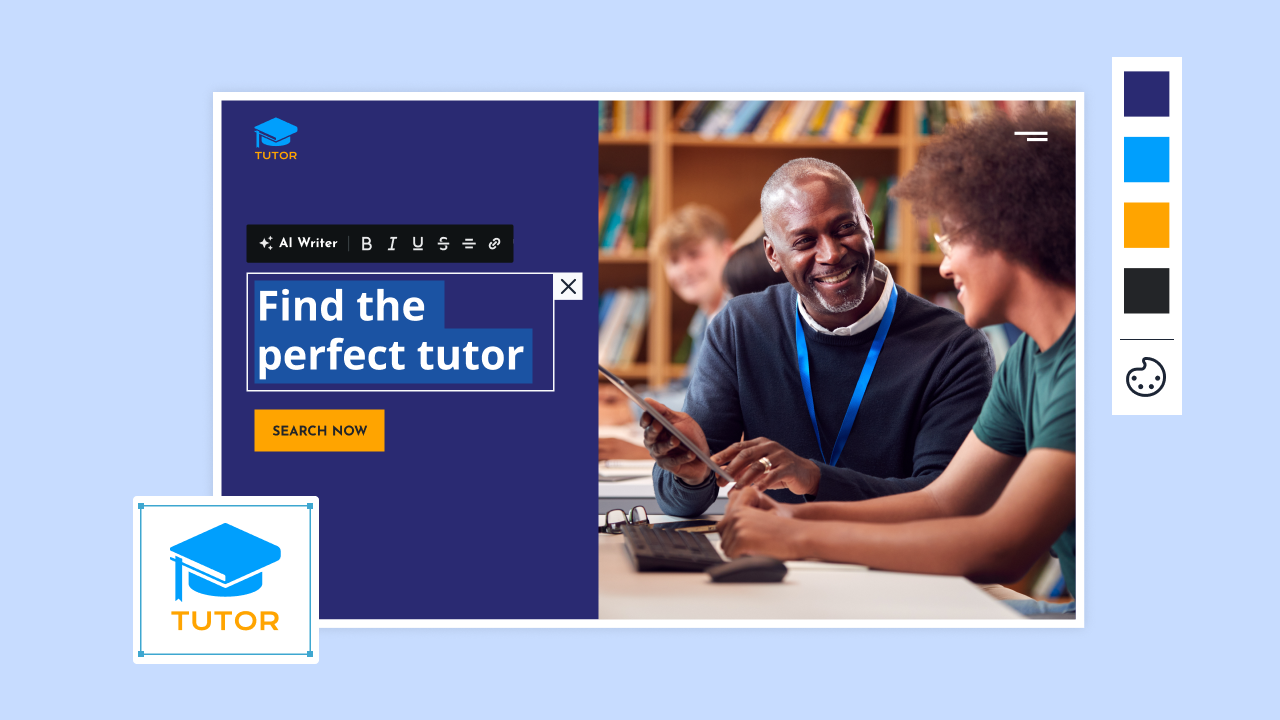
Use high-quality, authentic images that are relevant to your content. Avoid generic stock photos if possible. Showcasing real people learning, engaging in discussions, or experiencing your services can make your educational website more relatable and trustworthy for visitors.
Typography
The fonts you choose will have a major impact on readability. It is best to choose one to two fonts for your website.
A good practice is to choose one for your main headings and another for your body text. The heading font should be bold and easily readable. The body font should be simple and clean. Make sure the font is high-quality and works well across all devices.
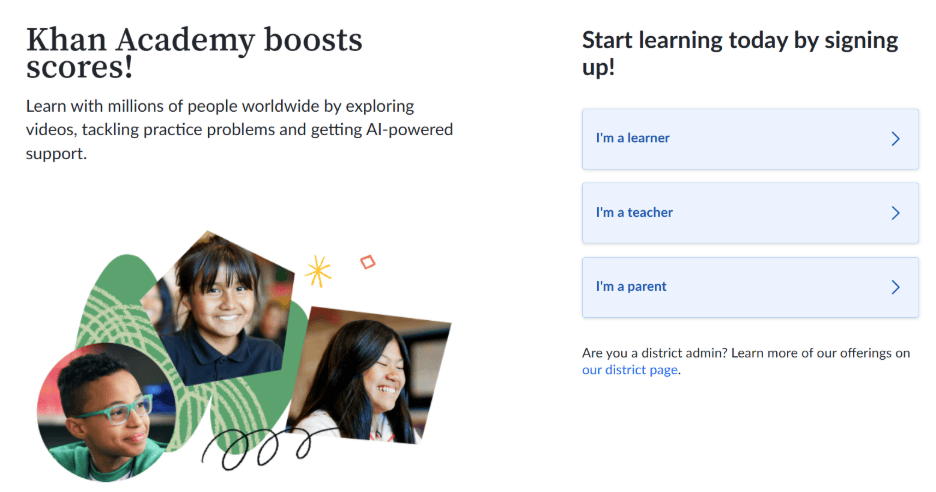
Pro tip: You can use more than two fonts for your education website so long as they have a cohesive visual style. Take Khanacademy.org for example. The site uses a mix of fonts, including Helvetica and Museo Sans, that aren’t too distinct from each other. They appear simple and are extremely legible.
Logo
Every educational website needs a logo and, if possible, a catchphrase. This is what goes on your certificates and other official documents, even if they are digital.
When creating your logo:
- Make sure it is high-resolution and easy to read at any size.
- Keep it clean, memorable, and reflective of your brand’s values.
- Use icons related to your field of education, like a book or a graduation cap.
What to keep in mind when designing your educational website
Educational websites often need more detail than regular business sites. To make sure yours is effective and easy to use, keep these points in mind:
- Avoid minimalism. Unlike many business websites, educational sites need to provide a lot of information. A minimalist design with shortened descriptions or a lack of detail will not be effective for visitors looking for detailed program descriptions, course schedules, and other important data.
- Design for everybody. Your educational website may attract a global audience. The design should cater to people from different cultures and backgrounds. Providing content in multiple languages is a key consideration.
- Prioritize design flexibility. Educational programs and events change quickly. The design of your website should be flexible, allowing for easy updates and rearrangements to keep the content current and relevant.
Step 7. Plan, organize, and create educational content
Creating content without a plan can confuse your readers and lead to redundant topics. A strategic approach is needed to ensure your topics follow one another in a logical sequence.
Here’s how to do it:
- Do competitive research
- Plot your topic list
- Do keyword research
- Create a variety of engaging content
1. Do competitive research
Research what other successful educational websites in your niche are doing. What topics are they covering? What types of content are they using? This research serves as a guide. It shows you what works for others and, more importantly, what is missing. Use this insight to develop your own unique topic list and content strategy.
2. Plot your topic list
Once you have your topic list, it is a good idea to sort your topics between evergreen and trending content. This helps you build a more comprehensive and balanced strategy.
- Evergreen content. These are the foundational topics that stay relevant for years. They should make up most of what you create.
- Trending content. These topics come and go with current events. Create them at the peak of a trend for a quick traffic boost and to attract new learners to your site. Once you have a list of topics, use a content calendar to plan and organize your content creation and publishing schedule.
3. Do keyword research
Keywords are the words and phrases people use to search online. To create content that truly helps your audience, you need to find the right keywords for each topic. Once you have them, you can naturally integrate them into everything you publish, from articles and blogs to product pages and video descriptions. You can find your keywords using SEO tools like Ahrefs, SEMrush, and SurferSEO.
4. Create a variety of engaging content
To make your educational website more engaging and accessible, offer a mix of content types to suit different learning styles. Systematically organize your content so learners can easily find what they need.
Consider incorporating these content types:
- Articles and blog posts
- How-to guides and tutorials
- Case studies
- Video content
- Audio content
- Interactive games
Step 8. Optimize your site for search engines
Search engine optimization (SEO) is the practice of helping search engines like Google find and prioritize your educational website in search results. Incorporating keywords is one of the ways to do that, but it is not all.
A successful SEO strategy prioritizes a great user experience and provides content that is valuable and relevant to its audience.
Here are a few things you can do to get your educational website to the front page of search results:
- Submit your XML sitemap
- Create metadata for all your pages
- Use clean, descriptive URLs
- Optimize for mobile
- Connect your content through internal links
- Create a backlink strategy
Submit your XML sitemap
Remember the pages you plotted out earlier? You will want to organize them into an XML sitemap. Submitting this sitemap to Google Search Console and Bing Webmaster Tools helps search engine crawlers better understand how to navigate and analyze your educational website.
Create metadata for all your pages
Have you noticed how you can see a preview of content when you search for something online? That’s metadata. It consists of:
- Meta title. A headline that should be around 50 to 60 characters.
- Meta description. A brief summary that should be around 155 to 160 characters.
While search engines may not always show the exact metadata you write, it still plays an important role in telling them what a page is about.
Use clean, descriptive URLs
Every page of your website has its own designated URL. It looks somewhat like this: yourlearningplatform.com/course/high-school-algebra-basics. If you do not update it, you may end up with a string of random numbers that makes it hard for search engines to identify what the page is about.
Optimize for mobile
The majority of web traffic now comes from mobile devices, so your site must look good and work well on any screen. Clear text, easy navigation, and images that adjust to fit smaller devices make the experience seamless.
Connect your content through internal links
Use internal links to connect different pages within your own educational website. Find relevant text within your content that you can link to other articles and resources.
Search engines use these to see how your website is structured and what pages are most important. Adding these will also make it easier for readers to navigate your educational website when they want to know more about a topic.
Create a backlink strategy
Backlinks are created when other sites mention your content on their pages. They help build authority for your education site as search engines pick up on them. To be linked, you will first need to build your reputation as an educator. You can do that by:
- Guest speaking on online course platforms or podcasts.
- Creating content for other learning platforms.
- Offering to write content for educational blogs.
- Reaching out to influencers and reviewers to feature your programs, courses, and materials.
These efforts will increase your odds of being linked to. If you see other educational sites sharing your content, you can proactively ask them to cite your educational site.
Step 9. Test, launch, and refine your educational website
Constantly check and refine your educational website before and after launching. Here’s a compiled checklist of specific elements and functions you need to take note of:
- Test all forms (contact, sign-up, etc.) to confirm they submit correctly and that data is delivered to the right destination.
- Check every internal and external link to ensure it directs users to the correct page or resource.
- View your site on various devices (desktop, tablet, mobile) and in different browsers (Chrome, Firefox, Safari, Edge) to confirm a consistent layout and fast-loading media.
- Check that all your learning tools, including exams, quizzes, videos, and interactive games, are working properly.
- Verify that all downloadable content, like worksheets and PDFs, is accessible and works correctly.
- Proofread every page to catch any typos, grammar errors, or misspellings.
- Ensure the site is accessible to users with disabilities, checking for features like image alt text and appropriate color contrast.
- Confirm your logo is high-resolution and the favicon (the small icon in the browser tab) is displayed correctly.
- Use Google Analytics to track site traffic and performance.
- Regularly review and update your content to meet current SEO trends.
- Update your site to match relevant educational events and holidays.
Pro tip: Get insight from actual users about your site’s performance. This way you know what is and isn’t working for them. This could include feedback on actual exam difficulty, your content, site’s performance, and a myriad of things.
Step 10. Market, promote, and grow your online presence
Once your website is launched, the next step is to get the word out and attract learners. Here are some of the most effective ways to grow your audience and build a strong community.
- Create content on educational platforms like Coursera and Udemy to showcase your expertise and drive traffic back to your website.
- Use platforms like LinkedIn, YouTube and Instagram for videos, and Spotify for podcasts to discuss topics in your niche.
- Collaborate with other professionals. Offer to be a guest speaker on podcasts, webinars, or other learning platforms to introduce yourself to a new audience.
- Offer to write a guest post for an educational blog or collaborate on a project with other experts in your field.
- Use email marketing to send targeted messages to your current and potential learners. Make sure to use a professional email to send regular newsletters and promote your latest courses and content.
- Build a community through forums, live Q & A sessions to get feedback and encourage discussions and interaction within your educational site.
Ready to build your education website?
You now have a clear roadmap to turn your vision into reality. The most challenging part—planning with purpose and strategy—is now behind you.
With this guide, you have everything you need to move forward with confidence. You know what kind of education site you need, how to design it, and how to attract your first learners.
Now, all that’s left is to start building. Dive right into our user-friendly drag-and-drop AI builder to turn your knowledge into something meaningful, inspiring, and lasting for others.
Frequently asked questions
To create your own educational website, you need to know what type of educational website you want to create, do research into what other similar sites are doing, and plot out your own plans. Each step needs to be done meticulously, as a solid foundation is critical for a successful, user-friendly, and goal-oriented website.
Yes, you don’t need any coding knowledge to build an education website. Many website builders offer drag-and-drop tools, templates, and built-in features designed for education. These platforms make it easy to customize your site without touching a line of code.
It depends on how complex your site is. A basic website with a domain and hosting might cost around $50 to $100 per year. Costs increase if you add premium features like custom design, membership tools, or eCommerce functionality.
If your website is aimed at younger learners, keep the layout simple and engaging. Use larger fonts, bright visuals, and clear icons. Interactive content like games, videos, or quizzes can help hold their attention. For older students or institutions, you can take a more structured and information-driven approach.
Absolutely. Videos are a great way to explain lessons, share announcements, or introduce instructors. Most website builders let you embed videos from YouTube or Vimeo or upload them directly to your site.
While it’s hard to name just one, the two most common types are online course platforms and educational blogs or content hubs. Online course platforms are popular because they are specifically designed for creating and selling courses, while blogs are widely used for sharing free content and building an audience.
ChatGPT cannot create a complete website on its own. However, you can use ChatGPT to assist with a variety of tasks, such as generating code snippets for pages, brainstorming content, and outlining the structure and design of your site.
To create a .edu website, you need to secure a .edu domain name. This is restricted to accredited, post-secondary institutions in the U.S. so you will not be able to create one if you are doing so for other learning centers.