Key takeaways:
- A booking website is an online platform that streamlines the booking process between the client and the service provider.
- Appointment scheduling tools are important for reducing double bookings and missed appointments.
- Choose a booking system that’s easy to use, mobile-friendly, and integrates well with your site, while supporting payments, reminders, calendar sync, and custom forms.
Have you ever found coordinating schedules, sending reminders, and managing cancellations more time-consuming than the service itself? Doing things manually can lead to double bookings, missed appointments, and frustrated customers, which hurts your business. Fortunately, there’s a fix for that: build a booking website.
No experience? Don’t worry. In this guide, you’ll learn how to make a booking website from scratch without the headache. We’ll walk through every step, from picking a domain name to integrating payment options, so you can launch a booking website that’s customer-centric and helps boost your reputation.
What is a booking website?
A booking website is an online platform where customers can book appointments and reserve services without calling or sending an email. Instead of manually managing your calendar, a booking website automates confirming appointments, sending reminders, and updating availability in real time.
Today, a booking website goes beyond an upgrade to your site; it’s a strategic move to keep up with modern customer expectations. In fact, over 46% of appointments are booked online, which reduces the burden on staff. As this number continues to grow, online booking will become the standard way customers schedule services.
There are two types of booking websites:
- Stand-alone booking site. A dedicated website that is common for small service providers who don’t need a full website with multiple pages.
- Custom full-service booking website. A professional site that includes a booking system alongside other features like product pages, service descriptions, and a blog.
10 steps to build a booking website
Here’s a quick overview of the steps you’ll follow to create your booking website:
- Pick a domain name
- Choose a reliable web hosting provider
- Select a website builder, preferably with a built-in booking function
- Design your booking website
- Upload content
- Integrate an appointment scheduling tool
- Integrate a payment provider
- Customize your booking forms
- Set your availability
- Test and publish your booking website
Let’s go through each step in detail so you can build a fully functional booking website from scratch.
1. Pick a domain name
Your domain name will be your booking website’s online address. It’s what customers will remember and what they’ll share when recommending your business to their friends. So, choose one that resonates with your brand and is easy for customers to recall.
Tips for choosing a domain name:
- Keep it short and simple.
- Make it relevant to your business or the services you offer.
- Avoid numbers, hyphens, and unusual spellings.
- Choose a domain extension that fits your brand and you can trust.
- Make sure it’s available and not trademarked before registering to avoid legal issues.
Once you’ve picked your domain name, register it right away through a reliable domain registrar so no one else can claim it.
2. Choose a reliable web hosting provider
Web hosting is the service that stores your website’s files and makes them accessible on the internet. Without it, your booking website won’t be visible to the public.
Choosing a reliable hosting provider is one of the important steps in building your website. Why? Because it’s the foundation of your online business. It influences your site’s speed, security, and overall performance. When these elements are strong, your customers can enjoy a smooth booking experience.
But how do you choose a web hosting provider? Here are key factors to consider when looking for a web hosting provider:
- High uptime, at least 99.9%, so your website is always accessible.
- Fast loading speeds to give visitors a smooth experience.
- Strong security features such as SSL certificates and malware protection.
- Responsive customer support for quick help when you need it.
- Scalable plans so you can upgrade as your business grows.
You can choose from different types of web hosting to find one that best fits your current needs and long-term goals.
Many popular website builders usually take care of that for you as part of the package.
3. Select a website builder, preferably with a built-in booking function
Speaking of website builders, it’s the platform you’ll use to create and manage your booking website. This is important because it will determine how easy it will be for you to design, update, and expand your site.
Today, the emergence of AI-powered website builders has made website building even easier. These tools use artificial intelligence to create a professional-looking website within minutes based on your inputs.
When choosing a website builder, consider factors such as:
- Ease-of-use
- Customization options
- Mobile responsiveness
- Scalability
However, one of the most important features to look for is appointment scheduling tool integration. Why? Because without it, you’d need to rely on third-party booking systems. This can be frustrating, especially if tech isn’t your strength. It can lead to errors, missed appointments, or extra work for you and your team.
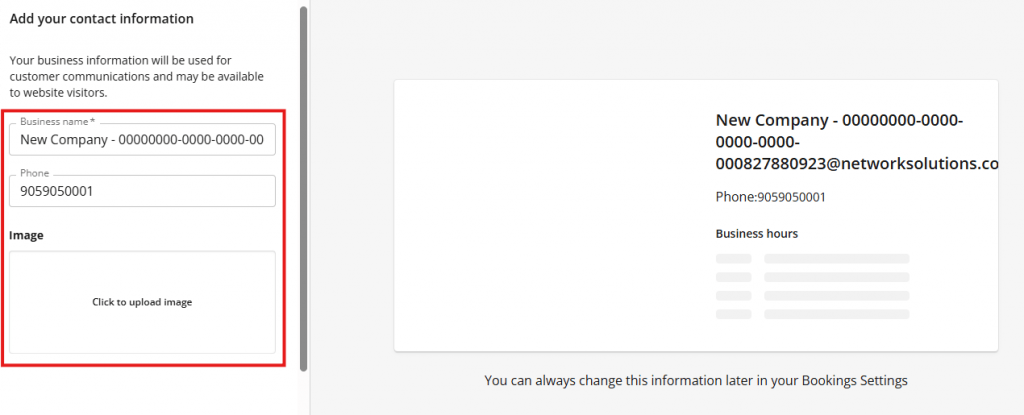
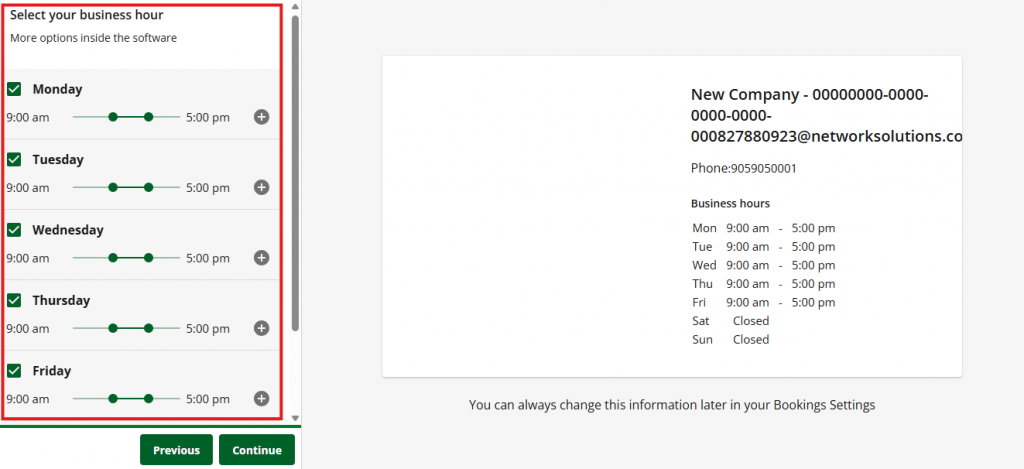
What’s good about having your appointment scheduling tool built in is that there’s no need to subscribe to a separate booking software or worry about complicated integrations. It works seamlessly with your site from day one. Just enable it in your account, set your availability, and you’re ready to take appointments.
If you build your booking website with Network Solutions, you’ll already have an appointment scheduling tool built in the ‘Website + Marketing’ and ‘eCommerce’ Plans.
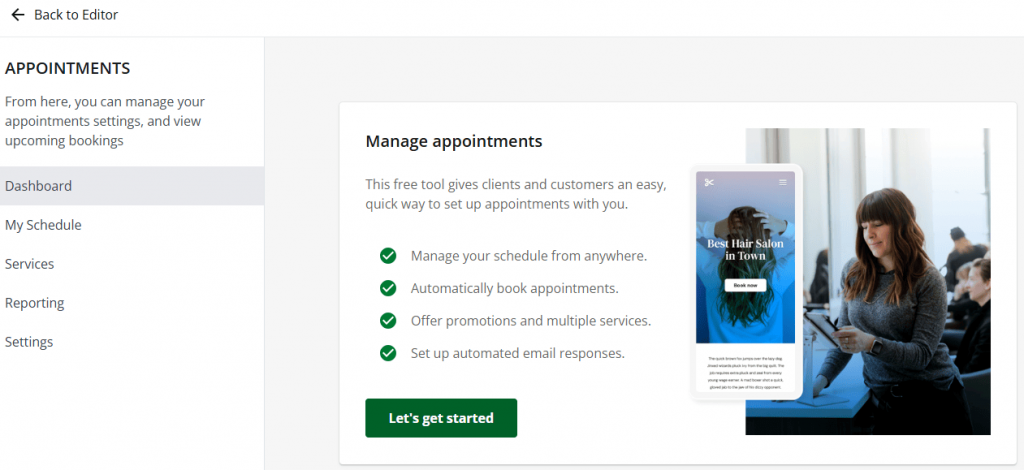
You can choose from pre-designed forms depending on your industry:
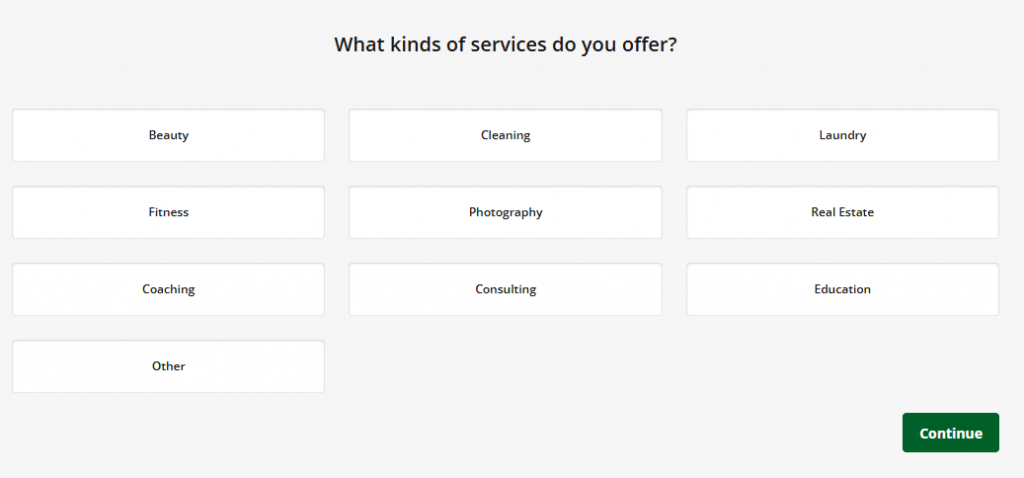
You basically just fill in your booking details and availability and you’re good to go:
4. Design your booking website
The design of your booking website plays an important role in attracting, keeping, and converting prospects to clients. So, focus on building a professional website that’s easy to navigate to build trust and encourage visitors to take the next step: schedule appointments or contact you for more details.
Here are a few practical tips to guide you:
- Use clear, descriptive headings.
- Be consistent with your color choices and make sure they match your brand.
- Keep your navigation menu simple so customers can easily find your booking page, contact information, and service details.
Your design should also be mobile-friendly and should contain the same content as your desktop version. Many customers will book from their phones or tablets, so your site needs to look and work just as well on smaller screens.
If design isn’t your strong suit, you can start with templates from your website builder. Many website builders today, like Network Solutions, offer customizable and mobile-friendly templates. This takes away the guesswork, keeping you moving forward toward your goal: publishing a professional, user-centric booking website.
For a completely hands-off approach, consider hiring a professional web design service. This option ensures your site meets your goals while saving time and avoiding trial-and-error.
5. Upload content
It’s time to fill your booking website with useful and engaging content.
Remember how there are two types of booking websites? There are two main approaches to uploading content.
For a stand-alone booking website
If your goal is a simple booking site, your content will mostly focus on:
- Your services and pricing
- Your booking form or calendar
- Business contact details
- Short “About” section or team introduction
- Key policies (cancellation, payment, etc.)
The goal is to keep things straightforward, making it quick for customers to find what they need and book.
For a full-custom appointment booking website
If you’re making a larger website with a booking page, you’ll need to prepare additional content, such as:
- Blog posts or articles to educate and attract visitors
- Service pages with more detailed descriptions and images
- Testimonials or case studies to build trust
- Photo galleries or video tours of your work or facility
- Frequently asked questions (FAQs) for common customer questions
6. Integrate an appointment scheduling software
If you prefer to use a third-party online booking system like Calendly, Google Calendar Appointment Schedules, or TimeTrade, you can still integrate it with your booking website.
Most of these tools provide embedded codes that you can add to your site’s HTML. Some also have booking links that you can easily configure. Just keep in mind that using an external tool may require extra setup. Here, you might consider consulting your website hosting or builder’s support team.
7. Integrate a payment provider
To ensure that your customers can pay upfront, integrating a payment method into your website is important. You’ll need a payment provider. This securely processes customer payments through credit and debit cards or digital wallets like Apple Pay and Google Pay.
Choosing the right provider builds trust and helps ensure bookings complete smoothly.
Here’s how you can add a payment method in Network Solutions.
8. Customize your booking forms
Your booking form is where interested visitors actually become paying clients. That’s why it needs to be simple, clear, and fit your services well.
A good rule of thumb is to not ask too many questions. Go for the basics like name, contact details, service type, and preferred date or time. If you need more details, you can add an extra field for “notes” or “special requests” at the end. This way, customers can book faster without feeling stressed by too many boxes to fill in.
You can adjust your booking forms to match your brand. You can change colors, add a logo, and edit the form fields based on what you really need from customers. A clean and easy form fosters a smooth customer experience and helps you avoid missed bookings or scheduling conflicts.
9. Set your availability
The next step is to set your available dates and times. This tells customers exactly when they can book your service, so there’s no overlapping schedules between you and your customers.
Think about your schedule carefully. Include your regular working hours, break times, and days off. If you have peak hours or specific days when you’re usually busy, block those off in your calendar to avoid double bookings.
10. Test and publish your booking website
Before you make your booking website live, test it first. Think of it like checking your house before inviting guests.
Go through your website as if you’re a customer. Try booking an appointment, filling out the form, and even making a test payment, if possible. Check if the appointment times are correct, the confirmation emails are sent, and all links work.
If you see any errors or if something feels confusing, fix them right away. You can also ask a friend or family member to try booking so you can get honest feedback. A fresh pair of eyes goes a long way when it comes to testing the functions of your booking website.
Once you’re happy with everything, it’s time to publish. Now you’re ready to welcome your first online bookings.
What to look for in a booking system
Here are a few things worth checking when choosing a booking system:
- Ease of use. If it’s too complicated, you’ll spend more time learning it than using it.
- Integration with your website. It should work seamlessly with your site, so customers can book without being redirected to another platform.
- Mobile-friendliness. Make sure it works properly on mobile since many people will book from their phones.
- Online payment integration. This helps streamline the payment process and reduce no-shows.
- Automated reminders. It can reduce manual follow-ups.
- Calendar sync. If you use Google Calendar, Outlook, or other scheduling tools, ensure the booking system can sync to avoid double-booking.
- Customizable forms. Your booking form should allow you to ask the right questions upfront, so you’re prepared for the appointment.
Not all booking systems are created equal. Choosing the right one can save you time, reduce errors, and give your customers a smoother experience.
When you get Network Solutions’ ‘Website + Marketing’ or ‘eCommerce’ plan, you’ll get the appointment setting feature to make managing bookings easy.
Build your booking website now
From choosing the right website builder to customizing your booking forms, every step leads to your goal of making it easier for customers to book with you. Now that you know the steps to create a simple online booking site, you can run your business with a system that handles appointments automatically and efficiently.
Check out Network Solutions’ AI Website Builder (‘Website + Marketing’ or ‘eCommerce plan’)for a quick and reliable way to build your booking website.
Frequently asked questions
A booking website is a digital platform that lets service-based businesses accept bookings and manage appointments online. It lets customers stay up to date with your availability, streamlining the scheduling process between you and your customers.
According to Google, you can create a single booking page with a personal Google Account or Workspace Business Starter plan. However, some features may only be available on certain subscriptions.
While Network Solutions doesn’t offer a free website builder, we offer budget-friendly solutions with features to help you create a website that can take your business to new heights.
