

Key takeaways:
- Blocking an IP address can help reduce unwanted traffic, spam, suspicious login attempts, and activity from known malicious sources.
- You can block IP address access at different levels, including your device firewall, router, web hosting control panel, and website security tools.
- Google Analytics 4 doesn’t block traffic from reaching your website, but it can filter internal IP traffic from reports so your data stays cleaner.
Your website gets the visitors you want, but sometimes it also gets traffic you don’t. Thousands of new IP addresses tied to spam, bots, and malicious traffic are identified each year, which makes it imperative to stay ahead of potential threats by implementing effective IP-blocking strategies.
Verizon’s 2026 Data Breach Investigations Report (DBIR) found that 31% of breaches began with software vulnerabilities, and 48% involved ransomware. Cloudflare also reported 47.1 million DDoS attacks in 2025 across its network, highlighting how common harmful traffic has become.
Many internet servers offer basic website security that can ward off some infiltration attempts, but some crafty criminals slip through the cracks.
So, what can you do? Learn the best ways to protect yourself from external threats.
In this guide, you’ll learn how IP addresses work, why you might want to block one, and how to block IP addresses on Windows, Mac, Linux, routers, web hosting platforms, and Google Analytics 4.
What is an IP address?
An Internet Protocol (IP) address is a unique numeric identifier assigned to each device connected to a network. It can be compared to a home address, but for your phones or laptops connected to the internet. Each device is assigned a unique IP address that allows it to interact with, receive information from, and otherwise contact other devices and networks on the internet.
What are the different types of IP addresses?
Not all IP addresses are the same. In fact, there are multiple IP addresses and address types that have their own uses. The main types include:
- Public
- Private
- Static
- Dynamic
Let’s discuss each one:
Public
This is the unique address your internet service provider (ISP) assigns to your network. It’s how your network communicates with the rest of the internet. Public IPs are globally routable and visible to all other devices on the internet. Every public IP address currently active is also unique.
It allows external devices or services, such as websites, to locate and communicate with your router and internal devices.
For example, when you open Google on your browser, your request will include your public IP address so that Google’s servers know where to send the information.
Private
A Private IP address is a non-routable address assigned to devices withinyour local network (e.g. home or office). These addresses are not directly accessible from the public internet and are only unique within their specific local network.
This IP address enables connections between devices within the same network. For example, you want to print a document from your laptop to your wireless printer. Both of these devices would use their private IP addresses to locate each other on your network.
Static
As its name suggests, static IP addresses are permanent and unchanging. These are typically configured manually by network administrators. Usually, static IPs are necessary for devices or services that require consistent accessibility at the same address.
For example, if you host a website from your own server, a static IP ensures that internet users can always find your site at the same address.
Dynamic
Unlike static IP addresses, dynamic IPs change regularly. This type of IP address is common for home networks because they’re generally more cost-effective (no financial charge). They are common in user devices like smartphones and laptops.
For instance, if you restart your home router, your ISP might assign it a new public dynamic IP address from their pool and your laptop might get a new private dynamic IP from your router.
What do IP addresses look like?
Even though most internet users connect to the internet using an IP address daily, the majority don’t know what an IP address looks like.
It can take two forms: IPv4, which stands for Internet Protocol version 4. and IPv6, which stands for Internet Protocol version 6.
IPv4
Invented in the 70s, IPv4 was the first wave of IP addresses. Generally, IPv4 addresses are composed of four numbers between 0 and 255, separated by dots or periods. It may look like: 99.31.235.187.
Since the early days of the Internet, IP addresses were assigned using the IPv4 model. But we’ve used up all available IPv4 addresses, which has led us to adopt IPv6. While most devices still use IPv4 to connect to the internet, the shift toward IPv6 began in earnest in 2011 when it was officially launched.
IPv6
On June 6, 2012, organizations like the Internet Society and major internet service providers launched IPv6 to accommodate the growing number of devices online. They made sure the number of conceivable IPv6 addresses is enormous and won’t run out anytime soon.
It uses a hexadecimal digit system, separates groups using colons, and may include letters like 2001:0db8:85a3:0000:0000:8a2e:0370:7334.
Why do you need to block IP addresses?
A business, educational institution, or internet user would attempt to block specific IP addresses for several reasons. In general, the most common reasons are:
- Blocking bots, spammers, and hackers: Bots, spammers, and hackers attempting to infiltrate your website can strain your bandwidth and reduce access speed for users. It’s also detrimental to sales if you run a business online.
- Limiting website access: Many academic institutions and businesses use IP blocking to restrict the websites that students or employees visit. The goal is typically to increase productivity by limiting distractions.
- Protecting data: Hackers often attempt to infiltrate websites to steal data or other vital information. That information can be used to blackmail or otherwise undermine a company.
- Maintaining confidentiality: Many academic institutions and companies that keep sensitive records—like transcripts, health records, etc.—are regularly targeted by hackers. Identifying malicious IP addresses and placing them on a blocklist keeps those records safe and confidential.
- Controlling traffic: Blocking IPs helps manage traffic to a website or network by restricting access from specific locations or known problematic IPs, which can improve website performance, support network security, and reduce server load.
- Keeping analytics data clean: Website owners can filter internal traffic, developer traffic, agency traffic, and testing activity so analytics reports better reflect real customer behavior.
- Enhancing privacy: Blocking IPs can be a method to prevent stalking, harassment, or other privacy intrusions, especially if these issues are traced back to specific IP addresses.
- Complying with legalities: Some businesses may need to use geo-blocking to block IPs from certain countries or regions due to trade restrictions, copyright laws, or other regulatory compliance requirements.
IP blocking works best when it is part of a broader security plan. Anthony Matera, Senior Director of Email Products at Network Solutions, notes that one avoidable mistake new website owners make is “believing they won’t get targeted/hacked,” along with “using weak, default, or reused passwords for their CMS, hosting accounts, or admin panels.”
In other words, blocking a suspicious IP address can help, but it shouldn’t replace strong passwords, multifactor authentication, software updates, backups, malware scanning, and other website security basics.
How to block an IP address
Here’s how to block an IP address using Mac, Windows, Linux, routers, web hosting, Google Analytics, and other built in features available through your device or provider.
Note: The steps below are current as of writing, but menus, labels, screenshots, and workflows can change without prior notice after platform, router, browser, software, or operating system updates. When in doubt, check the official help documentation for your device, software, router, or hosting provider.
Blocking an IP address for Mac users
macOS includes a built-in firewall, but it’s designed mainly to control incoming app and service connections rather than block a specific external IP address through a simple visual interface. Apple’s current Mac firewall settings are found under Apple menu > System Settings > Network > Firewall, where users can turn on firewall protection, manage incoming connections, and enable stealth mode.
For most Mac users, the more practical way to block a specific IP address is through the router or hosting platform.
To find your router address on Mac:
- In the top-left corner of your screen, click the Apple menu.
- Click System Settings.
- In the sidebar, click Network.
- Select your active connection, such as Wi-Fi or Ethernet.
- Click Details.
- Open the TCP/IP tab.
- Look for the Router address.
- Copy that address into your browser.
- Log in to your router using your admin username and password.
- Look for a section labeled Firewall, Security, Access control, Blocked sites, IP filtering, or a similar option.
- Add the IP address you want to block.
- Save or apply the changes.
If you want extra protection on the Mac itself, turn on the macOS firewall and review which apps are allowed to receive incoming connections. This won’t replace router-level IP blocking, but it can help reduce unwanted inbound connections.
Blocking an IP address for Windows users
On Windows, you can block an IP address through Windows Defender Firewall with Advanced Security. Microsoft’s current guidance says single-device users can open the advanced firewall console by selecting Start, typing wf.msc, and pressing Enter.
Before you start, decide whether you want to block:
- Inbound traffic: Traffic coming from that IP address to your device
- Outbound traffic: Traffic from your device going to that IP address
To block an IP address in Windows:
- In the Windows search bar, type wf.msc.
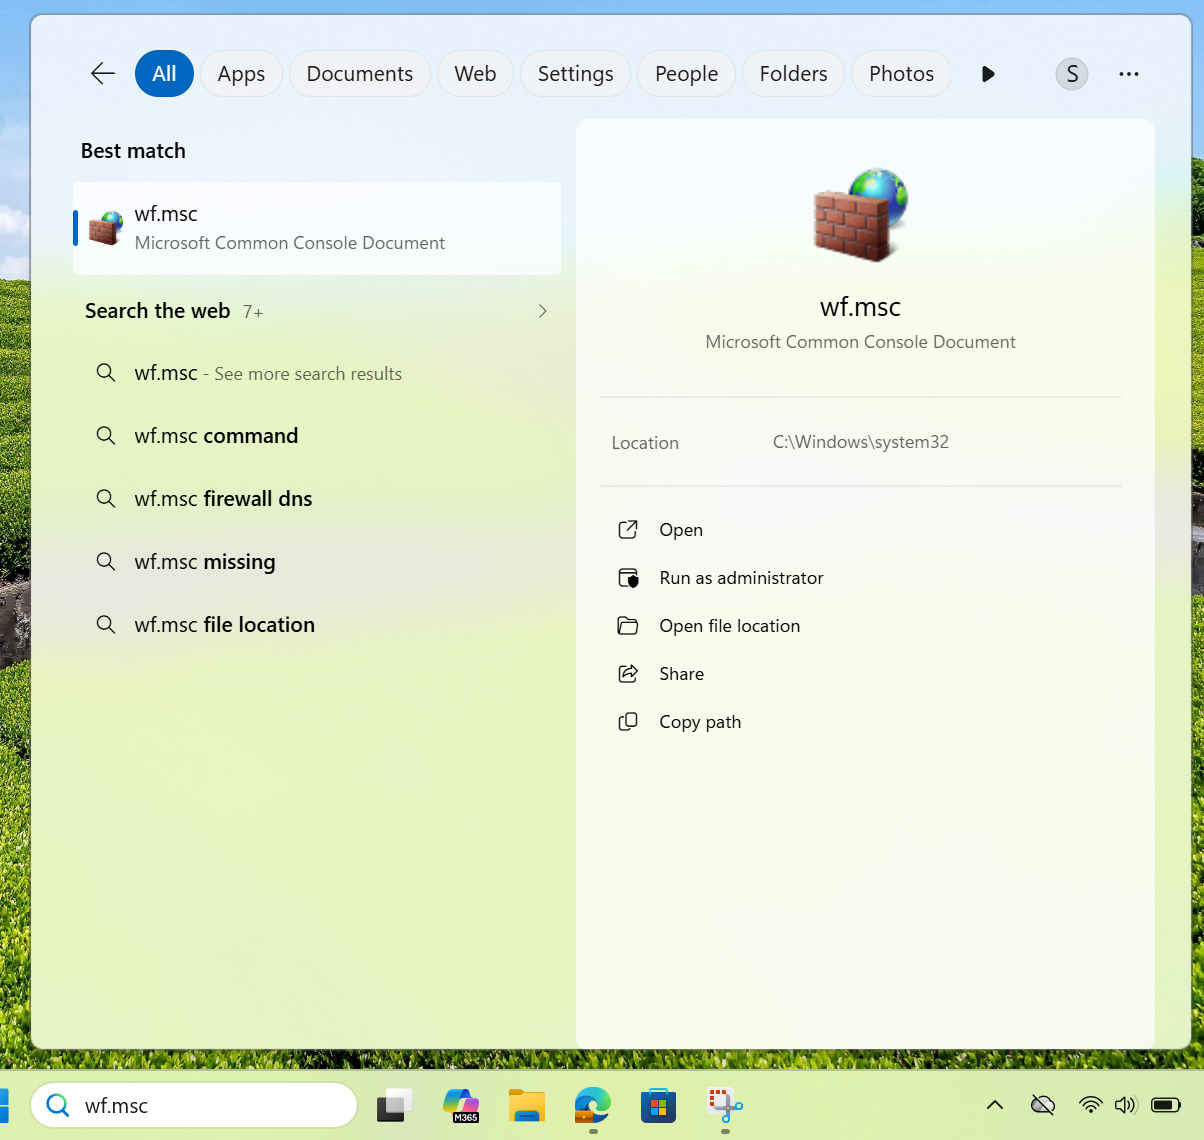
- Press Enter to open Windows Defender Firewall with Advanced Security.
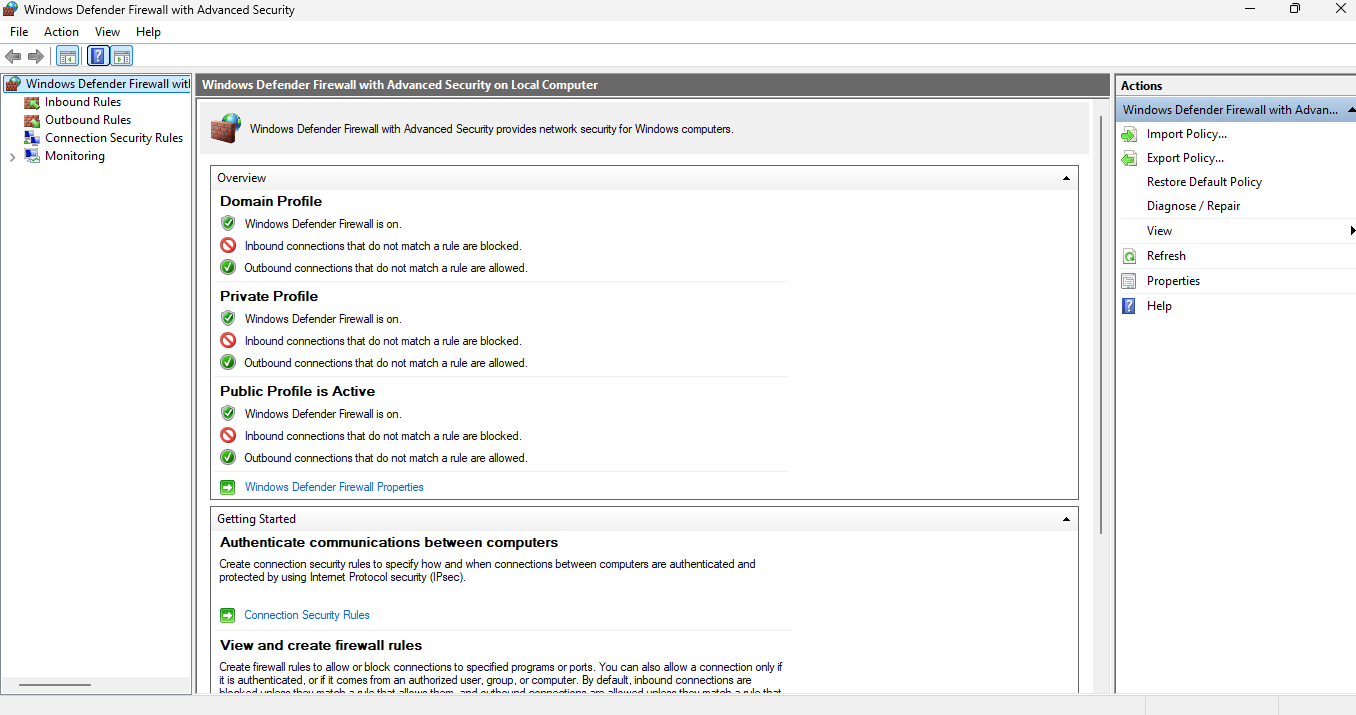
- In the left navigation, click Inbound Rules if you want to block incoming traffic. Click Outbound Rules if you want to stop your device from connecting to that IP address.
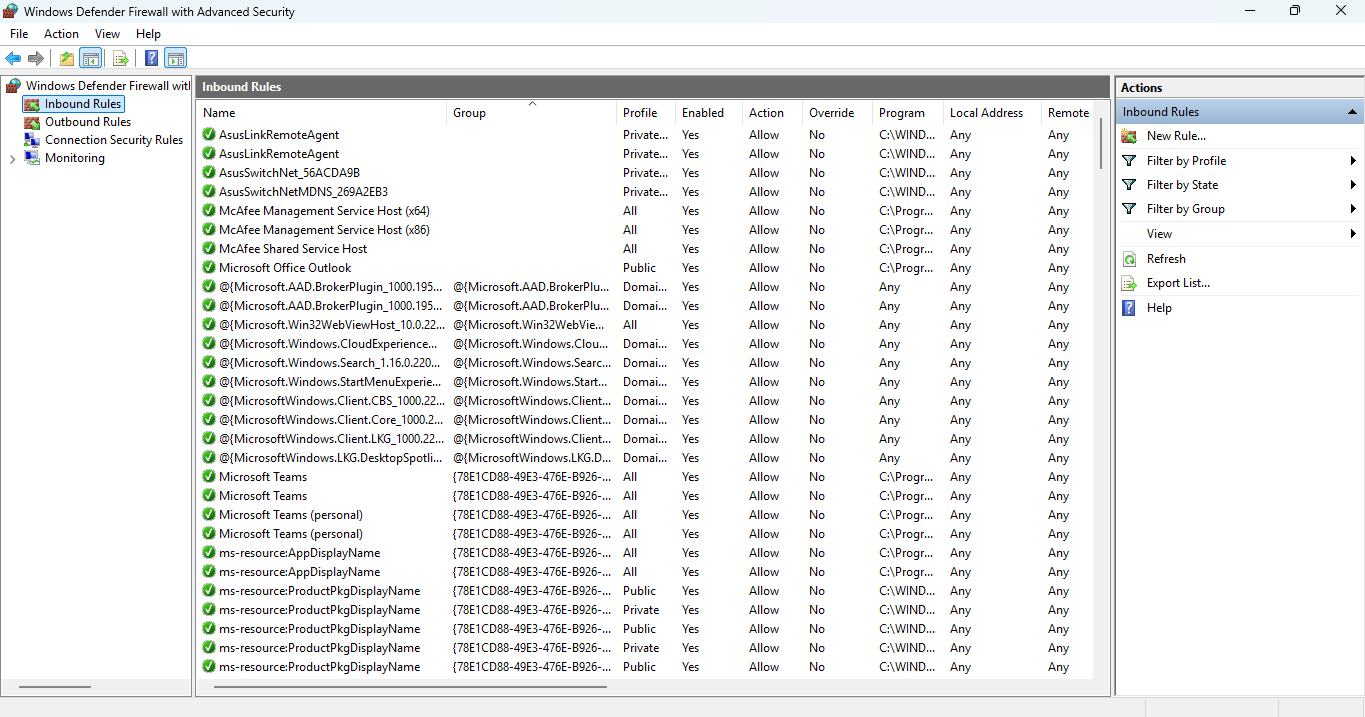
- In the right panel, click New rule.
- On the Rule type page, select Custom, then click Next.
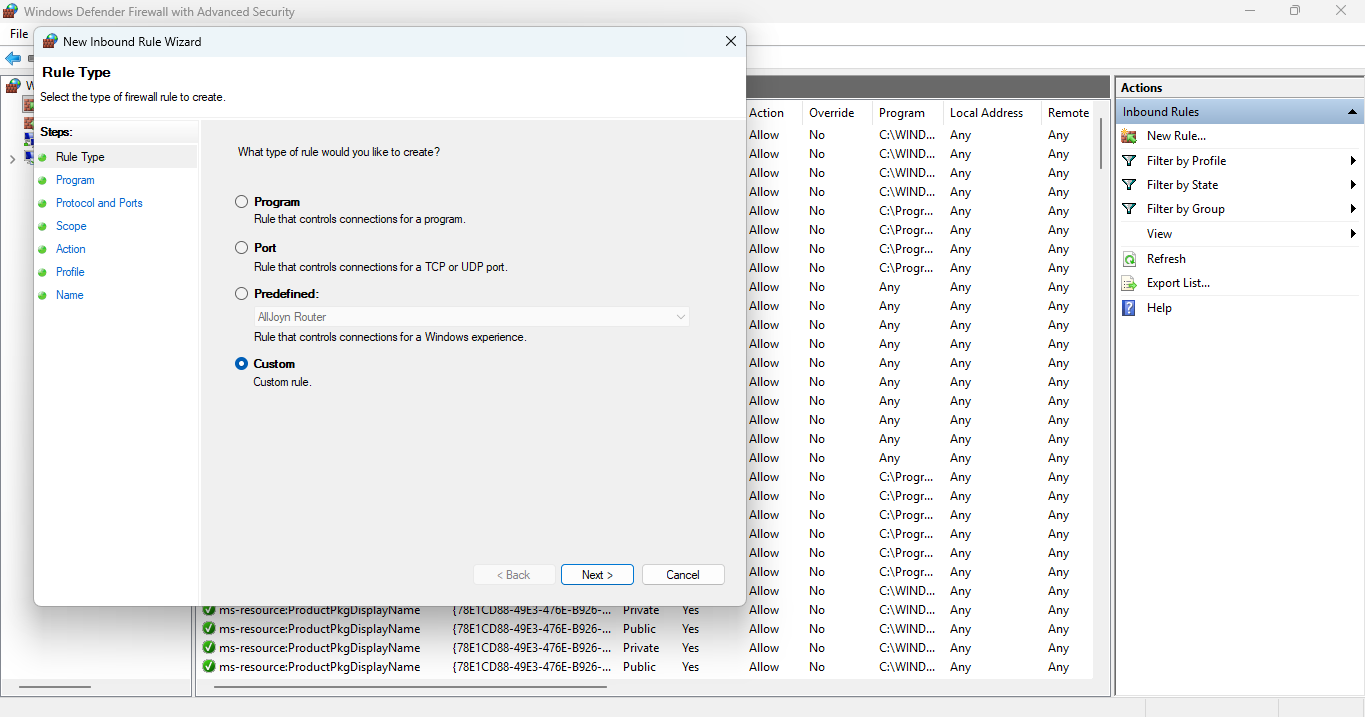
- On the Program page, select All programs, or choose a specific program path if the block should only apply to one application. Click Next.
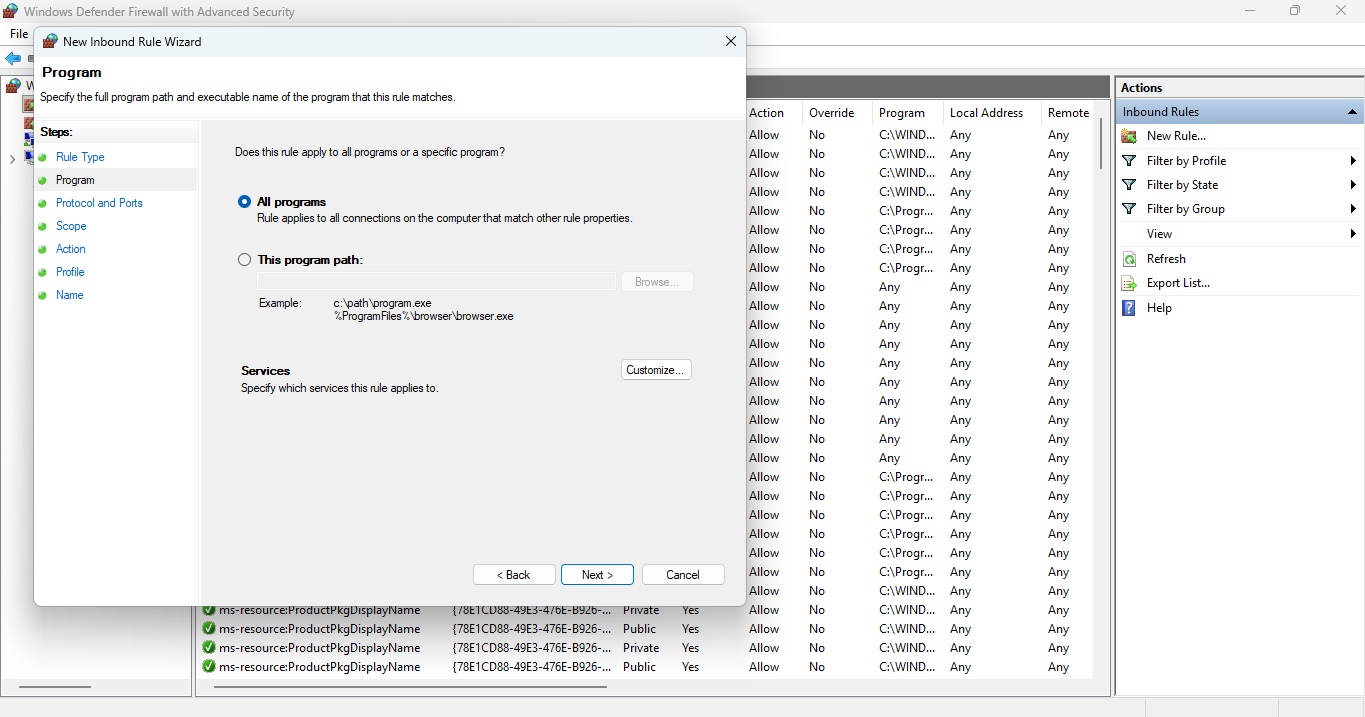
- On the Protocol and ports page, keep the default settings if you want the rule to apply broadly, or choose a specific protocol and port if you know exactly what to block. Click Next.
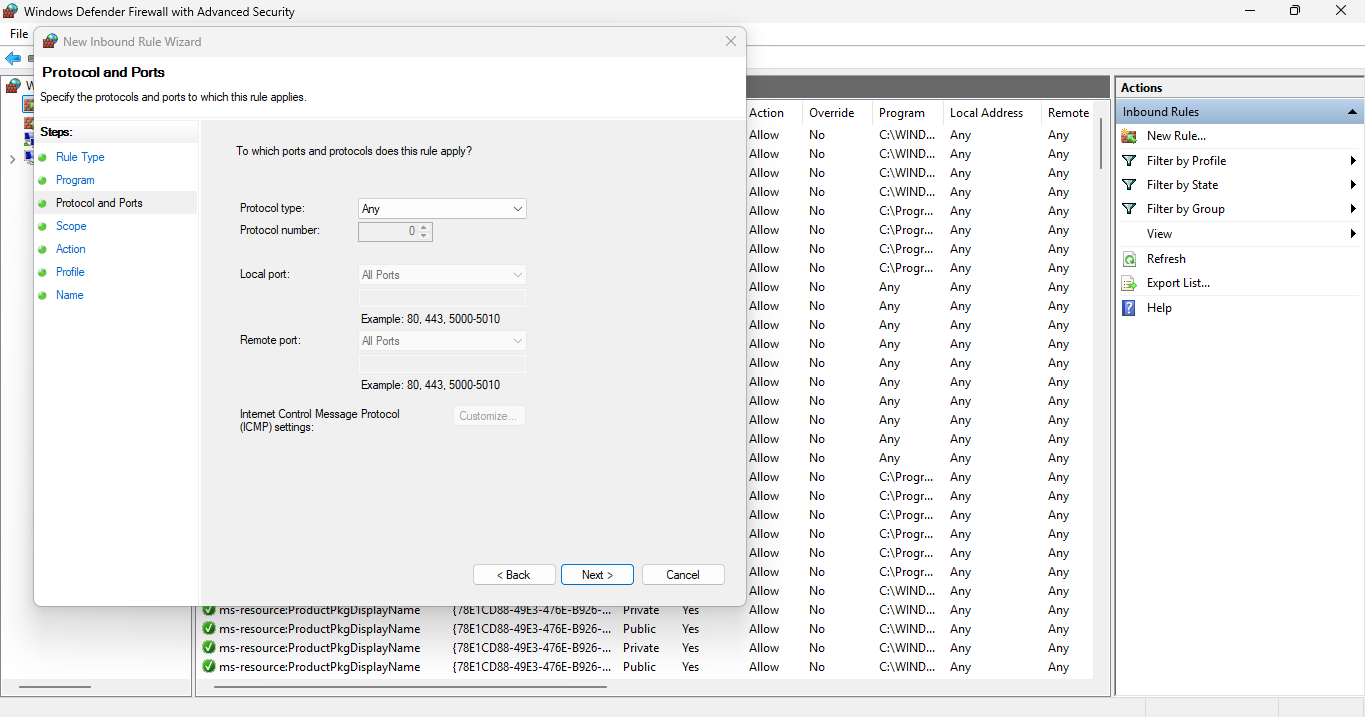
- On the Scope page, go to the section for remote IP addresses.
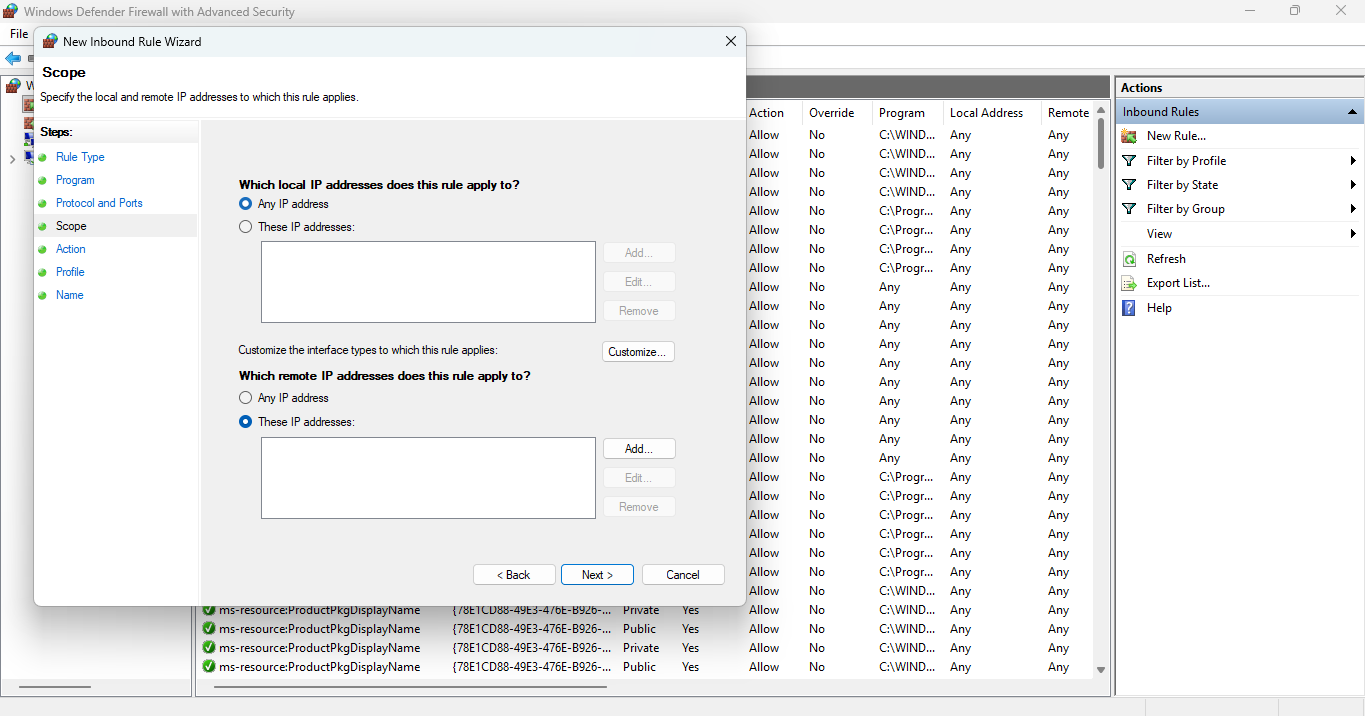
- Select These IP addresses, then click Add.
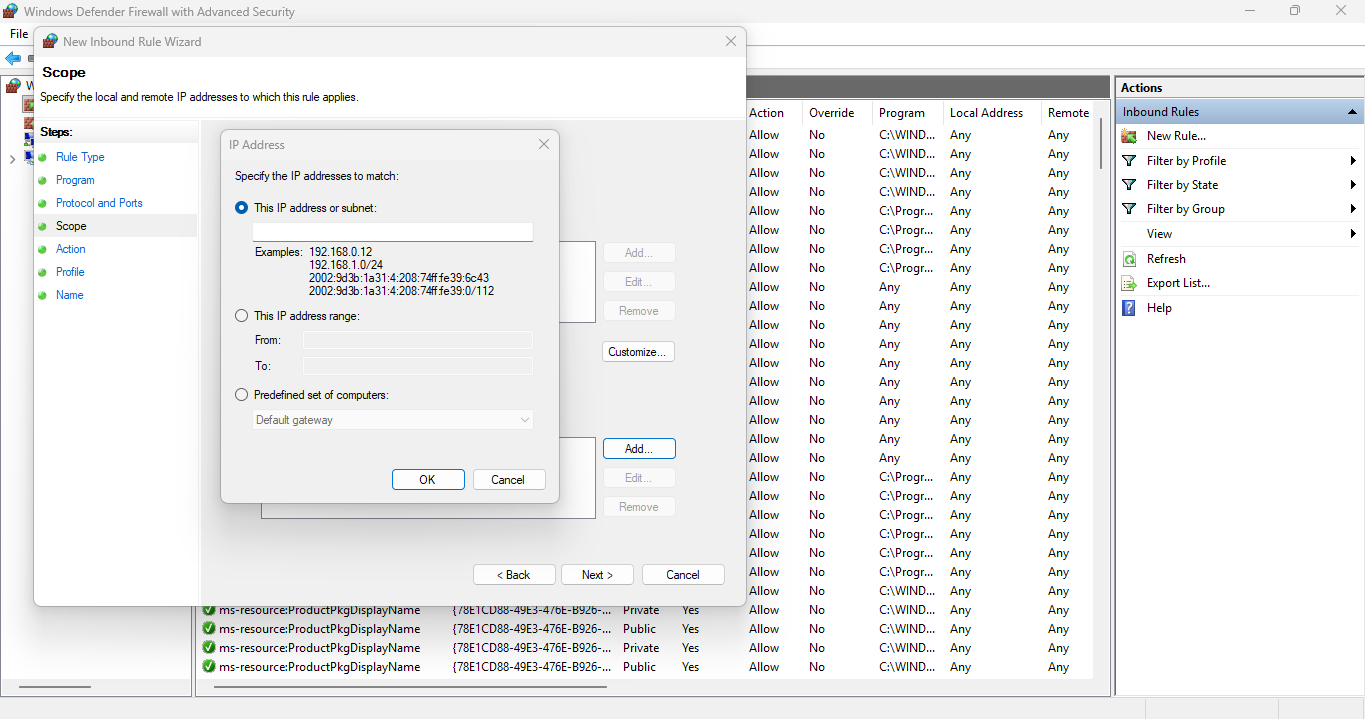
- Enter the IP address, IP range, or subnet you want to block.
- Click OK, then click Next.
- On the Action page, select Block the connection.
- Click Next.
- Choose when the rule applies: Domain, Private, and/or Public.
- Click Next.
- Add a clear name, such as “Block suspicious IP 203.0.113.10.”
- Click Finish.
Microsoft’s firewall wizard lets users define whether a rule applies to traffic to or from specific IP addresses on the Scope page. For broader coverage, create both inbound and outbound rules when needed.
Blocking IP addresses for Linux users
Linux users can block IP addresses in several ways. The right method depends on your distribution and firewall setup.
For many Ubuntu and Debian-based systems, Uncomplicated Firewall (UFW) is the simplest option. Ubuntu’s UFW documentation shows that you can deny traffic from a specific IP address using this format: sudo ufw deny from <ip address>.
To block a specific IP address with UFW:
- sudo ufw status verbose
- sudo ufw deny from 203.0.113.10
- sudo ufw enable
- sudo ufw status numbered
Replace 203.0.113.10 with the IP address you want to block.
To block one IP address from accessing a specific port, use:
- sudo ufw deny from 203.0.113.10 to any port 22
To remove a rule, first list numbered rules:
- sudo ufw status numbered
Then delete the rule number:
- sudo ufw delete 1
For advanced Linux setups, you may use iptables, nftables, or firewalld instead. For example, an iptables rule to drop incoming packets from one IP address looks like this:
sudo iptables -A INPUT -s 203.0.113.10 -j DROP
On production servers, make sure your firewall rules persist after restart. The persistence method depends on your Linux distribution and firewall tool.
Blocking IP addresses for routers
Blocking an IP address at the router or modem level can protect every device on your network. This is helpful for home offices, small teams, and businesses that want to control network traffic in one place.
Router menus vary by manufacturer, but the general process is similar:
- Open a browser on a device connected to your network.
- Enter your router’s IP address in the address bar. Common addresses include 192.168.1.1 and 192.168.0.1, but yours may be different. If you use a combined modem and router, check the label, app, or provider settings.
- Log in with your router admin username and password.
- Look for settings labeled Firewall, Security, Access control, Parental controls, IP filtering, or Blocked addresses.
- Choose whether you want to block a single IP address, a range, or a device.
- Enter the IP address or range you want to block.
- Save or apply the changes.
- Restart the router if the interface asks you to do so.
- Test the block or monitor your logs to confirm the rule is working.
Change the default router admin password if you haven’t already done so. A router with a default password is easier for attackers to access and reconfigure.
Blocking IP addresses for web hosting services
Blocking IP addresses through your web hosting service protects your website no matter where visitors try to access it from, including your home page and login pages. This is often more effective than blocking an IP address on one computer, especially if the issue involves spam, brute-force login attempts, scraping, or suspicious website traffic.
The exact steps depend on your hosting control panel. In many hosting dashboards, the feature may be called IP blocker, IP deny manager, Firewall, Security, Access restrictions, or WAF rules.
To block an IP address through your hosting service:
- Log into your hosting account or control panel.
- Open the Security, Firewall, or IP blocking section.
- Choose the option to add a blocked IP address.
- Enter the IP address you want to block.
- Add a short note if your control panel allows descriptions.
- Save or apply the change.
- Check your website access logs later to confirm the IP address is no longer reaching your site.
Some hosting platforms also allow range blocking. This may use Classless Inter-Domain Routing (CIDR) notation, such as:
192.168.1.0/24
Use IP ranges carefully. A range that is too broad can block real customers, partners, employees, or search engine crawlers.
For websites with frequent spam or attack attempts, a web application firewall (WAF) or website security tool may be a better long-term IP address blocker than a manual list.
Blocking IP addresses in Google Analytics 4
Google Analytics 4 doesn’t block traffic from reaching your website. It filters internal website activity from your reports, which is useful when your team, developer, agency, Mac users, or multiple operating systems regularly visit your site. Use a firewall, router rule, hosting rule, or security tool when you need to block IP address access for security.
To filter an IP in GA4, make sure you have Editor access.
- In Admin, under Data collection and modification, click Data streams.
- Select your web data stream, click Configure tag settings, choose Show more, then click Define internal traffic.
- Click Create, name the rule, keep or edit the traffic_type value, choose the IP match type, enter the IPv4 or IPv6 address or range, and click Create.
- Next, in Admin, click Data filters, select Create filter, choose Internal traffic, set the filter to Testing first, and validate it in Explore.
- When you’re sure it works, change the filter state to Active. Active filters permanently exclude matching data.
Google Analytics 4 replaced Universal Analytics. Standard Universal Analytics properties stopped processing hits on July 1, 2023, and most users lost access to Universal Analytics data and the interface starting July 1, 2024.
Troubleshooting common IP blocking issues
IP blocking is straightforward in theory, but a few issues can come up in practice. If your block does not work, or if legitimate users suddenly lose access, review the settings before adding more rules to determine what went wrong.
Blocked IPs are not taking effect
Sometimes, even after you set rules to block specific IPs, these blocks are not taking effect. This can leave your network vulnerable, so promptly address these issues.
- Verify firewall rules. Double-check your firewall settings. Make sure that all configurations are correctly implemented and active. This includes ensuring that the rules are applied to the right network domain and have the correct priority in your firewall’s rule list.
- Check IP entries. Verify that the IP addresses are in the correct format and match those intended for blocking. Pay attention to potential typographical errors or misplaced segments in the IP address.
- Restart equipment. Sometimes, changes may only take effect once the network equipment is restarted. This can apply to both routers and firewalls. A simple reboot can often activate the new settings, making your IP blocks effective.
Legitimate access blocked
On occasion, IP blocking can unintentionally affect legitimate users and restrict their access to your network or website, which leads to frustration and disruptions in business operations.
- Review the blocklist for errors. Regularly inspect your blocklist for any incorrect entries. This includes checking for IPs that should not have been listed or legitimate IP ranges mistakenly blocked due to an overlap with broader blocked segments.
- Adjust rules. You may need to adjust your firewall rules if legitimate IPs are blocked. This involves whitelisting certain IP addresses or modifying the criteria to block IPs to be more specific and prevent overblocking.
- Check for false positives. Ensure that your security settings are calibrated correctly. Overly aggressive security measures can sometimes block legitimate users, so finding a balance that maintains security without being overly restrictive is essential.
Difficulty finding IP address
Identifying the correct IP addresses to block is fundamental to effective network management. If you’re having trouble pinpointing which IPs to block, here are some methods to help:
- Use online tools. There are numerous tools available online that can resolve domain names to their corresponding IP addresses. These tools can be invaluable when you know the domain but not the IP.
- Check website logs. Your website’s access logs provide insights into the traffic it receives. Reviewing these logs allows you to identify potentially malicious activity based on IP addresses and take appropriate action.
Best practices for blocking IP addresses
When safeguarding your network through IP blocking or IP banning, it’s vital to follow a set of best practices to ensure that your efforts are practical and balanced. Proper IP blocklist management and security settings help protect against threats while ensuring legitimate users can access your network without disruptions. Here’s how you can maintain an optimal balance:
- Update blocklists. Regularly update your blocklists to reflect the evolving threat landscape. Add new suspicious IPs as threats are identified and remove IPs that no longer pose a risk.
- Review security settings. Continually reassess your security protocols to ensure they remain effective against current threats. This includes verifying that your firewall and other security tools are configured correctly and functioning as expected.
- Maintain user access. Carefully manage your IP blocking strategies to ensure you don’t accidentally block a legitimate user, customer, or person who needs access. Regular reviews and adjustments can help prevent such issues.
- Use automated tools. Leverage automated systems for managing IP addresses to reduce the likelihood of human error and streamline updating and applying blocklists.
- Implement a broader security strategy. View IP blocking as one element of a comprehensive security strategy. This integrates various defensive measures to create a multi-layered defense system.
- Enhance with additional measures. Augment IP blocking with additional security measures, such as intrusion detection systems and regular security audits, to ensure a thorough and robust protection scheme.
How to block or hide your own IP address
Many people prefer hiding their IP addresses for various reasons. Most of the time, it’s because of privacy and security reasons. For instance, some users hide their IP addresses because cybercriminals can use these details to track your location.
Meanwhile, hiding your IP address could also grant access to geographically restricted websites, depending on your geo location and the site’s rules.
The good news is, there are many ways you can block or hide your own IP address. Here are two practical ways:
- Use a VPN
- Use a proxy server
Use a VPN
A virtual private network (VPN) routes your internet connection through a private server. Websites and apps usually see the VPN server’s IP address instead of your real public IP address.
A VPN is often the better choice when you want broader device-level privacy because it can protect traffic from more than one browser or app, depending on how it is configured.
To use a VPN:
- Choose a reputable VPN provider.
- Review its privacy policy, logging policy, server locations, speed, and customer support.
- Download the VPN app from the provider’s official website or your device’s official app store.
- Create an account and choose a plan.
- Turn on security features such as a kill switch or multifactor authentication if available.
- Connect to a VPN server.
- Visit an IP lookup site to confirm that your visible IP address has changed.
Avoid unknown free VPNs. Some free tools may log activity, sell data, show intrusive ads, or use weak security. A free plan from a reputable provider is safer than a random free app with unclear ownership.
Use a proxy server
Aside from VPNs, proxy servers are also another method to hide your real IP address and access online content. A proxy server acts as an intermediary between your device and the internet. When you browse through a proxy, websites may see the proxy server’s IP address instead of your own.
Proxies can be useful for specific browser or app traffic, but they usually offer less protection than a VPN. Microsoft notes that VPNs and proxies may look similar, but a VPN generally provides a more secure connection than a proxy server.
To set up a proxy server in Windows:
- In Settings, go to Network & internet.
- Click Proxy.
- Under Automatic proxy setup, turn on Automatically detect settings if your organization supports it.
- For manual setup, under Manual proxy setup, next to Use a proxy server, click Set up.
- Turn on Use a proxy server.
- Enter the proxy IP address and port.
- Add any exceptions if needed.
- Click Save.
To set up a proxy server on Mac:
- Click the Apple menu.
- Go to System Settings.
- Click Network.
- Select your active network service.
- Click Details.
- Click Proxies.
- Choose the proxy type, such as Web proxy (HTTP), Secure web proxy (HTTPS), or SOCKS proxy.
- Enter the server address and port number.
- Add a username and password if required.
- Save your changes.
For mobile devices, proxy settings usually live inside Wi-Fi network settings. Menus vary by device and operating system, so follow your proxy provider’s instructions.
Why is my IP address blocked?
A blocked IP address might suddenly no longer access certain websites or services. This could prevent you from using email, streaming content, or even logging into platforms you usually use without problems.
If your IP was blocked by mistake—something that can happen with shared or dynamic IP addresses—you’ll need to figure out what caused this and talk to your service provider to fix the issue. Here are several potential reasons for the block:
- Viruses in your device
- Software extensions
- History of illegal activity
- Inappropriate website content
Let’s discuss each in detail:
Viruses and malware in your device
One of the most common reasons that IP addresses are blocked from accessing remote servers is that the remote server detects a virus within your IP address. Internet users often don’t even know they have picked up a virus.
Once you’ve removed the virus or malware from your network, reach out to the website you attempted to access and explain why you should be removed from the blacklist.
Software extensions
There are many ways to customize your internet browser. One example includes extensions that eliminate pop-up ads from websites or detect viruses hiding within a website.
There’s nothing illegal about adding extensions to your browser, but some websites will ban users who run ad-blockers. They may see this as a disruption of their revenue flow.
History of illegal activity
If you have a history of conducting illegal activity online, many website admins will block access to your IP address as a preventative measure because they think you’re untrustworthy. Online illegal activities may include illicit trade, activity on the dark web, or cybercrimes.
Inappropriate website content
If you operate a website that contains potentially offensive content like pornographic material or illegal trade, you will likely be blacklisted from many websites because your content is subjectively inappropriate.
While you may disagree with the decision of another admin to blacklist your website, the only way around the blacklist is a direct appeal to the admin.
Frequently asked questions
Yes. You can block an IP address through a firewall, router, hosting control panel, website security tool, or web application firewall. You can also filter internal IP traffic from Google Analytics 4 reports.
Find the IP address you want to block, choose where to block it, add a deny or block rule, save the change, and test that the rule works.
Use your firewall, router, hosting control panel, or website firewall. Use an inbound rule to block traffic coming to your device or site, and use an outbound rule to stop your device from connecting to that IP.
The blocked device or network is denied access based on the rule you created. Depending on the tool, the connection may be dropped, rejected, redirected, or filtered from reports.
Most phones don’t include a simple built-in firewall for blocking specific IP addresses at the system level. Block the IP address through your router, security app, VPN settings, or the specific app or website you manage.
Yes. This is called geoblocking. Website owners often use a firewall, WAF, or security service to block traffic from certain countries or regions. Use it carefully so you do not block legitimate customers.
In GA4, define internal traffic under your web data stream, then create an internal traffic data filter. Set the filter to Testing first, confirm it works, then switch it to Active.
No. Incognito Mode or private browsing prevents your browser from saving some local history, cookies, and site data. It doesn’t hide your IP address from websites, your ISP, or your network administrator.
In many cases, hiding your IP address with a VPN or proxy is legal in the United States. Don’t use IP masking to bypass laws, commit fraud, or violate platform rules. This article is for general information and is not legal advice.
Not directly in most cases. You can review server logs, security alerts, suspicious login notices, and account activity, but there is no simple real-time alert that tells an average user their IP address is being tracked.
Some free VPNs, proxies, or IP blocking tools may log your data, sell browsing activity, inject ads, use weak encryption, or expose you to malware. Research the provider before installing anything.
Protect your online presence from cyberthreats
Learning how to block IP address access gives you more control over your website, network, and data. It can help you slow down spam, reduce suspicious traffic, clean up analytics, and respond faster when one source is causing problems.
The net benefit is simple: fewer unwanted sources reaching the places they shouldn’t.
Still, IP blocking is only one part of website security. Pair it with strong passwords, multifactor authentication, software updates, backups, malware scanning, and a firewall. A layered approach gives your business a stronger foundation without making security feel overwhelming.
And when you register a domain with us, you can also use included tools such as a Coming Soon Page, Link In Bio, CRM App, Marketing Calendar App, and Social Marketing App to start building a safer, more consistent online presence from the beginning. address on Mac, Windows, Linux, routers, hosting platforms, and GA4, plus ways to hide your own IP.