Key takeaways:
- Creating a website involves rigorous steps that start from choosing a relevant domain name to maintaining your website’s content and features.
- Each website creation step requires a lot of strategy because your choice will affect the subsequent steps.
- You don’t need to have expert-level technical skills to build a website because there are now AI website builders to make the process easier.
There are plenty of reasons why people create a website: some start a blog to share their passion, others use their websites for eCommerce, or to showcase their portfolio. There are just many ways you can use a website.
Although many people want a website, they often get overwhelmed by the sheer thought of building one. Thankfully, with today’s technology, it’s easier to create your own website even with limited technical skills.
So, where to start? This blog will teach you how to make a website from scratch.
Why do you need a website?
Since their creation, websites have been multipurpose platforms. They serve as the cornerstone for individuals and organizations that want to establish their online presence.
Websites are internet staples that serve many benefits:
- They make you searchable online. Through search engine optimization (SEO), your site can appear in Google searches and connect you directly with people looking for what you offer.
- They make you look professional. A well-designed website conveys a sense of trustworthiness and dedication to your craft. It serves as a polished representation of your work, ideas, or brand.
- They show off who you are and what you can do. Whether it’s a portfolio of your creative projects or a professional site dedicated to your expertise, your website serves as a dedicated space to showcase your unique identity and value.
- They help you stand out. Unlike social media platforms, websites do not have competing advertisements or distractions, and you have your audience’s undivided attention.
- They let you own your content. When you post on social media platforms, you’re “digital sharecropping,” which means you’re creating content on a platform you don’t own. With your own website, you have full ownership and control over your content.
How to create a website
The website creation process requires multiple steps that involve a lot of planning for your site’s content and structure. The following are included in the creation process:
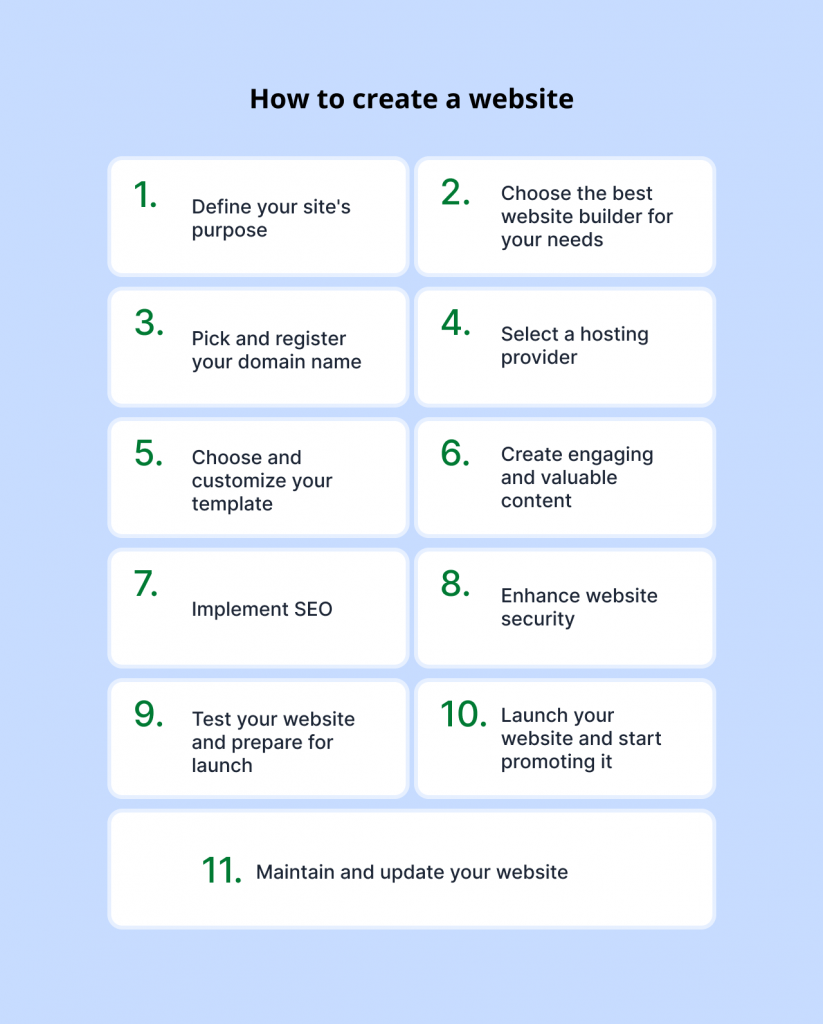
- Define your site’s purpose
- Choose the best website builder for your needs
- Pick and register your domain name
- Select a hosting provider
- Choose and customize your template
- Create engaging and valuable content
- Implement SEO
- Enhance website security
- Test your website and prepare for launch
- Launch your website and start promoting it
- Maintain and update your website
Now, let’s discuss each step in detail.
Step 1. Define your site’s purpose
Before jumping into plans, you need to establish which website type you want to build. Defining your niche early in your website creation process helps you solidify everything else: from the visual design and the content strategy to how you will measure user engagement.
What type of website should you create?
Your site’s purpose dictates its overall direction and the tools you’ll use. Common types include:
| Website type | Example |
| Business websites | Online stores or eCommerce Product landing pages Marketplaces |
| Content and media | News Podcast Magazine Streaming sites Blogs |
| Community and social | Fan sites Job boards Membership sites Social networks |
| Creative | Portfolio Freelance profiles Resume Personal brand sites |
| Educational | University sites Online courses Nonprofit organizations Test preparation sites Review centers |
| Lifestyle | Personal blogs Bridal and wedding pages Hobby sites Memorial pages Family blogs |
| Public service and institutions | Government sites Charity NGOs Religious organizations Archives and libraries Healthcare |
| Utilities and tools | Calculators Directories Search engines |
Let’s define each category:
- Business websites. These sites focus on commercial activities and aim to generate leads, make sales, or provide information about a company’s offerings.
- Content and media. These websites prioritize publishing and distributing information, entertainment, or news.
- Community and social. These platforms aim to connect users, facilitate interaction, and build online communities.
- Creative. These websites focus on showcasing personal or professional creative work and building a brand around an individual’s talents.
- Educational. These sites provide learning resources, online courses, or information for academic or instructional purposes.
- Lifestyle. These typically revolve around personal interests, hobbies, life events, or family sharing.
- Public service and institutions. These are typically governmental, charitable, or community-oriented
- Utilities and tools. These offer specific functionalities or applications designed to help users complete tasks or find specific information.
For a deeper dive into the different types of websites, read our blog about it for more suggestions.
How to identify your audience
Aside from defining your website’s type, understanding who you want to reach is equally important. Knowing your audience also guides every decision, from your site’s design and content to your marketing efforts.
Here’s how you can pinpoint your target website visitors:
- Picture your ideal visitors. Think about who would benefit most from your website. What are your ideal site visitors’ core interests and goals? For a personal blog, it could be fellow hobbyists or people seeking inspiration from your works.
- Develop audience persona. It also helps to create a semi-fictional profile that represents your target audience. Make sure to give them background and characteristics such as their age range, general interests, needs and desires, motivations, and online habits.
- Observe. Look for clues by reading related blogs, forums, articles, and social media. This will help you understand popular topics and common questions.
- Focus on the value you offer. Who would benefit from the content you offer? Are you providing answers, offering unique perspectives, teaching a skill, or showcasing inspiring work? Understanding this connection helps you attract and retain the right people.
Step 2. Choose the best website builder for your needs
After clarifying your site’s purpose and audience, your next step is to select the right platform to create your professional website. A website builder allows you to create a website without needing to code or advanced technical skills. Choosing the right one streamlines the entire website creation process.
How to choose the best website builder for you
It’s important to consider several factors when choosing the right website builder. These key points include:
- Ease of use. If you’re new to website creation, a builder with an intuitive drag-and-drop interface will save you significant time and frustration. Look for platforms that simplify design and content management.
- Features. Check if the builder’s offerings match your site’s specific needs. Do you require eCommerce capabilities, advanced blogging tools, a portfolio display or photo gallery, or membership options? Does it give you all the customization tools or website templates you need?
- Cost. Although there are free plans, most website builders have various pricing structures. Understand what each tier offers and whether it fits your budget for the long term. Remember to factor in potential costs for premium features, custom domains, or third-party integrations.
- Scalability. Always think ahead and consider your future growth. Check the website builder’s support capabilities and flexibility when traffic increases or if you add more features as your website evolves. Do they have third-party integrations?
- Security. The right website builder offers more than basic design features. It should also offer security tools to protect your site from potential threats. Look for features like SSL certificates and SiteLock.
When you’re just starting out, make sure to choose a website builder that prioritizes simplicity and support. For instance, do they have a user-friendly interface? Also, take advantage of free trials to test out different builders. This way, you’ll get a firsthand experience of the interface before committing and can see which one feels the most comfortable to you.
If you’re looking for a list of the best AI website builders, our blog post provides an in-depth explanation of each platform’s features and pricing.
Step 3. Pick and register your domain name
Once you’ve finally chosen the best website builder, the next step is to pick and register your domain name.
A domain name serves as the address for your website. It is how people will find you online, so it’s very important to choose one that reflects your brand identity.
How to choose the right domain name and extension
Creating an effective custom domain name requires extensive keyword research. A good domain name has relevant keywords that give potential visitors a clue about your site’s content.
For example, if your blog is about digital art, a domain name like gabrielladigitalartworks.com greatly conveys the site’s purpose.
To find the best keywords:
- Use keyword research tools (e.g. Google Keyword Planner, Ubersuggest, or WordStream’s free keyword tool).
- Analyze similar successful websites. What keywords do they use?
- Brainstorm related terms to your niche and list down synonyms and common phrases related to it.
When choosing the best domain name, make sure to:
- Keep it short and memorable. Shorter names are easier to type and easier to recall.
- Avoid complex spellings.
- Avoid using unnecessary symbols and numbers, unless they’re part of your brand.
Aside from your domain name, you should also consider what domain extension you want to use. Top-level domains (TLDs) like .com, .org, and .net are the popular choices because they’re universally recognized. But you shouldn’t limit yourself to these options if your preferred domain name is already taken with your chosen extension.
Newer, specific TLDs better suit niche websites. For instance, if you’re creating a blog site, the .blog extension immediately tells your visitors that your site is a blog. Or, if you’re located in a specific country, a country code top-level domain (ccTLDs) will be a good alternative.
For example: gabrielladigitalart.us instead of gabrielladigitalart.com
If you have listed a few domain name ideas, it’s best to check them at domain name search tools to see their available extensions and pricing.
How to register your domain
After you finalize your domain name and TLD, you need to register it with a domain registrar.
A domain registrar is an accredited company in charge of reserving and managing domain names. They are the intermediary between you and the Domain Name System (DNS). Examples of reliable registrars include Network Solutions, BlueHost, HostGator, and CrazyDomains.
The registration process varies per registrar, but platforms like Network Solutions follow these simple steps:
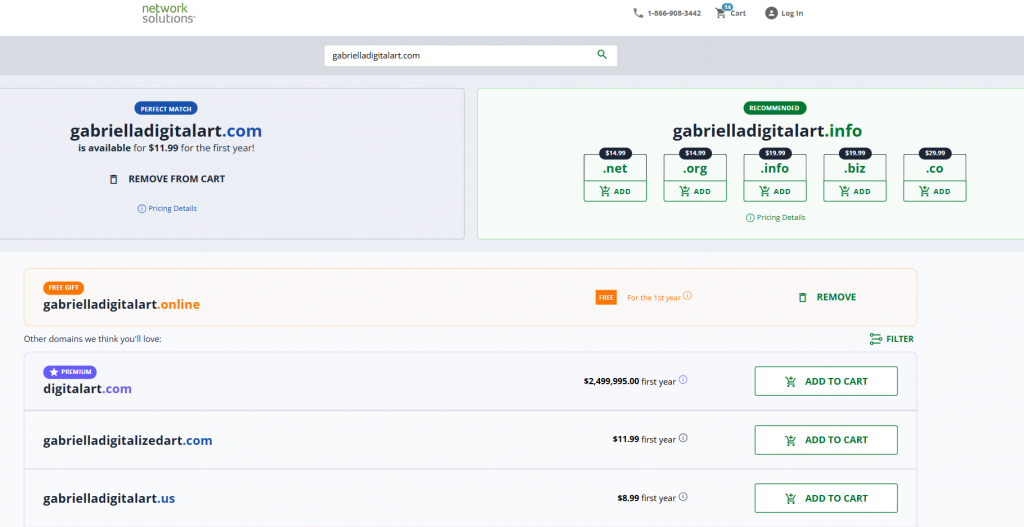
- Go to the Domain Name Search page and type in your preferred domain name into the search bar.

2. Wait for the page to load. It will show you a list of the available options for your domain name. If your preferred domain extension is unavailable, there will be a list of alternative options below. If you’ve seen anything you like, click ADD TO CART, then click CONTINUE.
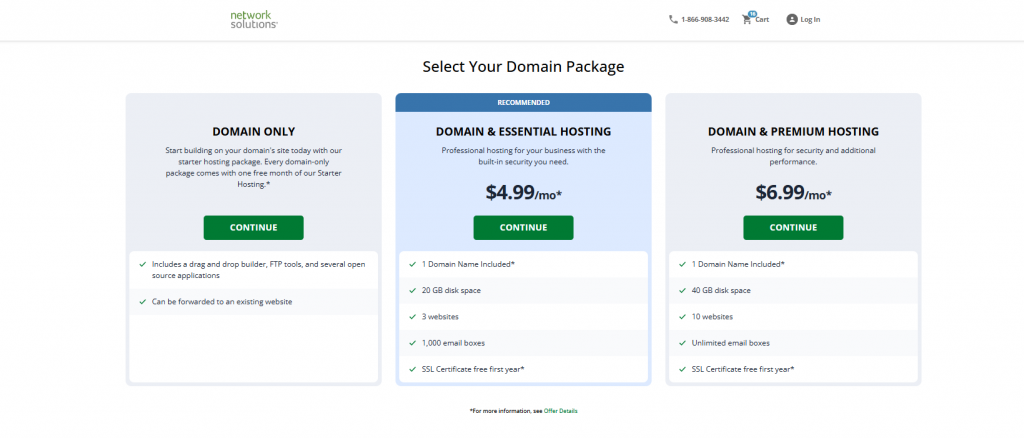
3. Select your domain package. Double-check which one suits your needs in terms of the disk space, features, and pricing.
4. You will be redirected to the Domain Add-Ons page, where you can add other tools and services like Domain Security Bundle, Domain Expiration Protection, SSL Certificate, and Google Workspace. Click CONTINUE TO CART if you’re already good with your initial chosen plan.
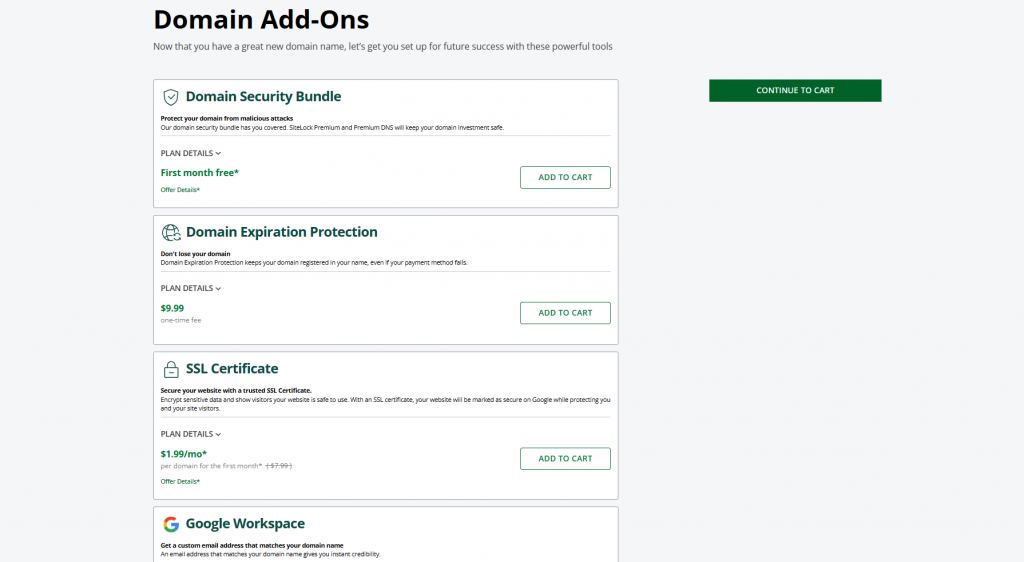
5. Provide your contact and billing information. Also, double-check all the items in your cart. If everything is good, click CONTINUE TO CHECKOUT. Network Solutions will now process your registration, and your domain name will be active within a few hours.

Step 4. Select a hosting provider
Most domain registrars also offer hosting solutions, but if your preferred one doesn’t, it’s a good idea to find a hosting provider. Web hosting is where all your website’s files and data reside, and it makes them accessible to anyone on the internet.
Choosing a reliable provider is important because it will directly impact your website’s performance and user experience. Basically, the best host should:
- Ensure the best site speed so that your website loads quickly
- Protect your website from malware, hacking attempts, and other online threats
- Have a high uptime to avoid frequent downtimes
Types of hosting
Web hosting comes in various forms that are suited for different needs:
| Hosting type | Pros | Cons | Ideal for |
| Shared | More cost-effective than other hosting types because multiple sites are sharing the cost | Unstable during peak traffic times Might get slower loading times or reduced responsiveness Can be vulnerable to security concerns | New websites, personal blogs, or small businesses with low traffic |
| Virtual private server (VPS) | More stable and scalable than shared hosting | Costs more than shared hosting Might require a higher level of technical expertise Has more limits compared to dedicated servers | Growing websites, medium-sized businesses Sites needing more consistent performance and some customization beyond shared hosting |
| Dedicated | Allows more resources to handle high traffic volume without affecting the site’s performance More levels of control, security, and customization | Pricier than the other hosting types Requires a higher degree of technical expertise | Organizations that require high level of security and performance |
| Cloud | High server uptime and speed Highly secured Scalable | It can lead to unexpected costs because of its pay-as-you-go model | Websites with fluctuating traffic |
- Shared. As its name suggests, shared hosting means multiple websites share the same server resources (e.g., RAM, CPU, and storage space).
- Virtual private server (VPS). A single physical server is partitioned into multiple isolated virtual environments. Each VPS has an allocation of resources, even though it shares the underlying physical hardware.
- Dedicated. This means your website gets an entire physical server to itself. Unlike shared hosting, dedicated hosting provides maximum control, performance, and security that is ideal for large, high-traffic websites.
- Cloud. Your website pulls resources from a network of interconnected virtual servers or “the cloud.” If one server fails, others in the network will pick up the slack.
Built-in hosting vs external hosting
Aside from external web hosting, your choice of website builder also often dictates your hosting option, which is called built-in hosting. Let’s compare the two:
- Built-in hosting. Many website builders include hosting as part of their offerings. This simplifies the process because you don’t need to manage and get a separate hosting provider.
- External hosting. Some platforms require you to choose and manage your own hosting, but this option can be difficult for beginners.
Step 5. Choose and customize your template
Once your domain is registered and hosting is in place, you can focus on your website’s visual appearance. Website builders have customizable templates and themes that design your site’s structure, including its layout, styling, and default elements.
How to choose a template that fits your brand
Selecting the right template lays the foundation for your site’s aesthetic and functionality. When choosing the best one, you should consider the following:
- Your website type. Website builders offer templates categorized by purpose. Look for templates specifically designed for your site’s type. For example, if you’re building a portfolio site, choose a template with large image galleries and clean layouts. For blogs, choose templates with easy navigation to articles.
- Your visitor’s experience. Make sure your template offers clear navigation for your visitors. Can they easily find what they need?
- Mobile responsiveness. Aside from its appearance, your template should be fully responsive and functional on all devices.
Customizing your template
Templates are a great starting point, but customization makes them uniquely yours and aligns better with your goals and branding. You can modify the following:
- Colors. Make sure your template’s color palette matches or is similar to your branding. If you don’t have a brand identity yet, use color psychology to evoke specific feelings. For example, if your blog is wellness-centered, a green or nature-themed color palette conveys health and relaxation. You can also use color palette generator tools.
- Fonts. Your choice of font affects both appeal and readability. Ensure that your fonts and typography combination match and are cohesive. Avoid using handwritten or script fonts as much as possible.
- Images. Don’t make your website text-heavy. Make sure there are visuals to break up text blocks and add designs to your pages. Use your own photos as much as possible. While it’s not illegal to use stock photos, they’re a bit generic, and it can be harder to find images that fit with your goals.
- Layout. You can rearrange the template’s elements to your liking. Some tweaks include using white space, sizing, and placements. These changes organize your content and improve readability.
Using templates is convenient, but if you want a more unique and professional website, get a custom web design service to save you time.

Step 6. Create engaging and valuable content
With your website’s foundation and design set, it’s time to focus on its most important element: your content. Content is the heart of your website: it informs, entertains, and connects with your audience.
Content types to include on your website
The content you create directly depends on your website’s type and goals. Common forms include:
Blogs
These are text-based content articles, guides, or opinion pieces that provide information, expertise, or stories. Your blog topic depends on your niche, but there are multiple blog types to consider:
| Category | Examples |
| Audiovisual | Video blogs Podcasts Slideshows Infographics |
| Educational | Guides Tutorials FAQ page Glossaries Case studies Problem and solution posts |
| Engagement and interactive | Quizzes Giveaways Surveys |
| Human interest | Interviews Success stories Profiles Expert advice Inspirational stories |
| Lists | Listicles Checklists Weekly/monthly roundups |
| News and opinion | Industry news Current events Pop culture Rants Opinion pieces Open letters Commentary |
| Reviews and comparison | Product reviews Product comparisons |
Take note that you can mix and match these blog types. For example, this travel blog published a blog about the best food in Taiwan. In essence, it is educational (a guide), but it’s also a list, review, and human interest (expert advice).

Product listings
These are product information mostly found on eCommerce business sites, including:
- Product name
- Description
- Pricing
- Images
- Videos
- Specifications
- Features
- Benefits
- Ingredients
- Nutrition facts
- What’s in the box/what’s included
- Best before/best by/expiration date
- Stock level
- FAQs
Portfolios
These are visual showcases of your creative or professional work (e.g., projects and case studies). If you have existing client testimonials, include those on your portfolio page, too.
Here is an example of a website with a well-made portfolio page:
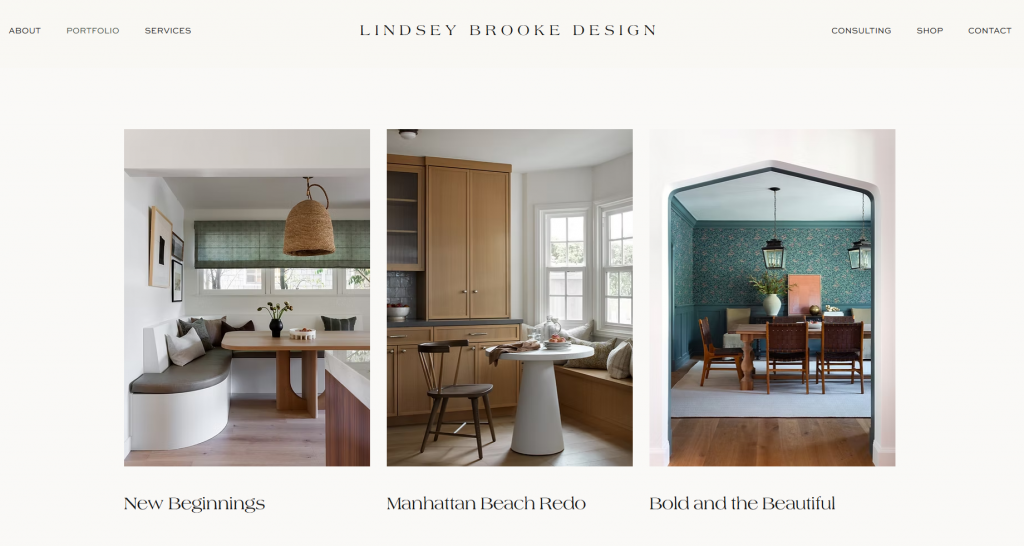
Since the website owner is an interior designer, she ensured that her portfolio featured an image gallery to showcase her successful projects.
Remember that high-quality content creation goes beyond looking good; it should be highly engaging and valuable to your website visitors. Develop a content strategy that focuses on your audience’s needs and wants.
Create a content calendar to plan and organize your publishing schedule. Decide on a realistic publishing frequency (e.g., once a week or five times a month) and stick to it.
Step 7. Implement SEO
Creating content is just the beginning. Even the most valuable content won’t benefit anyone if they cannot find it. You need SEO to improve your site’s visibility.
SEO is the process of boosting your website’s visibility in search results. It ensures your site gets found by the right people at the right time. The better your SEO, the higher your website ranks and gets organic traffic.
Although most website builders have built-in SEO tools, it pays to know their functions and how you should optimize them.
Below are a few SEO methods:
- On-page SEO
- Off-page SEO
- Keyword strategy
- Mobile optimization
On-Page SEO
On-Page SEO refers to optimizing elements directly on your website pages. You control these factors.
| Element | Purpose | How to optimize |
| Title tags | The clickable headline that appears in search results and browser tabs It accurately describes the page’s content and includes relevant keywords to attract clicks. | Keep them concise, around 50 to 60 characters Include your primary keyword |
| Meta description | A brief summary under the title tag in search results While not a direct ranking factor, a compelling description encourages users to click. | Make it enticing and concise, around 160 characters Include your primary target keyword and call to action |
| Header tags (H1, H2, H3, etc) | They organize your content by making it readable for users and understandable for search engines Your H1 tag usually represents the main topic, with H2s and H3s breaking down subtopics. | Naturally integrate relevant keywords into the headings |
| Internal links | These connect relevant pages within your website For example, a blog post about healthy recipes links to another post about meal prep tips. This helps search engines understand site structure and helps visitors navigate your site. | Link relevant pages together using descriptive anchor text |
| External links | Linking from your website to a relevant, high-authority page on a different website Example: a research article on your site links to a scientific study published on a university website. This adds credibility and provides additional value to users | Only link to high-authority sites that support your content |
| Alt text | Text descriptions that provide context for images These improve accessibility and help search engines understand image content | Describe the images accurately and concisely |
| URL | Your page’s unique web address | Make them short, descriptive, and keyword-rich Do not use a long string of numbers or irrelevant characters |
| Keywords | Terms and phrases people type into search engines to find information | Conduct thorough keyword research to find relevant terms |
| Schema markup | Code that helps search engines understand your content’s context better | Implement relevant schema using tools or plugins |
| Images | Visual elements that add to the content’s context and enhance user engagement | Compress images to reduce file size without losing quality |
| Featured snippet and AI overview optimization | Helps achieve direct answers in Google’s Featured Snippets or AI overview at search engine results pages | Directly answer common questions in your content Use clear headings, short paragraphs, bulleted lists, and tables that are easy for AI to extract |
| LLM-friendly content structuring | Helps large language models (LLMs) to extract and synthesize information for AI-generated answers and overviews | Use short, scannable paragraphs Incorporate summary points, bullet lists, and bold text for key takeaways |
Off-page SEO
Off-page SEO is focused on optimization outside your website. Although these are not directly on your site, these external signals are still important for building trust and authority. You need these to work together with on-page to rank higher in search engine result pages.
| Element | Purpose | How to optimize |
| Link building (backlinks) | The process of gaining links from other sites to your site | Create high-quality and valuable content |
| Social media marketing | Promoting content and engaging with the audience on social media platforms Although not direct ranking factors, they help drive traffic and natural backlinks | Share your website content regularly on relevant social media platforms Engage with your followers, respond to comments, and use relevant hashtags |
| Local SEO | Optimizing searches for local search results Example: Japanese-Filipino fusion restaurants in Manhattan, NY | For businesses, create a Google Business Profile Include your name, address, and phone information at all online directories and your website |
| Online reviews | Builds trust and credibility with potential customers | Actively ask satisfied clients for reviews |
Keyword strategy
As mentioned above, keywords are terms that people type into search engines. It’s important to use a strong keyword strategy to align your content with queries. Let’s discuss a few methods that will help you build a solid keyword strategy:
Use tools for keyword research
Various free tools help you discover new ideas, search volume data, and competition levels. On the other hand, paid tools like SEMrush provide more in-depth analysis that includes keyword difficulty scores.
Aim for long-tail keywords
Focus on longer, more specific phrases (e.g., “how to make a website using AI website builders” instead of just “build website”). These often have lower competition and higher conversion potential. You can find these long-tail keywords usually on Google’s People Also Ask box and the Related Searches section. Online forums are also great sources for long-tail keyword opportunities.
Understand search intent
Are they blog posts or product pages? How did they structure their headings? How did they organize their H2s?
Before creating content, it helps to understand search intent by performing Google searches. Type your target keywords and analyze the top-tanking results.
Make sure that your content matches the intent. If your target keyword’s results show that users are looking for information, then write a comprehensive guide.
Mobile optimization
Search engines also factor in mobile responsiveness in search rankings. In particular, Google has a mobile-first indexing, which prioritizes a site’s mobile version over its desktop counterpart. This move is the search engine’s way of adapting to users shifting toward mobile devices.
To optimize for mobile, you should:
- Use a responsive design that automatically adjusts your website’s layout, images, and design to fit any screen size.
- Prioritize fast page load times by compressing images, minifying CSS and JavaScript files, and leveraging browser caching.
- Make sure all interactive elements (e.g., buttons and links) are large enough for easy tapping.
- Select font sizes and line heights that are readable on smaller screens without requiring excessive zooming.
- Avoid aggressive and intrusive pop-ups that block content.
Step 8. Enhance website security
After building and optimizing your site, implement security measures to protect it and its visitors from threats. Website security is necessary for several reasons:
- Security measures protect your site from hacking, malware, and data breaches that can corrupt data and steal sensitive information
- They enhance your trustworthiness to visitors
- They preserve your brand’s reputation
- They help avoid SEO penalties
Security best practices
Implement these fundamental practices to enhance your website’s security:
- Install SSL certificates. These encrypt data exchanges between your site and its visitors, which protects sensitive information like login credentials and payment details.
- Implement secure login practices. Use complex passwords for all admin accounts, databases, and hosting panels. Enable two-factor authentication (2FA) whenever possible to add an extra layer of security.
- Perform regular backups. Automate regular backups of your website’s files and database. Store them in a secure and off-site location. Having backups is your primary defense against data loss from hacking and errors.
- Update all software regularly. Ensure your themes, plugins, and extensions are regularly updated to fix vulnerabilities.
- Use third-party services. Use automated malware scanning and vulnerability detection tools to monitor suspicious activities and potential threats. These services also offer removal or cleaning services.
Step 9. Test your website and prepare for launch
Now that your site is fully built, optimized, and secured, the next step before going live is testing. This ensures everything works as intended. Here’s a checklist of what you should do:
- Verify your website’s page load time using Google PageSpeed Insights.
- Confirm if your site displays and functions perfectly on various devices and screen sizes.
- Test your website across different web browsers to ensure consistency in user experience.
- Testing for speed, mobile optimization, and browser compatibility.
- Check whether all pages, forms, buttons, and interactive elements are functioning.
- Ensure there are CTAs that lead users to where they expect to go.
- If you sell products, test the entire purchase process through checkout.
- Check and review links. Make sure there are no broken links.
Step 10. Launch your website and start promoting it
Getting your website live involves a few technical and practical steps to ensure it’s fully operational and ready for visitors. The exact launching process depends on your hosting provider or website builder, but it typically involves pointing your domain name to your hosting server and clicking the “Publish” or “Go Live” button.
Don’t forget to create a professional email address using your domain to build credibility.
How to promote your new site
Launching is just the beginning. You need to promote your new website to drive traffic to your content. To do this, you should:
- Use social media marketing to announce your new website and content.
- Use email marketing by building an email list and sending them updates, and make sure your recipients voluntarily signed up.
- Consider paid advertising like Google Ads for immediate visibility and targeted traffic.
- Share your blog posts and other content on relevant online communities, forums, and industry-specific platforms.
Step 11. Maintain and update your website
After creating your website, you need to continuously maintain it, so it remains secure and relevant. Here’s what you should do to ensure ongoing performance and growth management:
Track your website’s analytics
Collect and observe your site’s analytics to gain insights into user behavior. This will provide insights into what’s working, what’s not, and how users engage with your content. Set up Google Analytics or a similar web analytics tool on your website to track all relevant metrics such as:
- Traffic sources
- Page views
- Bounce rates
- Click-through rates
Review your analytics data on a weekly or monthly basis.
Do regular site updates
Using your analytics, make sure to use this information to keep your website’s content and features fresh. Make sure you:
- Periodically review and update existing website content with recent information to keep it fresh for users and search engines
- Conduct regular security checks and vulnerability scans
- Apply updates to software and other site tools and features
Use content marketing
Aside from search engine optimization, content marketing is another way to attract new visitors and retain your existing audience. Since you’re already making site content, you’re already doing content marketing. But to do it effectively, you should:
- Consistently publish high-quality, SEO-optimized blog posts. This signals to search engines that your site is active and authoritative
- Diversify your content types
- Plan your content in advance and align it with seasonal events, industry trends, and your audience’s evolving needs
- Transform existing content into new formats (e.g., turn a blog post into an infographic, video script, or social media series) to maximize its reach and value
Build your professional-looking website with ease
Building a website is a long journey that transforms your ideas into a tangible online presence. From selecting your perfect domain to setting up ongoing maintenance, each step builds on the last to create a fully functional and optimized website. By methodically following these stages, you lay a strong foundation for connecting with your audience and achieving your online goals.
The website-building process is long, and it’s perfectly fine to take one step at a time. The most important thing is to start. Begin your journey today by using platforms like Network Solutions. We have everything you need to launch a website from scratch. Build your first site with us today!
Frequently asked questions
The cost of building a website in 2025 can range from free to over $100,000, and it depends on various factors such as whether you use a website builder or hire a professional team.
To create a website for free, use free website builders or content management systems (CMS) like WordPress. However, there are a few limitations to using free website builders, such as limited design flexibility and lack of a custom domain name.
The time it takes to create a website can range from a few hours to several months, depending on your website’s complexity, features, design, and development method (building by yourself or hiring a developer)
There is no definite best website builder, and it depends heavily on your needs and expertise. For example, if you’re looking for an all-in-one platform with easy-to-use drag-and-drop features, Network Solutions’ AI website builder is one of the best choices along with Wix. If your eCommerce is your priority, Shopify is a viable option.
Website builders and CMS are both tools for creating a website, but they differ in technical complexity. Website builders are often easier and more beginner-friendly, while CMS requires more technical knowledge.
Yes, you still need a website even if there’s social media. Although social media offers greater reach, you don’t have direct control over your content and audience. Websites also provide better customization and credibility.
A website is also a long-term investment, while social media platforms are at risk of disappearing or prone to algorithm changes.
Common mistakes to avoid when building a website include neglecting user experience (poor navigation, slow load times, and confusing layouts), ignoring mobile optimization, and skipping SEO.

