Key takeaways:
- You can set up email with domain in just a few steps and create a professional email address without technical experience.
- Connecting your custom email address to platforms like Gmail or Outlook makes it easier to manage and use your email every day.
- Using a domain-based email boosts trust, improves security, and helps customers take your business more seriously.
A professional email address that matches your domain name helps your business look more credible. It also gives customers a clearer way to recognize your brand, especially when your business uses a branded email address like [email protected].
If you already have a domain name, you can use it to create an email address that helps customers recognize your business every time you reach out. We’ll walk through the main setup steps, including how to create your email address, update your DNS records, connect it to Gmail, Outlook, Apple Mail, or mobile email apps, and troubleshoot common setup issues along the way.
Find the perfect domain
Ready to register a domain name? Check domain availability and get started with Network Solutions today.
Why use a domain-based email address
Creating a business email address that matches your domain name offers practical benefits that personal email accounts can’t provide.
Here’s why it’s worth making the switch:
- Professionalism and trust: A custom domain email makes your business look more established than a free email address. It helps customers feel more confident that they’re communicating with a real business.
- Team organization: You can create role-based addresses like [email protected], [email protected], or [email protected]. This helps route messages to the right person or team and keeps business communication easier to manage.
- Security features: Many professional email services include spam filters, encryption, and phishing protection. These help receiving servers verify your email identity, which supports spam filtering and improves deliverability.
- Brand visibility: Every message you send includes your domain name, which keeps your business visible in customers’ inboxes. This reinforces brand recognition, making it easier for customers to remember your website.
For a deeper look at why professional email matters, see our guide on why your business needs a professional email address.
What you need to get started
Before you set up email with your domain, make sure you have these three things ready:
- A domain name
- An email hosting provider or service
- Access to your domain’s DNS settings
Together, these let you create your email account, connect it to your domain, and make sure messages reach the right inbox.
Domain name
A domain name is your website address, such as yourbusiness.com. You must already own a domain before setting up email. If you don’t have one yet, you can register a domain with us. Your custom email address will use this domain (e.g., [email protected]), so customers can connect your messages back to your business.
Email hosting provider or service
An email hosting provider stores your messages, manages your mailbox, and connects your email account to a mail server so you can send and receive messages. This can be a dedicated email hosting service, a platform like Google Workspace or Microsoft 365, or email included with some hosting plans. For help comparing providers, check our email account setup guide.
Access to your domain’s DNS settings
Your DNS records control where messages are sent. To set up email, you’ll need access to your domain registrar’s dashboard to add or update records such as MX, SPF, and DKIM. These records help route your email correctly and will be explained in the setup steps below.
How to set up an email account with your domain name
Once your domain name, email hosting, and DNS access are ready, you can start creating your email account. The exact dashboard and steps may be different depending on your email provider or domain registrar, but the setup process usually follows the same basic steps:
- Log in to your email hosting dashboard.
- Create your custom email address.
- Update your domain’s DNS records.
- Save and test your new email address.
- Set up additional email addresses (optional).
Step 1: Log in to your email hosting dashboard
Your email hosting provider is where you’ll create and manage your email accounts. This might be part of your web hosting service (like cPanel), or a separate platform like Google Workspace or Microsoft 365. Once you’re logged in, look for the email or mailbox section.
Step 2: Create your custom email address
Choose the email name you want to use, such as [email protected], [email protected], or [email protected]. Add it through the provider’s control panel by filling out the form, selecting your domain from the dropdown (if required), and setting a strong password. Some platforms may also let you set mailbox size or other preferences here.
For a more organized business email setup, create role-based addresses for different functions, such as support@ for customer questions or billing@ for invoices.
Step 3: Update your domain’s DNS records
This step links your email to your domain name and ensures your messages are routed through the correct mail server. To do this, you’ll need to update your DNS records through your domain registrar dashboard or control panel.
You’ll need to:
- Add MX records to route email through your provider’s servers.
- Add SPF records to help prevent spammers from forging your domain.
- Add DKIM records to protect your emails with a digital signature.
- Add a DMARC policy to specify how receiving servers should handle unauthenticated messages.
Your email provider will give you the exact values for each record type, so avoid guessing or copying values from another setup. When you add these records, your domain registrar may ask for details like Host or Name, Value or Points To, Priority for MX records, and TTL. These fields tell DNS where the record applies, what value to use, and how the record should behave once it’s saved.

This accuracy matters because DNS records do more than route messages. They also help protect your email domain from misuse.
Anthony Matera, our Senior Director of Email Products, explains: “Ensure SPF, DKIM, and DMARC records are set up correctly in your domain settings to prevent your domain from being used for phishing.” When configured correctly, these records work together to support spam protection, verify your messages, and reduce the risk of spoofing.
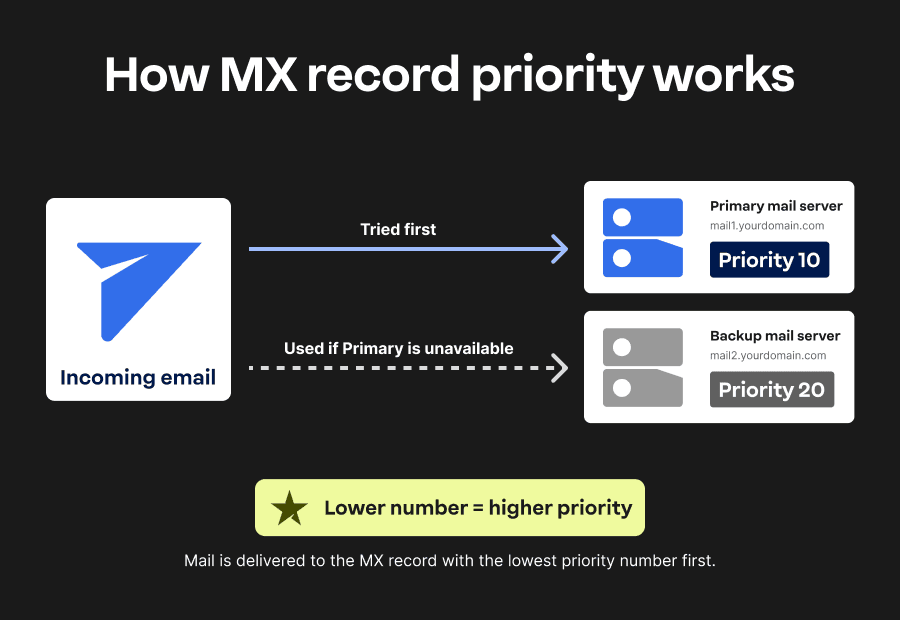
Once you’ve entered the values from your email provider, you may notice priority numbers beside your MX records. These values tell servers which mail server to try first. A lower number has a higher priority, so an MX record with priority 10 will be used before one with priority 20. Providers often include multiple MX records so email can still be delivered if the primary server is unavailable.
Another field you may see is Time to Live (TTL). This controls how long DNS servers cache your records before checking for updates again. A shorter TTL, such as 300 seconds, tells DNS servers to check for updates more often, so changes can appear sooner. A longer TTL, such as 3600 seconds, tells DNS servers to keep the record longer before checking again.
After saving your records, give the changes time to update across the internet. DNS changes may appear within an hour, but full propagation can take 24 to 48 hours. While you wait, you can use DNS lookup tools like MXToolbox or Google Admin Toolbox to check whether your MX or TXT record changes are already visible online.
Step 4: Save and test your new email address
Once the DNS changes are saved, wait about an hour for them to update (although it can sometimes take up to 24 hours). Then, log in to your new email address and try sending and receiving test messages to make sure everything works.
Step 5: Set up additional email addresses (optional)
If you have a team, you can create additional addresses, such as sales@, billing@, or personal inboxes like [email protected]. Most email platforms let you manage multiple mailboxes from one dashboard, so you can keep each business email account organized as your needs grow.
Our Professional Email plans support multiple mailboxes and can scale with small businesses as they add more people, roles, or customer touchpoints. Every domain name purchase also includes free apps like Link in Bio, Social Marketing App, Marketing Calendar, Customers App, and Coming Soon Page to help your business connect with customers and break through online.
Give every part of your business a professional address.
Set up role-based inboxes, manage multiple mailboxes, and keep your business communication organized as you grow.

How to connect your domain email to Gmail, Outlook, and other email clients
Once your custom email address is working, you may want to check it from an inbox you already use. Most email providers let you connect your domain email to clients like Gmail, Outlook, Apple Mail, iOS Mail, or the Gmail app on Android. This helps you keep your professional email accessible across the tools and devices you use every day.
Why use email clients for your domain email?
Connecting your domain email to an email client gives you more flexibility in how you manage your email account.
- You can use a familiar inbox while keeping your custom email address professional.
- You can manage personal and business messages in one place.
- You don’t have to log in to a separate hosting dashboard just to check mail.
- Many email clients offer mobile apps, so you can stay connected while working from your phone or tablet.
Using email clients lets you keep the branding benefits of a domain-based address while using the inbox tools you already know.
Connect your domain email to Gmail
Step 1: Sign in to your Gmail account. Use the Gmail inbox you want to connect your domain email to.
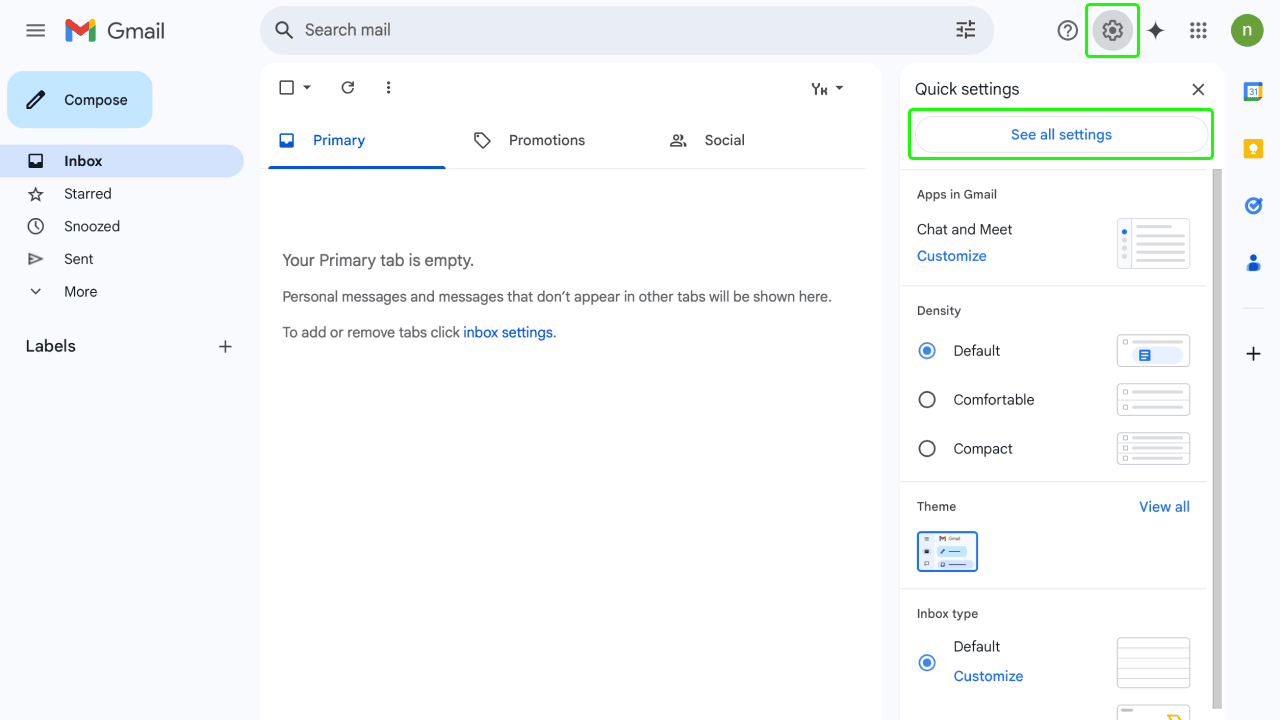
Step 2: Go to your Gmail settings. Click the gear icon in the top right, select See all settings, then go to the Accounts and Import tab.
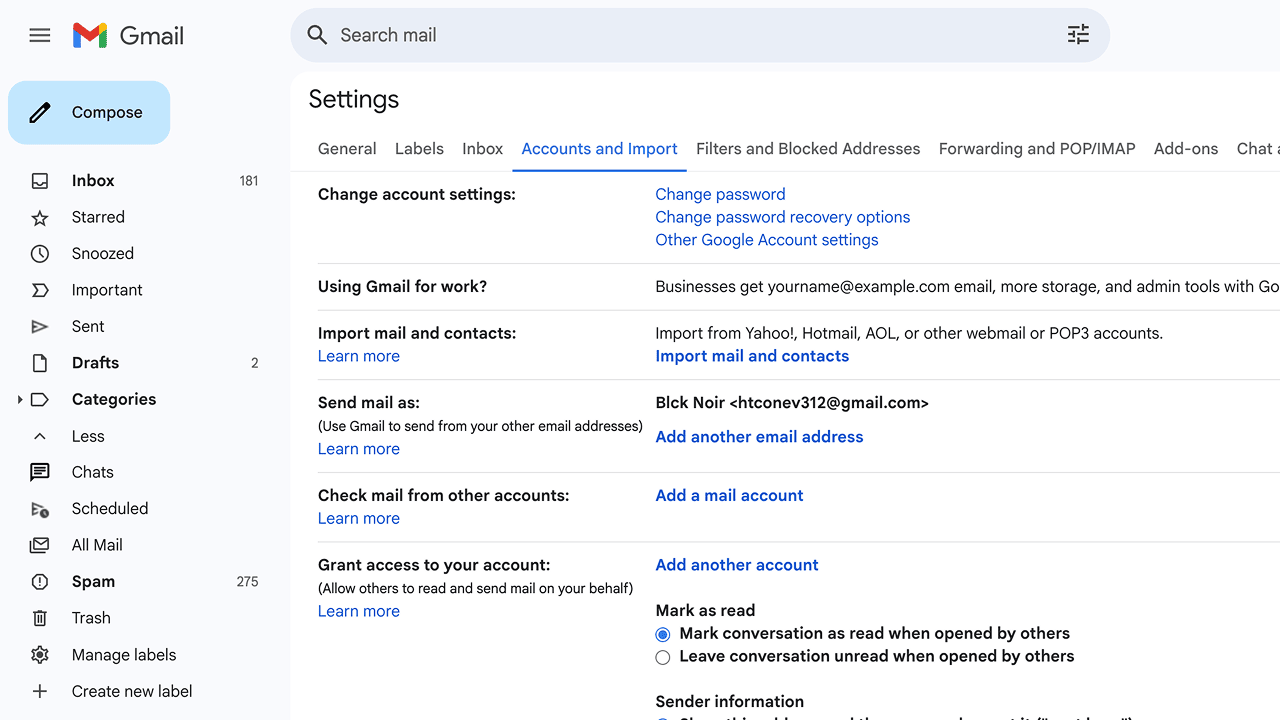
Step 3: Add your custom email address. Under Send mail as, click Add another email address. Enter your name and domain email (like [email protected]), then click Next Step.
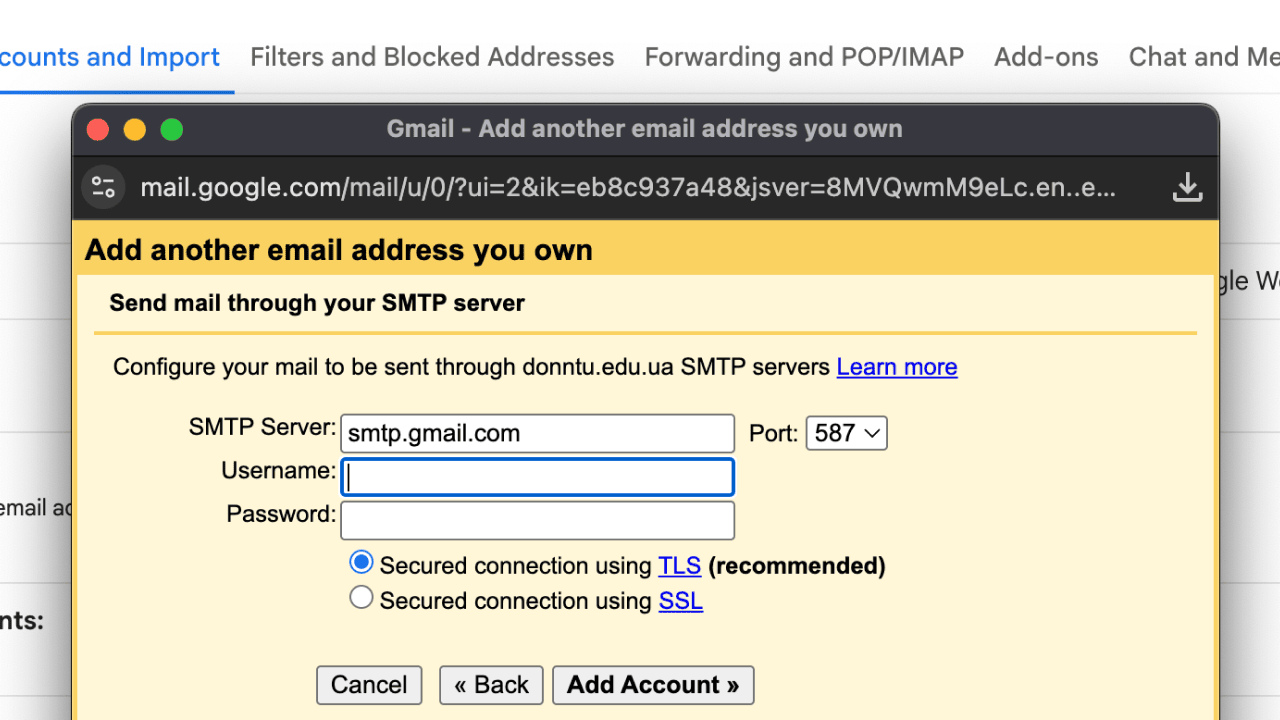
Step 4: Enter your email provider’s SMTP settings. Gmail will ask for your SMTP server info, port number (usually 465 or 587), and your login details. Use the exact settings provided by your host. Make sure to check the option for a secure connection (SSL/TLS).
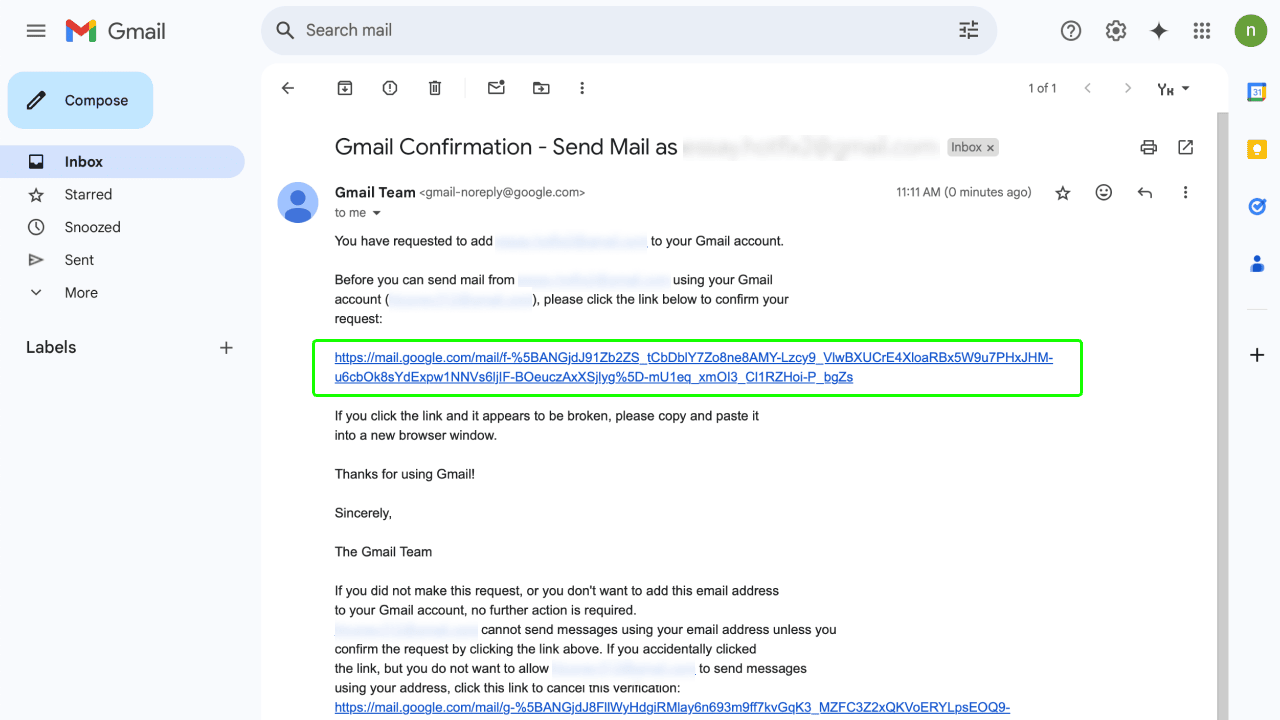
Step 5: Confirm and verify. Google will send a verification email to your domain inbox. Click the link in that email to confirm. Once verified, you can send mail from Gmail using your domain email address.
Optional: Receive emails inside Gmail. To check incoming messages from your domain email, go back to Accounts and Import and click Add a mail account under Check mail from other accounts. Enter the POP3 settings provided by your email host.
Connect your domain email to Outlook
- Open Outlook and go to Account Settings: In the File tab, choose Account Settings, then click New to add a new mailbox.
- Enter your custom email details: Type in your name, your domain email address, and the password you created.
- Choose manual setup if needed: If Outlook doesn’t automatically detect your provider, select Manual setup and enter the IMAP/POP and SMTP settings from your host.
- Test and finish setup: Outlook will test the connection. If everything looks good, it will confirm and add your domain email account to the app.
Connect your domain email to Apple Mail
- Open Apple Mail and add an account: Open the Mail app on your Mac, go to Mail > Add Account, then choose Other Mail Account.
- Enter your custom email details: Type in your name, your full domain email address, and the password you created for that email account.
- Add server settings if needed: If Apple Mail doesn’t detect your settings automatically, enter the IMAP and SMTP mail server details from your email provider. This may include server names, ports, and SSL/TLS settings.
- Verify and finish setup: Once Apple Mail confirms the connection, make sure Mail is selected, then finish the setup. The process is similar across recent macOS versions, but mobile setup uses a different flow, which we’ll cover in the iOS section.
Set up your domain email on iOS (iPhone/iPad)
- Open Mail settings: On your iPhone or iPad, go to Settings > Apps > Mail > Mail Accounts.
- Add your account: Tap Add Account. If your email provider is listed, choose it and follow the prompts. If not, tap Add Other Account, then Mail Account.
- Enter your email details: Add your name, full custom email address, password, and a description for the email account.
- Add server settings if needed: If Mail can’t find your settings automatically, choose IMAP or POP, then enter the incoming and outgoing mail server details from your email provider.
- Save and test: Tap Save to finish, then open Mail to confirm your professional email can send and receive messages.
Set up your domain email on Android
- Open the Gmail app: On your Android phone or tablet, open Gmail, tap your profile icon, then tap Add another account.
- Choose your account type: If your provider is listed, follow the prompts. If not, choose Other to add your custom email address manually.
- Enter your email details: Type your full email address, choose Personal IMAP or Personal POP3 if prompted, then enter your password.
- Add server settings if needed: Enter the incoming and outgoing mail server details from your email provider.
- Finish setup: Follow the remaining prompts to add the email account. Steps may vary slightly depending on your Android version and Gmail app updates.
Post-setup email configuration
Once your email account is working, you can fine-tune it for daily use. These next steps help make your professional email easier to manage, more consistent with your brand, and better suited for customer communication.
- Setting up email aliases
- Configuring email forwarding
- Creating professional email signatures
- Enabling two-factor authentication (2FA)
Setting up email aliases
An email alias is an alternative email address that routes messages to your primary email account. Think of it as a forwarding nickname for your inbox, so you can use different addresses without creating separate mailboxes.
For example, you can use [email protected] for sales inquiries, [email protected] for customer questions, and [email protected] for general information, but all three can deliver to [email protected]. To set one up, check your email hosting provider’s control panel for an Aliases or Email Forwarding section.
Configuring email forwarding
Email forwarding automatically sends copies of messages from one email account to another address. For example, you can forward your professional email to a personal inbox, send backup copies to another account, or route messages to a teammate who handles certain requests.
Most providers let you manage forwarding through the email hosting control panel. Depending on your settings, you may be able to keep copies in the original inbox or forward messages without storing them there.
Creating professional email signatures
A professional email signature gives every message a professional sign-off with your contact details and brand information. For a business email, include your name, title, company name, phone number, website, and optional social links.
You can usually create one in your email client settings, such as Gmail, Outlook, or Apple Mail, or through your webmail interface. Keep the design simple so your signature loads properly and displays well across different inboxes.
Enabling two-factor authentication (2FA)
Two-factor authentication adds an extra layer of security to your email account by requiring a second verification step beyond your password. The verification could be a code sent by SMS, a prompt from an authenticator app like Google Authenticator or Authy, or backup codes you can use if you lose access to your device.
2FA helps prevent unauthorized access even if your password is compromised. You can usually enable it through your email hosting provider’s security settings. For more ways to protect your professional email, see our email account setup guide.
Troubleshooting tips and common setup issues
If your email isn’t working the way it should, start with the basics. Most setup issues come from incorrect DNS records, login details, or mail server settings. Here are a few common problems to check and how to fix them.
Issue 1: Email isn’t sending or receiving
Make sure your domain’s MX records are set up correctly. These records tell the internet where to deliver your email. Messages won’t go through if they’re missing or pointing to the wrong place. You can usually find the correct MX records in your email provider’s setup guide.
Issue 2: You’re getting an error when logging in
Double-check that you’re using the full custom email address and the correct password for your email account. If you just created the account, try resetting the password from your email provider’s dashboard.
Errors such as “Authentication failed” or “Invalid credentials” usually indicate an incorrect password. “IMAP/SMTP connection refused” may mean the port or mail server address is incorrect, while “Server not found” often comes from a typo in the server name.
Also, make sure you’re using the correct login URL or app settings from your provider.
Issue 3: Messages are going to the spam folder
This often happens when SPF, DKIM, or DMARC records are missing from your DNS records. These records are usually added as a TXT record and help receiving servers confirm that messages from your email domain are legitimate.
- Sender Policy Framework (SPF) authorizes which mail servers can send email from your domain.
- DomainKeys Identified Mail (DKIM) adds an encrypted signature to prove your email is authentic.
- Domain-based Message Authentication, Reporting, and Conformance (DMARC) specifies how receiving servers should handle messages that fail SPF or DKIM checks.
Together, these records support spam protection, build sender reputation, and help messages pass through spam filters. Check your email provider’s setup instructions for the correct values. Adding these records can improve deliverability, but new domains may still need time to build a trusted sending history.
Issue 4: You connected to Gmail or Outlook, but it’s not syncing
If you added your email account to Gmail, Outlook, or Apple Mail and it’s not syncing, check the incoming and outgoing mail server settings. Make sure the server names, ports, and security options, such as SSL or TLS, match your provider’s exact instructions. A small typo or the wrong port can prevent messages from being sent, received, or updated properly.
Issue 5: DNS changes haven’t taken effect yet
DNS updates can take some time. While many changes go live within an hour, some can take up to 24–48 hours to fully update. If everything is set correctly and it’s still not working, waiting a little longer often helps.
Having issues beyond these? Most email providers have support articles that walk you through more specific problems. If you have a domain with us, you can also contact support or check the help center for email-related topics.
Frequently asked questions
Yes, but your domain needs to be set up correctly. You’ll need to add DNS records like SPF, DKIM, and MX to verify that your domain is allowed to send email. Without them, your messages might end up in spam folders or get blocked.
You can run your own server, but it takes a good deal of technical know-how. Most business owners choose hosted email services because they’re easier to manage and offer built-in security.
Start by choosing an email hosting provider. Once you create your mailbox (for example, [email protected]), you’ll need to connect your domain by updating its MX records. If you don’t have a provider yet, we offer secure and reliable business email plans that make this process simple.
Yes. You can connect your custom email address to Gmail so you can send and receive messages from a familiar inbox. You’ll need the server settings from your email provider, and in some cases, you may need to add the address through Gmail’s Accounts and Import settings.
Creating the email account may only take a few minutes, but DNS updates can take longer. Some changes appear within an hour, while full propagation can take 24 to 48 hours.
IMAP keeps your email synced across devices, so messages appear the same whether you check them from a phone, laptop, or webmail. POP3 downloads messages to a single device and may not sync changes across devices. For most business email setups, IMAP is the better option.
Yes. You can create multiple addresses with one domain name, such as [email protected], [email protected], or [email protected]. This helps organize customer messages by team, role, or business function.
The cheapest option is usually to use a domain you already own and pair it with an affordable email hosting plan. Some hosting or domain plans may include basic email features, but a dedicated professional email plan usually gives you better reliability, storage, and support.
Free options are limited because you still need to own the domain name and have a service to host the mailbox. Some providers include free email forwarding or limited email features with a domain or hosting plan, but a full inbox for sending and receiving mail usually requires an email hosting service.
Need help setting up your domain email?
If you’re ready to switch to a custom email address but still have a few questions, you’re not alone. It’s easy to get stuck between DNS records, email hosts, and setup instructions, especially when you’re connecting your domain name to a new email account. Setting up a domain-based email is easier with the right guidance, and we’re here to walk you through it.
You can explore our help center for step-by-step tutorials or check out our business email plans to find a professional email setup that fits your needs. Since your domain name is what powers your custom email address, keeping your domain and email together can make setup and management easier.
If you still need a domain, you can register one with us or transfer your existing domain to manage everything in one place. Every domain purchase also includes free apps like Link in Bio, Social App, Marketing Calendar, Customers App, and Coming Soon Page to help your business break through online. From single inboxes to full teams, we’ll help you build a professional email experience from the ground up.