Key takeaways:
- It’s important to prepare your domain before transferring it from Namecheap. Ensure that 60 days have passed since your domain’s initial registration or most recent transfer. Additionally, disable your domain’s Registrar Lock and other privacy features.
- Transferring your domain involves getting an authorization code from your previous registrar and providing it to the new one. You should copy the code exactly as it is because it’s case-sensitive and shouldn’t have unnecessary spaces.
- After the transfer, double-check a few things to ensure your website functions correctly. This includes updating your nameservers to point to the new registrar’s servers. You might also consider your new registrar’s other domain security features.
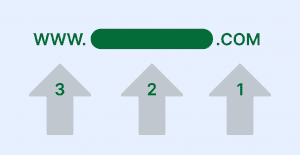
Switching domain registrars doesn’t have to be confusing. If you registered your domain name with Namecheap and you’re considering transferring to a new domain registrar, you’ve come to the right place.
This guide will take you through the important steps to complete a Namecheap domain transfer. We’ll also cover initiating a transfer request to a new registrar and a post-transfer checklist.
Move your domain to a setup built for what’s next.
Bring your domain to Network Solutions for a simpler experience, stronger security features, and tools that support your business as it grows.

What to do before transferring a domain from Namecheap?
Disclaimer: The process(es) described here are current at the time of writing but may change without prior notice.
Checking a few things before starting the domain transfer process helps you avoid issues along the way. Go through the checklist below to prepare your Namecheap domain for transfer:
- Ensure your domain is more than 60 days old from initial registration to follow the Internet Corporation for Assigned Names and Numbers (ICANN) Transfer Policy.
- Make sure 60 days have passed after a recent domain transfer between registrars.
- Check whether the registrant email address associated with the domain you’re transferring out is up to date.
- Disable temporarily any domain privacy protection feature.
Note: If you’re unfamiliar with some of these terms, our domain glossary can help clarify key domain and hosting concepts mentioned in this guide.
Follow these steps to disable the domain privacy service on your Namecheap domain:
- Log in to your Namecheap account.
- Click Domain List in the left sidebar and hit the MANAGE button next to the domain.
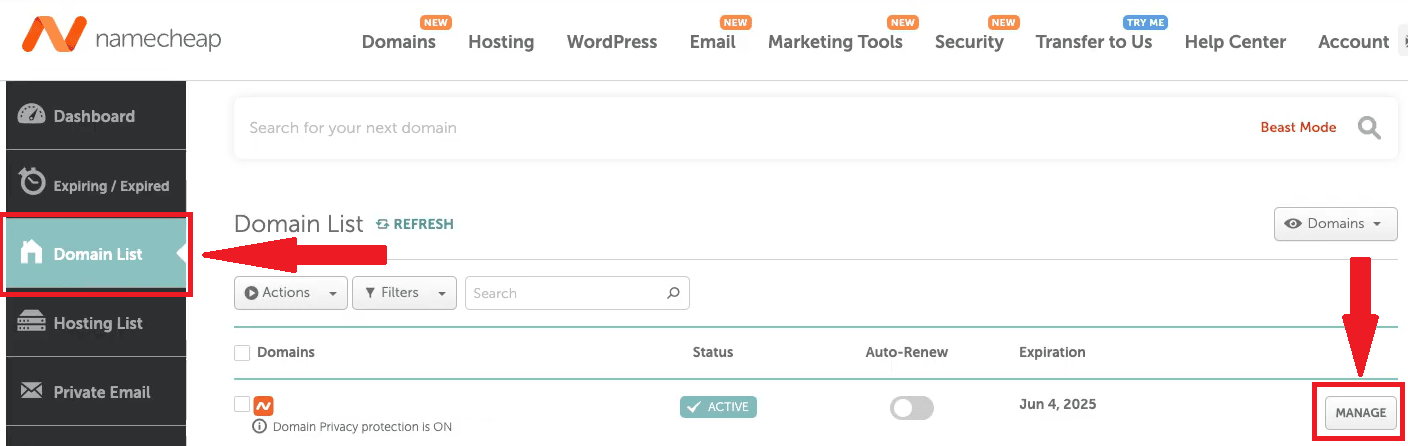
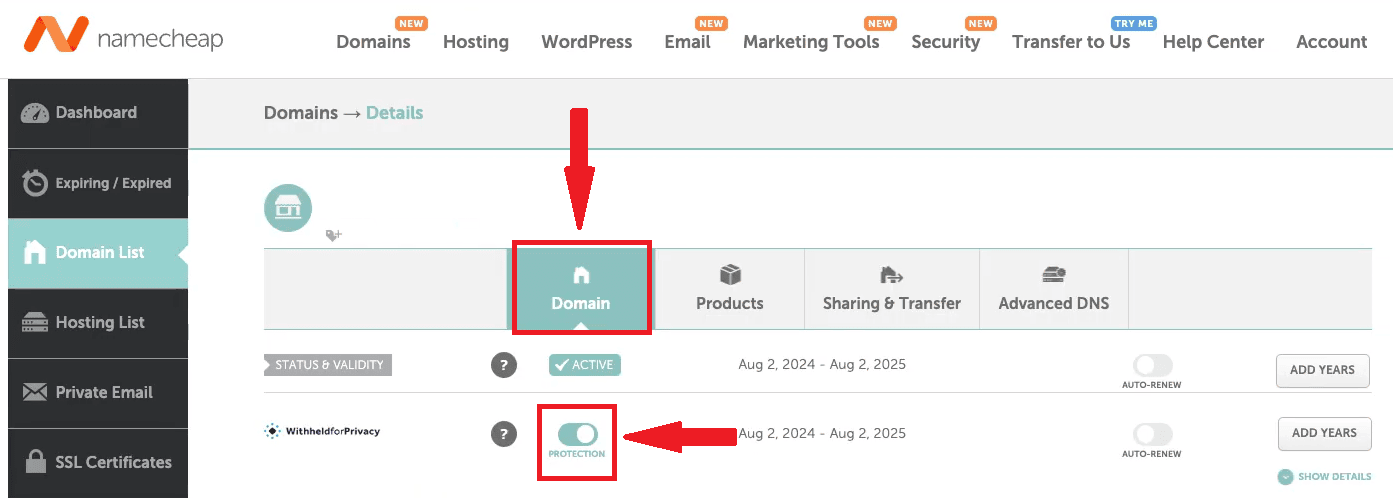
- Toggle the PROTECTION switch under the Domain column to disable the feature.
How to transfer a domain from Namecheap to a new registrar
After ticking off all items in the previous checklist, it’s time to start the domain transfer process. This section covers two parts: transferring a domain away from Namecheap and transferring it to a new domain registrar.
Here’s how to transfer a domain from Namecheap:
- Unlock the domain
- Get the authorization code
- Initiate a transfer request at the new registrar
- Provide the Auth Code to the new registrar
- Wait for your Namecheap domain transfer confirmation
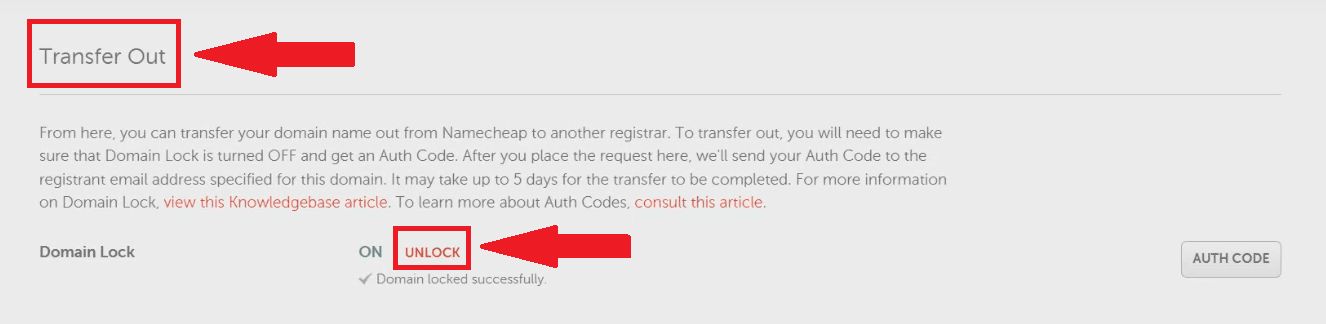
Step 1: Unlock the domain
A domain lock (also called Registrar Lock) is a security feature that prevents unauthorized actions on your domain, including transfers and changes to contact information. Namecheap enables this feature on its users’ domains by default.
Follow these steps to unlock your domain:
- In the same Domain Management window where you turned off domain privacy, click Sharing & Transfer.
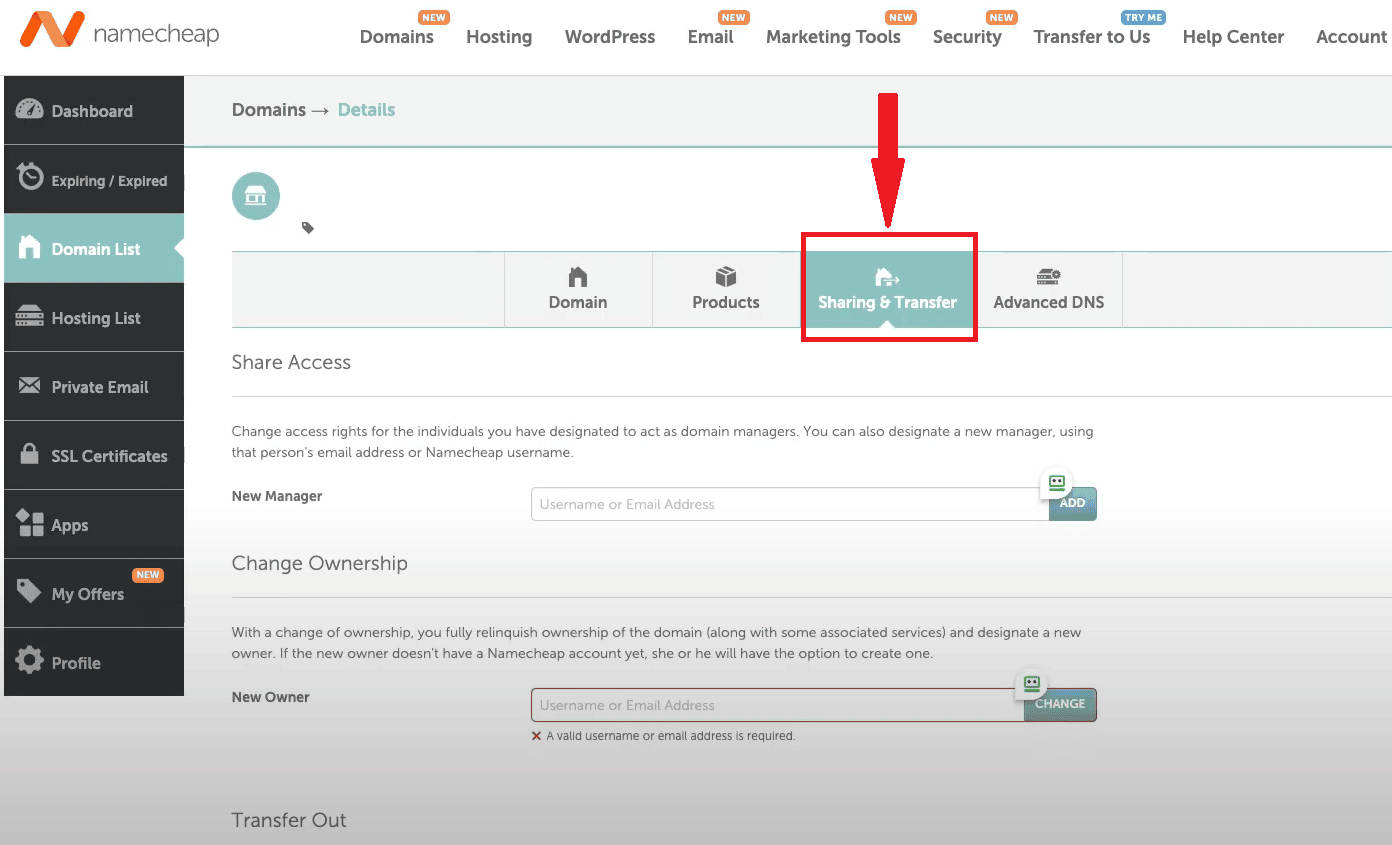
- Scroll to the bottom of the page and find the Transfer Out section. Then, hit UNLOCK next to the Domain Lock feature.
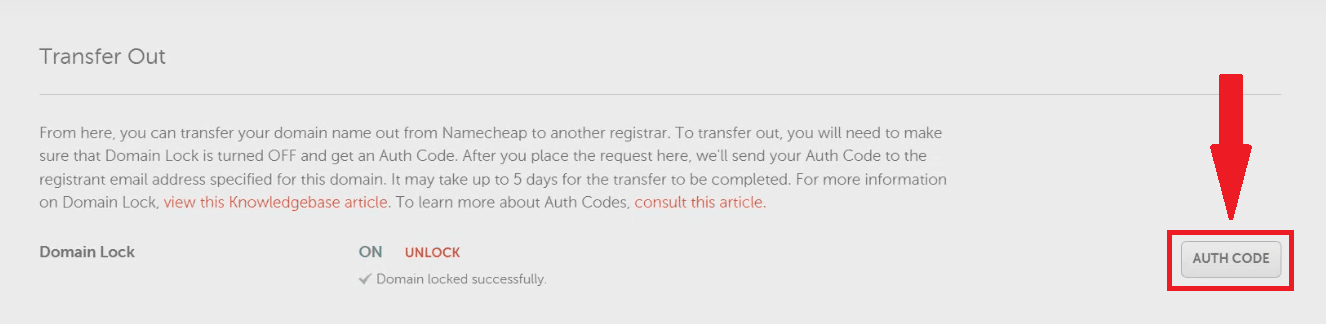
Step 2: Get the authorization code
ICANN requires a domain authorization code (also known as an Auth Code) to process a domain transfer. Registrars assign these unique Auth Codes to domain names at the time of registration.
Here are the steps in obtaining your domain’s Auth Code:
- On the same page where you unlocked your domain, click the AUTH CODE button at the bottom-right of the screen.
- A Get Auth Code window will pop up. This prompt will ask you to provide a reason for the transfer. Select an option and click Send Code.
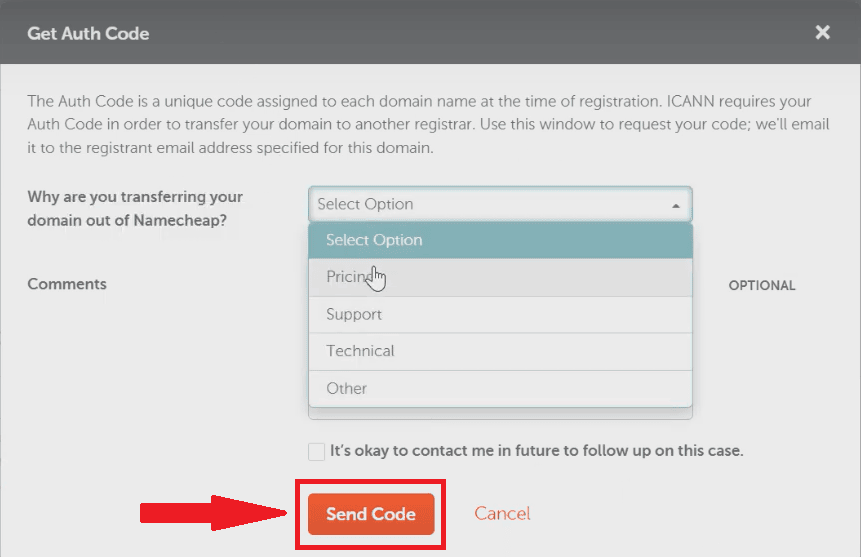
- Namecheap will then send the Auth Code to the domain’s registrant email address. You’ll use this code for the next part of this section, which is transferring your domain to a new registrar.
Step 3: Initiate a transfer request at the new registrar
Initiating a transfer request at a new registrar might vary slightly across providers. For this part, we’ll use Network Solutions’ process to give you a general idea of how to transfer a domain to a different registrar.
- Go to Network Solutions’ Domain Transfer website page, and enter your domain name in the field provided. You can transfer multiple domains (up to 200) at once by separating them with commas.
- Type the domain name(s) you wish to transfer to Network Solutions, and click the Get Started button.
- After entering your domain, you’ll see an order summary with the details of your transfer. The domain transfer fee is $10.99*, which includes the first-year fee.
At this stage, you can choose to extend your domain registration by adding extra years. Simply select your preferred renewal term from the dropdown, though keep in mind that additional years will increase the total cost.
You may also notice promotional discounts applied automatically. An ICANN fee (usually around $0.40*) will be added to your final amount as well.
Once everything looks good, review your order thoroughly before clicking the Continue to checkout button.
- You’ll be redirected to the next page, where you’ll need to create an account with Network Solutions. After completing the form, hit Submit payment. This purchase will serve as your domain transfer request.
Disclaimer: Price is current as of the time of writing. Please refer to Domain Transfer for up-to-date pricing and terms and conditions.
Step 4: Provide the Auth Code to the new registrar
Expect an email from Network Solutions requesting your domain’s authorization code. Once received, go to the link in the email and enter the Auth Code to begin the domain transfer.
A domain transfer typically takes five to seven days to complete. This processing time may vary depending on factors such as your previous registrar’s promptness in releasing your domain.
Please note that country-code domains such as .uk, .is, .es, .ch, .li, .de, .fr, and .to may have different requirements and processes.
Step 5: Wait for your Namecheap domain transfer confirmation
When transferring a domain from Namecheap, you can’t monitor its progress in real-time. However, Namecheap will send a notification email to let you know whether the domain transfer was completed or rejected.
It’s best to keep an eye out for emails from both your previous and new registrars. This way, you can act promptly should they require you to complete additional steps for the domain transfer.
Find the perfect domain
Ready to register a domain name? Check domain availability and get started with Network Solutions today.
Post-transfer and troubleshooting tips for domain transfers
A domain transfer doesn’t technically end with a confirmation email. You’ll need to take a few more steps to ensure you can use your domain with your new registrar seamlessly.
Consider this general post-transfer checklist and troubleshooting tips for a successful Namecheap domain transfer:
Domain post-transfer checklist
- Update nameservers: When you change hosting providers, update your domain’s nameservers to point to the new provider’s name servers so visitors can access your site at its new location. If you’re only changing registrars, make sure your nameservers are still set to your hosting provider’s nameservers so your website continues to work as expected.
- Re-enable domain privacy features: Enable the Registrar Lock once the transfer is completed. If your new registrar offers other domain security features, take advantage of those, too.
- Cancel domain-related services from the old registrar: Don’t forget to cancel services from your previous registrar. These could include web hosting or a custom domain email address.
- Test website functionality: Thoroughly test your website to ensure all pages, links, and forms work as they should. Also, check if your email service can send and receive emails properly.
Haven’t figured out which registrar to transfer to yet? Our Namecheap vs. Network Solutions comparison is a good starting point for your research.
Troubleshooting tips
- For incorrect Auth Code: Backtrack and check if you copied the code exactly. The Auth Code is case-sensitive and shouldn’t have any leading or trailing spaces. If the code still doesn’t work, request a new one from your current registrar.
- For missed email communications about the transfer: Ensure you use the same email address for all communications regarding the domain transfer. This means that the email address associated with your domain registered with your current registrar should be the same one you use to make an account with your new registrar.
- For Registrar Hold: Your current registrar might place your domain on hold for various reasons, such as billing issues, legal disputes, or failure to respond to inquiries. Contact the registrar to determine the reason for the hold and resolve any outstanding issues.
- For technical issues at either registrar: Occasionally, technical glitches or system outages at either the current or the new registrar can temporarily prevent or delay a transfer. Contact the support teams of both registrars to inquire about any known issues and keep them informed of the situation.
Frequently asked questions
The length of a domain transfer takes five to seven days to complete. The exact timeframe will still depend on factors like Namecheap’s promptness in releasing your domain.
Another factor that can affect the transfer is your timeliness in responding to emails from your current and new registrars.
It usually takes up to seven days to complete a domain transfer because three entities coordinate with each other. These are your current registrar, the ICANN, and your new registrar. All these entities follow their own protocols to ensure security and prevent unauthorized transfers.
Yes, you can speed up a domain transfer. One thing you can do is request your current registrar to manually approve your outgoing transfer. You can also inquire with your new registrar about expedited transfer services for a fee.
No, Namecheap doesn’t charge you to transfer your domain out. However, you’ll typically need to pay your new registrar the standard transfer fee, plus other charges associated with your domain.
No, your website won’t typically experience downtime during a domain transfer. Domain transfers only involve changing domain registrars, not hosting providers. While the transfer is ongoing, your website’s files are still stored on the same server, so it remains accessible to visitors.
However, you won’t be able to change where your domain points (e.g., update the nameservers) while the transfer is in progress. If you plan to switch hosting providers or make DNS changes, it’s best to do so before starting the transfer.
If you’re unsure how domains and servers work together, it helps to understand the difference between a hostname and a domain name.
The 60-day domain transfer rule states that you can’t transfer your domain to a new registrar if it’s within 60 days of your last transfer. ICANN created this rule to prevent accidental or fraudulent transfers.
Some registrars might automatically cancel the transfer request if the domain expires before the process is complete. In this case, you’ll likely need to renew the domain with the original registrar before attempting the transfer again. We highly recommend initiating the transfer well before your domain’s expiration date. To be on the safe side, start the transfer process a month before.
Recap of how to transfer your Namecheap domain
This section covers a quick checklist for transferring your domain from Namecheap. Use this handy guide to help you during the transfer process:
- Unlock the domain.
- Get the Auth Code.
- Initiate a transfer request at the new registrar.
- Provide the Auth Code to the new registrar.
- Wait for the domain transfer confirmation.
Transfer your domain name to Network Solutions today
Transferring a domain from Namecheap is straightforward. It involves preparing your domain for transfer, disabling the Registrar Lock, getting the Auth Code, initiating the transfer with a new registrar, and confirming the request through email.
This guide has provided everything you need to make your Namecheap domain transfer as smooth as possible.
The next step is choosing a provider that supports your domain long term. If you want full control, stronger protection, and fewer issues down the line, it’s worth making the switch to a platform built for it.
We give you that foundation with Domain Privacy + Protection, Domain Expiration Protection, and Trademark Protection with AdultBlock, so your domain stays secure.
Make the switch now.