
You updated your domain settings. Now you’re waiting — nothing happens. This is DNS propagation at work. It’s simply the delay between making a change to your domain records and those changes being visible worldwide.
Let’s look at what DNS propagation is in more detail, how long it takes, how to check your changes, and which tools can help you track the process.

What is DNS propagation, and how does it work?
DNS propagation is the process of updating and distributing changes to your Domain Name System (DNS) records across the network of DNS servers. For example, moving your website to a new hosting provider. You update your DNS records so that your domain name points to the new server’s IP address. The change appears instantly in your control panel, but when you visit the site, you still see the old version.
That’s because DNS information refreshes asynchronously across different devices and systems — your internet service provider (ISP), browser, operating system, and your modem. Some updates occur within hours. Others might take a day or two to recognize the new records.
How long does DNS propagation take?
Most DNS changes propagate within 24–48 hours. We recommended planning for the full 48-hour window to ensure all visitors can view the changes. Different record types propagate at different speeds:
- A and AAAA records (Zero–24 hours). These point your domain to an IP address. They’re the most common records and typically update quickly.
- CNAME records (Zero–24 hours). These alias one domain to another. They follow similar timelines to A records.
- MX records (24–48 hours). These handle email routing. They tend to be cached longer because email systems prioritize stability.
- TXT records (24–72 hours). These stores text data, such as SPF records, for email authentication. They can take the longest to propagate fully.
- NS records (48–72 hours). These define your authoritative name servers. Changes made here affect your entire DNS setup, so they’re cached for longer to ensure stability.
What affects DNS propagation time?
Your Time to Live (TTL) setting is the determining factor. Assigning your TTL to 86400 seconds (24 hours) sets your DNS cache refresh to the next day. Lower your TTL to 300 seconds (5 minutes), and caches will refresh much faster.
But here’s the catch: caching happens at multiple levels. Even with a low TTL, some ISPs ignore it and use their own caching rules. That’s why you can’t guarantee instant propagation.
Interested in related topics? Try reading DNS Security Benefits: Why You Need It + Best Practices or check our blog posts and knowledge base articles that cover a wide range of topics.
How to check DNS propagation
After making changes to your DNS records, verify that they are working correctly. Here are four reliable methods to check propagation status.
- Use DNS propagation checker tools.
- Query authoritative name servers
- Compare public DNS resolvers.
- Flush your local DNS cache.
Use DNS propagation checker tools
The easiest way to check DNS propagation is by using online tools or DNS checkers that query authoritative DNS servers.
Tools like whatsmydns.net and dnschecker.org help you check your domain’s assigned IP across different locations. These tools display results from multiple global locations, making it easy to identify servers that have and have not reflected the change.
Check at least three to five locations for consistency. If most locations show your new IP address, propagation is nearly complete. If results are mixed, you’re still in the middle of the process.
Query authoritative name servers
For a more direct check, query your domain’s authoritative name server. This shows you what your DNS provider has on record — the “source of truth” for your domain.
On Windows, open Command Prompt and type:
nslookup yourdomain.com ns1.yourprovider.com
On macOS or Linux, open Terminal and use:
dig @ns1.yourprovider.com yourdomain.com
Replace yourdomain.com with your actual domain and ns1.yourprovider.com with your authoritative name server. You can find this in your DNS settings or by running nslookup -type=ns yourdomain.com.
If your authoritative server returns the updated information, your DNS provider has the change. If other servers still show old data, the cache refresh isn’t complete.
Compare public DNS resolvers
Testing your domain against different public DNS resolvers helps you see which regions have updated.
Try these three major resolvers:
- Google DNS: 8.8.8.8
- Cloudflare DNS: 1.1.1.1
- Quad9 DNS: 9.9.9.9
On Windows:
nslookup yourdomain.com 8.8.8.8
On macOS/Linux:
dig @8.8.8.8 yourdomain.com
Run the same command for each resolver. If they all return your new IP address, propagation is mostly complete. If the results differ, some resolvers may have cached your old data, while others have updated it.
This method provides a practical understanding of what different users around the world see.
Flush your local DNS cache
Sometimes, your visitors can access your site with the DNS changes reflected, but you may still see the old page. That’s because your device or browser cached old DNS information.
Clear your DNS cache to force your system to request fresh data.
On Windows: Open Command Prompt as administrator and run:
ipconfig /flushdns
On macOS: Open Terminal and run:
sudo dscacheutil -flushcache; sudo killall -HUP mDNSResponder
In your browser: Most browsers cache DNS separately. In Chrome, Firefox, or Edge, clearing browsing data and clearing “cached images and files” usually does the trick. Some browsers also have DNS-specific caches you can clear through their settings.
Flushing your cache ensures you’re seeing the real, current DNS data rather than an outdated local copy.
How to speed up DNS propagation (when possible)
You can’t force instant propagation, but you can take steps to make it faster. Here’s what actually works.
- Lower TTL before changes (set 24–48 hours ahead)
- Time updates for off-peak hours
- Use a CDN or DNS service with global traffic managers
- Notify users and teams
Note: There’s no magic button to instantly propagate DNS changes across the internet. Anyone who tells you otherwise is wrong. But these strategies can help reduce the time it takes.
Lower TTL before changes
This is the single most effective thing you can do. At least 24–48 hours before making your DNS change, log into your DNS management panel and reduce your TTL to 300 seconds (5 minutes). This instructs DNS resolvers worldwide to refresh your records every five minutes, rather than every few hours.
When you make the actual DNS change, those resolvers will quickly pick up the new information because they check frequently. After propagation completes, increase your TTL back to a higher value, such as 3600 seconds (1 hour) or 86400 seconds (24 hours), to reduce the load on your DNS servers.
Why wait 24–48 hours before making the change? Existing caches need time to expire at the old TTL rate. If your TTL was set to 24 hours, caches will hold onto your data for the full period. Only after that period expires will they respect the new five-minute TTL.
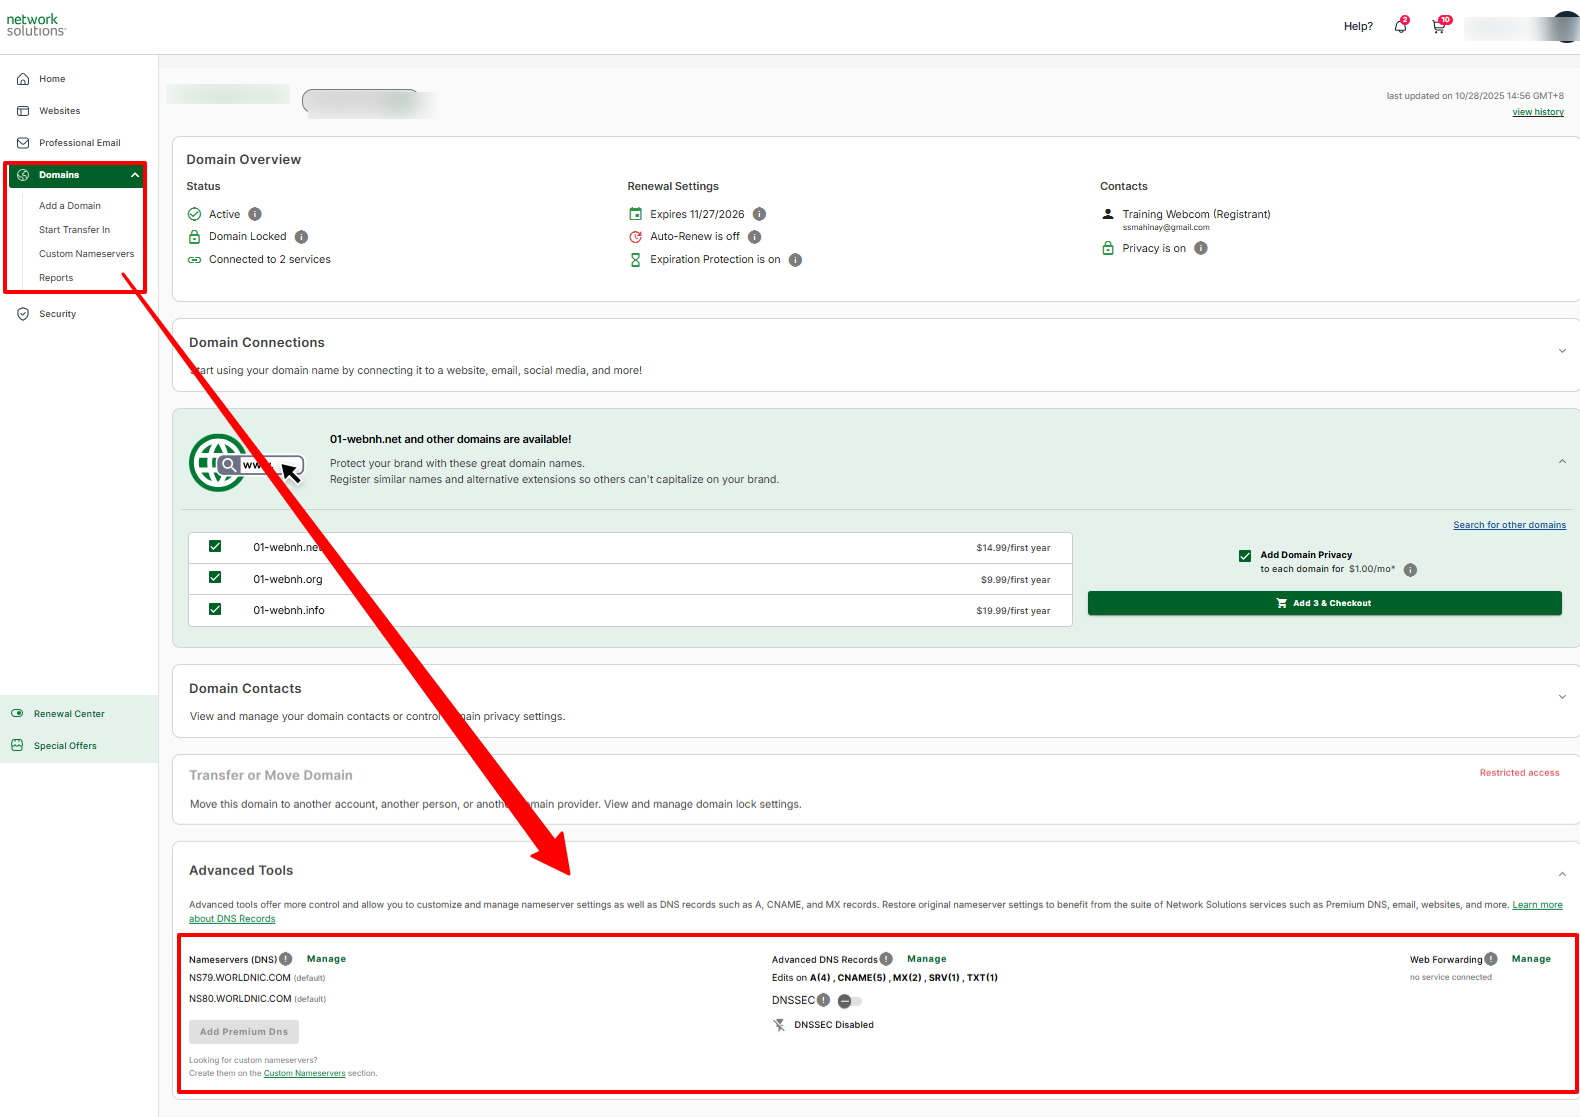
If you’re managing your domain and DNS records through Network Solutions, you can access the control panel to adjust propagation speed.
Time updates for off-peak hours
Schedule your DNS changes for early morning or late evening when website traffic is lowest.
This won’t speed up technical propagation, but it minimizes disruption. During propagation, some users can still access the old site, while others see the new one. DNS propagation affects fewer users when traffic is low.
Check your analytics to identify your quietest hours, and then make adjustments during that time frame. For most sites, 2–4 AM in your primary audience’s time zone is ideal.
Use a CDN or DNS service with global traffic managers
Premium DNS providers and content delivery networks have servers distributed globally, which means your DNS updates reach worldwide resolvers faster.
Services like Cloudflare, AWS Route 53, Akamai, and Azure DNS maintain points of presence on every continent. When you update a DNS record, these services push the change to all their servers simultaneously.
Global traffic managers go a step further by routing users to the nearest available server. If you’re migrating to a new host, a traffic manager can gradually shift traffic to the new location while keeping the old one as a fallback.
The service comes at a premium, but if minimizing downtime matters to your business, it’s worth the investment.
Notify users and teams
Communication doesn’t speed up propagation, but it prevents panic.
Tell your customers, internal teams, and stakeholders that you’re making a DNS change. Note the potential issues that may arise, including accessing outdated pages and experiencing connectivity problems. An update shows the affected parties that you care about their experience and are responding to potential issues.
Include the timeframe (usually 24–48 hours) and let people know it’s normal for updates to roll out gradually. Most users understand when they know what’s happening.
Troubleshooting DNS propagation issues
DNS changes usually go smoothly, but sometimes issues arise. Some problems stemming from DNS propagation include:
- Your site is still unreachable
- Some users are seeing an old version of your site
- Your email isn’t working after a DNS change
- It’s been over 72 hours, and nothing’s updated
Your site is still unreachable
First, verify that propagation is ongoing. Go to whatsmydns.net and enter your domain. Check results from at least five different locations around the world.
If most locations show your new IP address, propagation is working as intended. The issue might be with your local DNS cache or with your web server configuration.
If most locations still display the old IP address or no result at all, your DNS change may not have been saved properly. Log back into your DNS management panel and verify:
- The record was published/saved (not just edited)
- There are no typos in the IP address
- You’re editing the correct zone file for your domain
Some DNS providers require you to click “Save” and then “Publish” or “Activate” changes. Just saving isn’t enough.
Some users are seeing an old version of your site
Different ISPs and DNS resolvers cache data at different rates, so some users will see updates before others.
If it’s been less than 48 hours, this is expected behavior. If it’s been longer, users likely have aggressive local caching.
Ask affected visitors to:
- Flush their DNS cache
- Try switching to Google DNS (8.8.8.8) or Cloudflare DNS (1.1.1.1) temporarily
- Clear their browser cache
- Try accessing the site from a different network (like mobile data instead of Wi-Fi)
In most cases, the issue resolves itself as local caches expire.
Your email isn’t working after a DNS change
Email issues after DNS changes typically stem from issues with MX or SPF records.
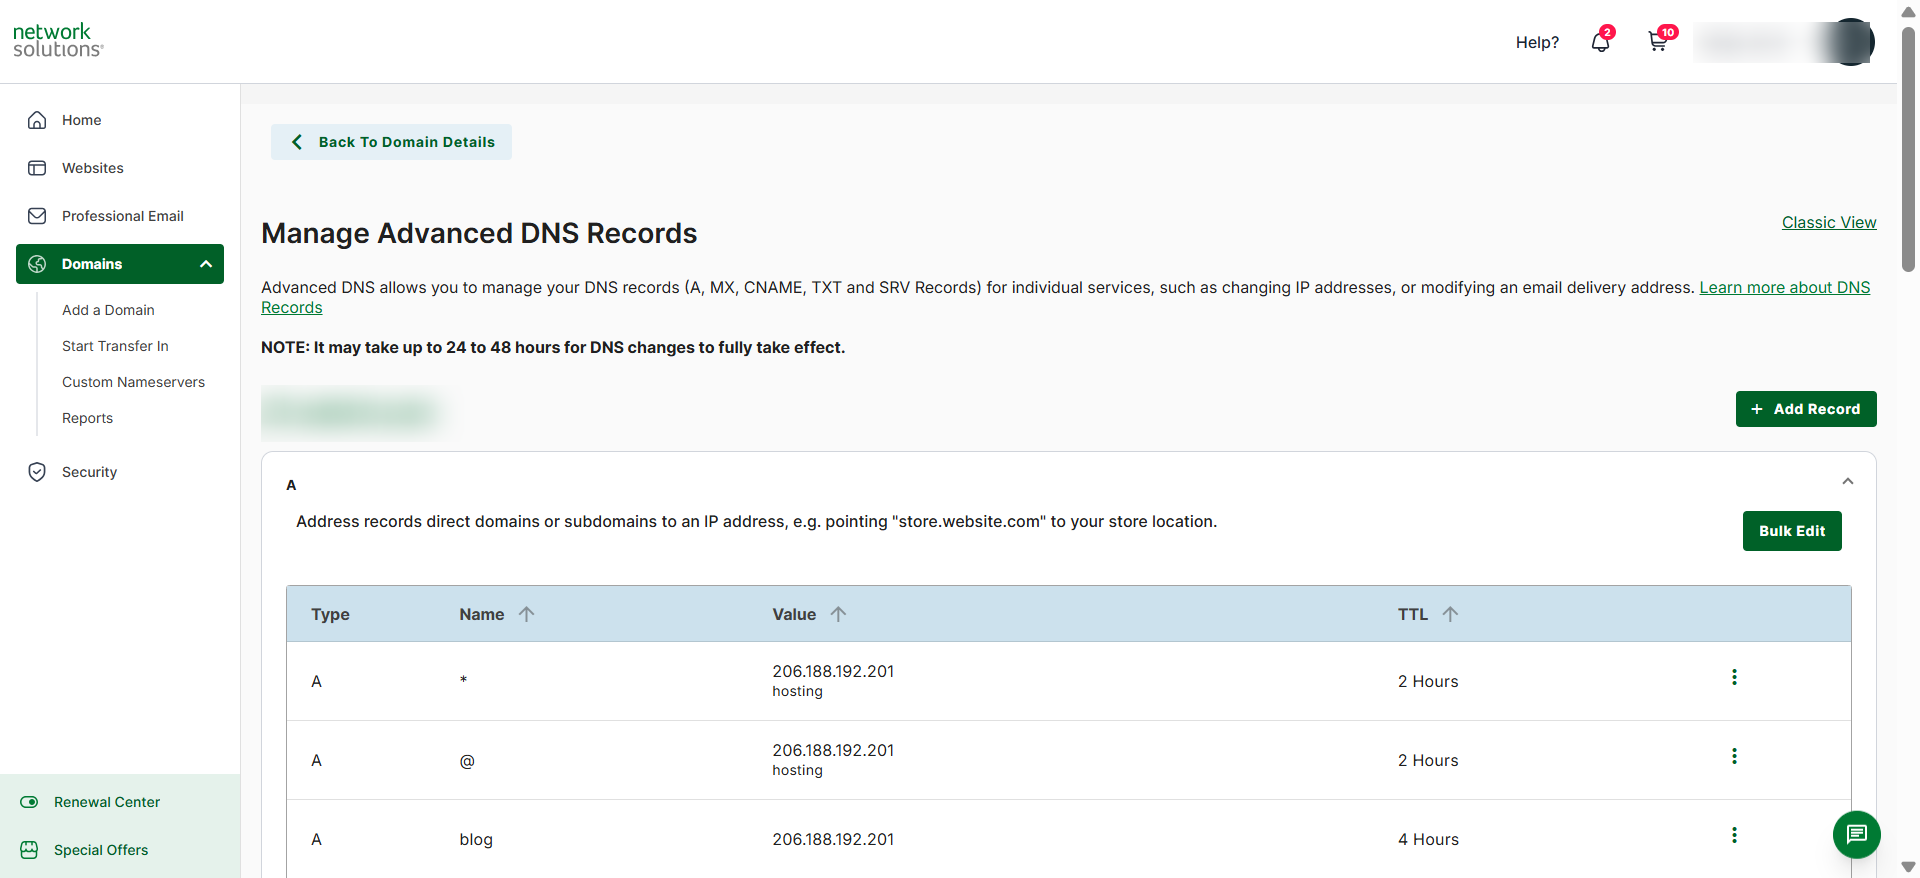
Double-check your MX records in your DNS panel. For example, at Network Solutions, you can utilize our advanced tools under the “Domain” section to view and modify your records. Check for setting conflicts, including:
- Correct spelling for the mail server hostname
- Properly set priority values (lower numbers = higher priority)
- Including a period at the end of the hostname if required by your DNS provider
Check your SPF record (a TXT record) to ensure it includes the servers of your email provider.
MX records can take 24–48 hours to fully propagate. Contact your email provider or DNS host for assistance if two days have passed and you are still unable to access your mailbox.
It’s been over 72 hours, and nothing’s updated
If it’s been more than three days and your DNS change still hasn’t propagated globally, something is wrong.
Common culprits include:
- Typo in the DNS record: A missing period, wrong IP address, or spacing issue can break the record
- DNSSEC conflict: If you have DNSSEC enabled and didn’t update the DS records with your domain registrar, validation will fail
- Incorrect name servers: Your domain might be pointing to old name servers that don’t have the updated records
Check for errors in your DNS panel. Most providers highlight invalid records in red or show error messages.
If everything appears correct but the issue persists, contact Network Solutions support or your DNS provider for further assistance. They can check server logs and identify issues you can’t see from the control panel.

Frequently asked questions
DNS propagation is the time it takes for DNS changes to spread across the internet. When you update a DNS record, the change doesn’t happen instantly everywhere. DNS servers worldwide cache (store) your domain information to speed up lookups. Propagation is the period during which these servers refresh their caches with your new information.
Most DNS changes propagate within 24–48 hours. Some users may see updates within a few hours, while others may wait up to 72 hours, depending on their ISP’s caching policies and the type of record that was changed.
Yes, but only to a point. Lower your Time to Live (TTL) to at least 300 seconds, ideally 24–48 hours, before making DNS changes. This tells DNS resolvers to refresh more frequently.
9.9.9.9 is Quad9, a free public DNS resolver focused on security and privacy. It blocks access to malicious domains while not logging your browsing activity. You can use it to test DNS propagation by querying it directly to see if your DNS change has reached Quad9’s servers. It’s an alternative to Google DNS (8.8.8.8) or Cloudflare DNS (1.1.1.1).
Different DNS resolvers cache records for different amounts of time. Your ISP might cache your domain for 24 hours, while someone else’s caches it for only 1 hour. Browsers and operating systems also maintain their own DNS caches locally. During propagation, some users’ systems have refreshed their cache while others are still using old data. This resolves naturally as caches expire.
Not directly. Search engine crawlers eventually see the updated DNS records and index your new site. However, if your site is down during propagation or resolves to the wrong server, Google sees errors.
Take control of your DNS management
DNS propagation affects every domain change. You manage it by using clear processes and following best practices.
If you manage your domain at Network Solutions, you get DNS tools in your domain settings. You set custom TTL values, edit records without technical skills, and get help with MX and SPF setup.
DNS management is a continuing process. With the right security practices, you can protect yourself and your users while simplifying daily tasks. For stronger protection and smoother management, review our domain management product to support your setup.