Key takeaways:
- A 401 Unauthorized error means the site is blocking access because your login details are missing or invalid.
- The error often occurs due to a mistyped URL, outdated browser data, or an expired login session.
- Clearing your cache and cookies, checking the URL, or signing in again usually fixes the issue quickly.
Okay, so picture this: you’re trying to open a door, you knock, the person inside clearly hears you… and then just stares at you through the peephole and goes “nope.” That’s basically a 401 error. The server got your message. It just doesn’t trust you enough to let you in.
A 401 means your login info is either missing, wrong, or just not matching up with what the site expects. There are no credentials or entry. Simple as that.
If you run a website, this matters way more than you’d think. When your visitors keep hitting a 401, it’s not only annoying for them. It makes your whole site look sketchy and broken.
A lot of the time it comes down to how access is set up behind the scenes. Think login pages, password-protected content, members-only dashboards, paywalled articles, or private file directories. When any piece of that system goes sideways, your users just get completely locked out with zero explanation.
So, what actually causes a 401 error, and how do you fix it? Keep reading because we’re about to break down all the usual suspects and exactly what to do about each one.
Find the perfect domain
Ready to register a domain name? Check domain availability and get started with Network Solutions today.
What is the 401 Error code?
HTTP error 401 means a user doesn’t have permission to access a target resource, usually a password-protected website. The response includes a WWW-Authenticate header, which tells the browser what authentication method is required. The website denies entry if the user lacks valid authentication credentials.
In short, you get a 401 error if you don’t have the appropriate login details or if your credentials have expired.
As a result, a variation of 401 error messages may appear on screen depending on the visitor’s browser. Google Chrome and Microsoft Edge users will likely see the “HTTP Error 401” error message below the phrase “If the problem continues, contact the site owner.”
401 error variations
Users may see a 401 error appear in different ways depending on their browser or how the site handles authentication. Some common variations include:
- HTTP Error 401 Unauthorized
- 401 Unauthorized Error
- Error 401 Unauthorized
- Access Denied
- 401 Authorization Required
These messages may appear with different wording, but they’re all simple indicators that something interrupted the authentication process. Each variation gives a small clue about why the requested resource didn’t load.
Types of 401 Error
Now that you’ve seen the different 401 error messages, here’s a quick look at the specific types and what usually causes them. These codes help pinpoint what went wrong during the authentication process so you can narrow down the next steps.
- 401.1 – Failed login attempt
- 401.2 – The server configuration caused the failed login attempt
- 401.3 – The Access Control List (ACL) blocked access to the requested resource
- 401.501 – The client sent too many requests and reached the maximum request limit
- 401.502 – A client from the same IP address triggered the dynamic IP restriction rule
- 401.503 – The client’s IP is on the server’s deny list
- 401.504 – The client’s hostname is in the server’s deny list
And just so you have the full picture, there are also a few less common variations out there that relate to deeper authentication and authorization rules that are worth knowing about:
- 401.5 – ISAPI or CGI authorization failed
- 401.6 – The request came from an invalid trusted domain
- 401.7 – The URL hit a blocked path because of URL authorization rules
No matter the variation, each one circles back to the same idea: the server can’t confirm the user’s identity, so it stops the request until you provide valid authentication credentials.
But before you can fix it, you need to know what’s causing it in the first place.
What causes a 401 error?
A 401 error usually pops up when something interrupts the authentication process mid-way through an HTTP request. Incorrect login information is the most common trigger. In many cases, this comes down to how credentials are created and managed. As Anthony Matera, Senior Director of Email Products, explains:
“Using weak, default, or reused passwords for CMS platforms, hosting accounts, or admin panels can be cracked in seconds.”
When credentials don’t match, expire, or aren’t secure, the server can’t verify your identity, so access gets blocked.
But there are plenty of other authorization problems that can set it off, too, including:
- Incorrect URL: Sometimes the link itself is the problem. If the URL points to a restricted resource or a password-protected page, and something’s off about it, you’re getting a 401 before you even have a chance to prove yourself.
- Outdated browser cache or cookies: Your browser holds onto saved login data, and when that data expires, it messes with the whole authentication process. Your browser comes in with an expired ID and wonders why it got turned away.
- Plugin misconfiguration: Some plugins can clash with your site’s security settings and accidentally flag a totally normal login attempt as suspicious. Your own firewall ends up blocking you.
- Server-protected URLs: A lot of hosting providers lock down certain parts of their servers on purpose. If a visitor tries to access those restricted resources without the right access rights, a 401 is exactly what they’ll get.
- Restricted .htaccess file: This one trips up a lot of website owners. If password protection was set up at some point and never removed, the .htaccess file keeps enforcing it without you noticing, and the 401 error code just keeps showing up.
- DNS problems: An outdated DNS cache can stop your browser from even reaching the right server to begin with. Refreshing your DNS settings points your device back to where it needs to go.
- IP-based restrictions: Some servers automatically block certain IP addresses, especially if they detect unusual activity or have strict access rights rules baked into their security setup.
If you’re dealing with a 401 error, you’re likely just a few minutes away from fixing it. Once you know what’s actually causing it, it’s easier to figure out what to do next.
How to fix the 401 error code
With the causes in mind, here are a few simple ways to fix it. These steps help resolve issues with your browser, your device, or your login information.
- Correct any URL errors.
- Clear your browser cache and cookies.
- Flush the DNS cache from your device.
- Contact the site owner.
- Double-check your login details.
- Disable browser extensions.
Here are the steps in detail:
Step 1: Correct any URL errors.
Even a tiny mistake in the URL can send to a restricted or protected resource. So, take time to:
- Review the URL carefully
- Remove extra characters or incorrect paths
- Try accessing the correct page again
Incorrect URLs can send a request to a resource that requires valid authentication credentials.
Step 2: Clear your browser cache and cookies.
Stored cache and cookies can hold outdated authentication data, which can trigger a http 401 error. That’s why it’s best to try:
- Clearing your browser cache and cookies
- Restarting your browser
- Logging in again to refresh your session
This helps remove any saved invalid credentials linked to your account.
To get that done, here’s exactly what to do:
For Google Chrome
1. At the top right-hand corner, click the Kebab Menu or three vertical dots.
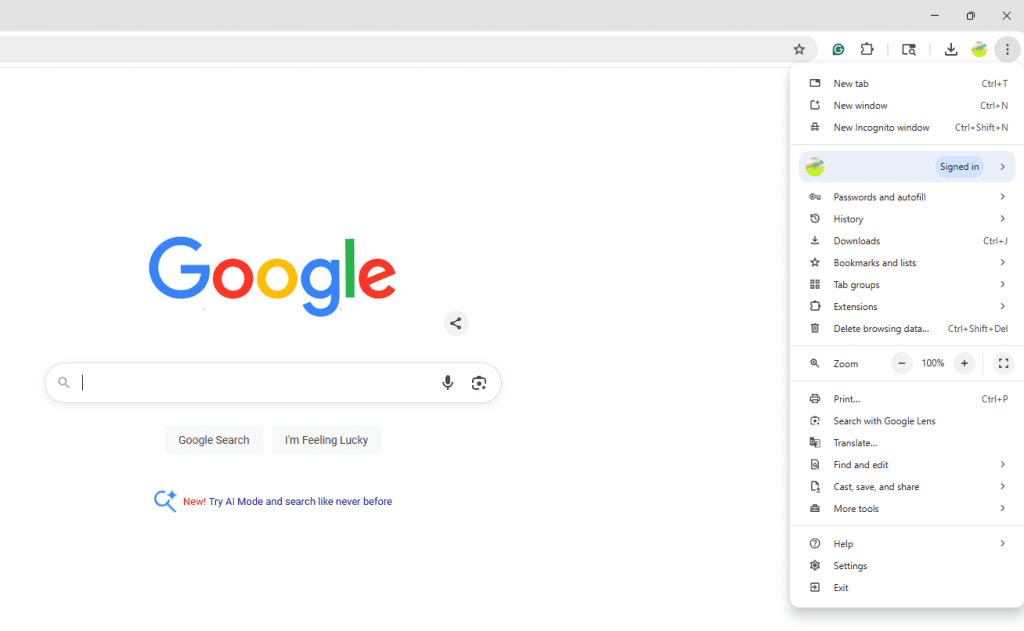
2. Scroll down and click Settings.
3. On the left-hand side, click Privacy and Security.
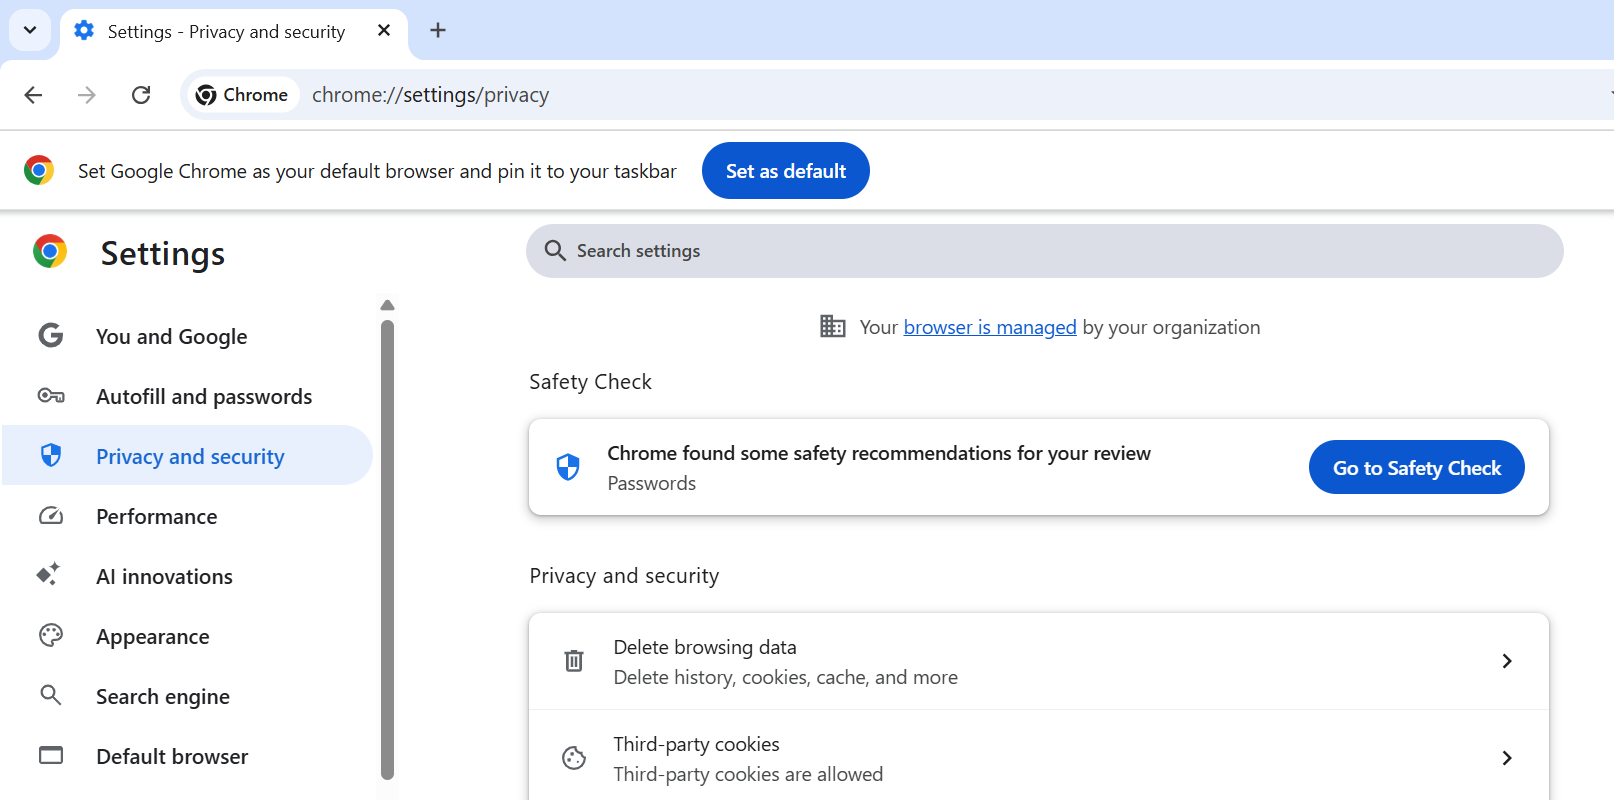
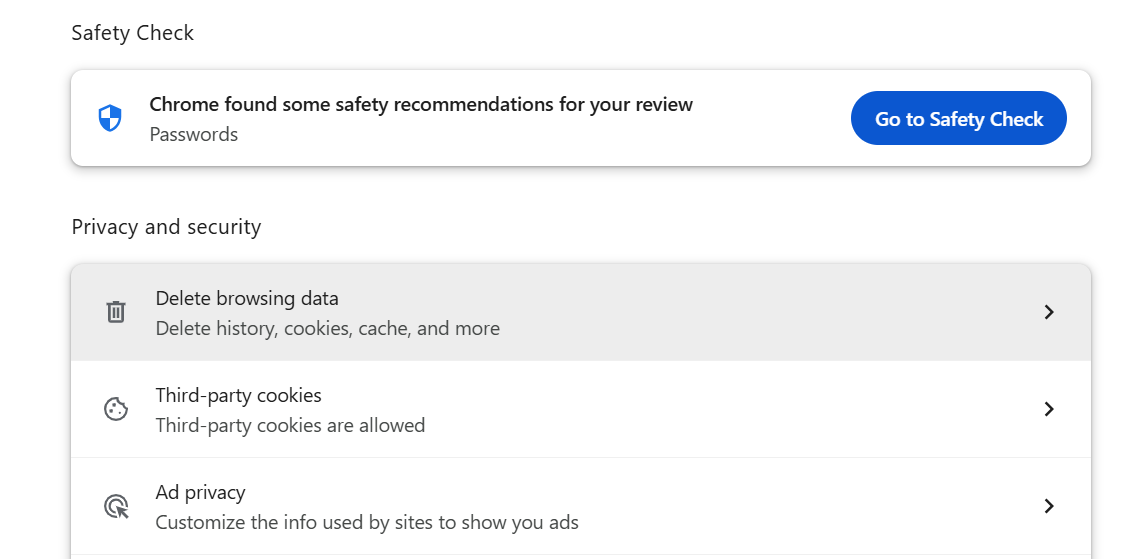
4. On the Privacy and Security tab, click Delete Browsing Data.
5. Uncheck Browsing History to keep track of the previous websites you’ve visited.
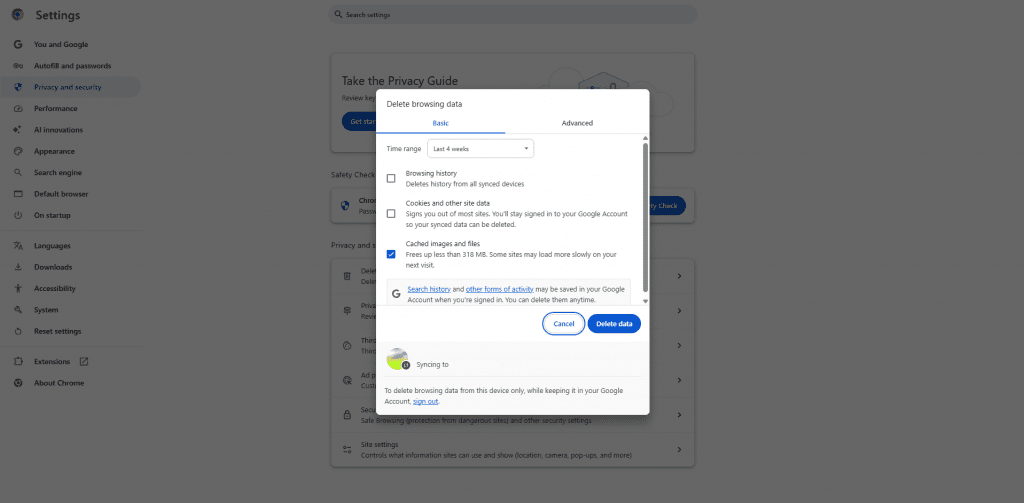
6. At the bottom right-hand corner of the pop-up, click Delete Data.
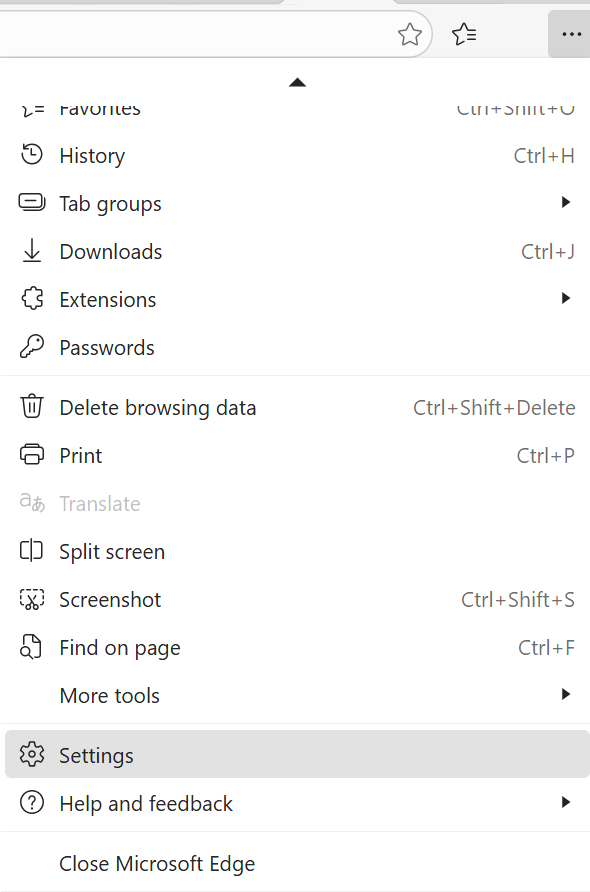
For Microsoft Edge
1. At the top right-hand corner, click on the Meatballs Menu or the three horizontal dots.

2. Far down, click Settings.
3. On the left-hand side, click Privacy, Search, and Services.
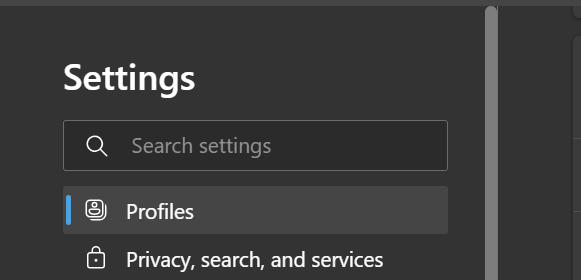
4. Scroll down and look for the Delete Browsing Data tab.
5. On the Delete browsing data tab, click Choose What to Clear.

6. Uncheck Browsing History and Download History.
7. Click Clear Now.
For Mozilla Firefox users, clearing browsing data may look slightly different compared to Chrome and Edge. It’s done by clicking the library icon at the top-right corner of your browser. Click Clear Recent History, then choose a time range. If you choose the Everything option, all your browsing and downloading history, active logins, search history, cookies, and cache will be removed from your device’s internal storage.
Step 3. Flush the DNS cache from your device.
If the same error occurs after clearing your browsing data, the next thing to do is clear your DNS resolver cache. Although this step isn’t as common, you can do this by opening your command prompt (Windows) or Terminal app (Mac).
For Windows users
- On your Windows Search Bar, type cmd.
- Click Command Prompt.
- In the Command Prompt, enter ipconfig/flushdns.
- Press Enter.
For Mac users
On the Spotlight search, Type Terminal and press Enter to open the Terminal app.
- If you’re using macOS Big Sur or later versions of macOS, type the following command in the Terminal window: sudo killall -HUP mDNSResponder.
- Press Enter.
- Type in your password. Note that you won’t see the characters on your screen.
- Press Enter.
Older macOS requires different commands. Try the following:
MacOS version | Command |
|---|---|
Catalina | sudo killall -HUP mDNSResponder |
Mojave | sudo killall -HUP mDNSResponder |
High Sierra | sudo killall -HUP mDNSResponder |
Sierra | sudo killall -HUP mDNSResponder |
El Capitan | sudo killall -HUP mDNSResponder |
Mavericks | sudo killall -HUP mDNSResponder |
Mountain Lion | sudo killall -HUP mDNSResponder |
Lion | sudo killall -HUP mDNSResponder |
Yosemite | sudo discoveryutil udnsflushcaches |
Step 4: Contact the site owner.
If the problem continues, contact the website owner for help. Tell them about the 401 error and the steps you’ve taken to resolve it. This way, they can provide additional solutions specific to their website, such as resetting your account credentials or granting the necessary permissions.
Step 5: Double-check your login details.
A 401 Unauthorized error often happens when the server rejects your authentication credentials. So:
- Make sure your username and password are correct
- Check for typos, case sensitivity, or expired login details
- Re-enter your credentials to confirm access
If the request failed, invalid or missing credentials are the most common cause.
Step 6: Disable browser extensions.
Some tools can interfere with authentication or block access rights. Try to:
- Turn off VPN or proxy services
- Disable browser extensions temporarily
- Try accessing the page again
These tools can affect your IP address or request headers, which may lead to authorization problems.
How can a website owner fix the 401 error?
While the 401 error code is usually on the client’s side, sometimes errors can stem from a server error. How can you fix it? Here’s how:
- Deactivate your WordPress plugins
- Review the security settings of your website
- Check your site’s .htaccess file
- Contact your hosting provider
- Check your server configuration
Important: Please proceed with caution, especially when it comes to settings that affect your website security and up-time.
Here are each method in detail:
1. Deactivate your WordPress plugins
From a developer’s perspective, if your visitors are still having trouble accessing your website, try deactivating your site’s security plugins.
To do this, follow these steps:
- Open your WordPress dashboard.
- On the right-hand side, click the Plugins option.
- Click Installed Plugins.
- From the dropdown menu, look for the security plugin you wish to deactivate.
- Click Deactivate.
See if the 401 is still there. Once fixed, your visitors may now have server access to explore your website.
You can also try temporarily deactivating your theme if you want to rule out conflicts that cause the authentication process to fail or affect user permissions.
2. Review the security settings of your website
Another way to resolve your site’s 401 error issue and approve a client request to access your web page is to disable password protection. You can do this by following these steps:
- Through Site Tools, open your hosting panel.
- Open the Security section.
- Select the Protected URLs option.
- Click Manage Protected URLs.
- Delete any unnecessary protection settings under the Actions column.
Double-check that no outdated redirects, rules, or required authentication methods are blocking access for an authenticated user.
3. Check your site’s .htaccess file
You can also disable any password protection from there. Here’s how:
- Go to your File Manager (FTP).
- Locate the .htaccess file and open it.
- At the bottom, delete the code where it says password-protected area.
Note: Modifying the .htaccess file can cause serious problems if not done correctly. If a user is not comfortable with server-side file editing, please refer to the next option.
Also, if your site uses other server types, try to check equivalent configuration files or authentication headers such as the WWW-Authenticate header to confirm the correct method is being used.
4. Contact your hosting provider
If you’ve tried everything and the 401 error persists, contact your hosting provider. Tell them about the issue and the necessary steps you’ve already taken. This way, they can check for further server-side authentication issues, misconfigurations, and security rules that you might have overlooked.
Additional note: Before making major changes, be sure to back up your site, especially if you’ve recently updated plugins, edited configuration files, or cleared an expired browser cache.
5. Check your server configuration
Sometimes the issue lies in the underlying configuration of your hosting environment. Reviewing key settings helps confirm that the server knows how to process the request correctly.
You can check the following:
- File and folder permissions in your file manager
- Whether the correct authentication method is being used
- If the server is sending the right authentication headers
- Whether specific rules or modules are blocking the request
- If the site requires an API key or token for the authentication server
If you’re unsure where to look, your hosting provider can point you to the right configuration files or logs.
What are common mistakes when fixing 401 errors?
Website owners often make mistakes that prolong the resolution process. These missteps frequently involve overlooking fundamental causes, implementing changes without proper precautions, or not using diagnostic tools and resources.
Let’s discuss further below:
- Ignoring client-side issues: A common mistake is immediately looking for server problems without first ruling out simple client-side fixes like instructing users to clear their browser cache, check their login credentials, or try a different browser.
- Overlooking CDN or firewall rules: Most website owners forget that the Content Delivery Network (CDN) or external firewall rules can sometimes interfere with authentication processes and lead to 401 errors.
- Assuming a single cause: Each 401 error has a unique underlying reason. It’s wrong to assume that it always stems from the same cause instead of systematically investigating all potential sources based on the error’s context.
- Not backing up: Without a backup, it will be more difficult to recover from an incorrect change or modification.
- Quickly modifying security settings: Editing important files or modifying security features without considering other factors.
- Using an incorrect or outdated URL: Even a small typo or old link can trigger a 401 unauthorized error or the wrong HTTP status code, especially if the web page is restricted or behind password protection.
- Relying on expired browser data: Saved or expired browser cache, old cache data, or outdated browser cookies can cause the authentication server to reject the request even if nothing has changed on the website.
- Assuming credentials are correct: Typing the wrong username, password, or API key can lead to incorrect credentials being sent in the request. This stops the server from completing proper authentication or matching the required authentication method.
- Ignoring session timeout or restricted access: When a user’s session expires, the server may block the request to protect restricted resources. Logging in again refreshes the session and restores the user permissions needed to access the page.
- Overlooking request headers: Sometimes the issue comes from misconfigured authentication headers or settings under the response header section, which tell the server how to verify the request.
Best practices to avoid 401 errors
Overall, the best way to prevent the 401 Unauthorized error from recurring is to make sure that you’re inputting valid credentials, which include the correct username, user ID, and URL.
It’s also a good habit to regularly clear your browser cache, cookies, and site data before things go wrong. Old, stored data is one of those sneaky triggers that slows your page down and causes formatting headaches before you even realize what’s going on.
What’s the difference between error 401, 403, and 404?
Before we wrap this up, it’s important to address common misconceptions about HTTP status codes, especially those in the 400s. 401, 403, and 404 errors are often confused because they relate to access issues.
But they have distinct meanings:
- The 401 error means that the WWW-Authenticate header detects invalid or missing credentials, which indicates an unauthorized or expired session from your end.
- The 403 error, also known as the “403 Forbidden” error code, is a response status code indicating the server understands the request but still denies the client access. This type of error is the same as the 401 error. However, any re-authentication credentials won’t change the web page access due to the website owner’s restrictions.
- The 404 error or “Not Found” error indicates a broken or dead link. This means that the website is either temporarily or permanently unavailable.
This error may be caused by moved or deleted pages, a mistyped URL, caching issues, DNS settings problems, or missing assets from the website.
Error code | Meaning | Cause |
|---|---|---|
401 | Unauthorized | No valid credentials |
403 | Forbidden | Access is denied despite authentication |
404 | Not Found | Page doesn’t exist |
Frequently asked questions
A 401 error is an HTTP status code that appears when the server understands your request but won’t allow access due to invalid or missing credentials. You’ll need to provide valid credentials, like your login details or an access token, to get in.
401 errors are usually caused by issues with authentication or access. Common causes include:
– Incorrect login credentials
– Missing authentication headers in the request
– The browser didn’t send the required authentication information
– An expired or invalid access token
– Server-side security settings are blocking access to the requested resource
– Outdated cache or stored data is causing authentication issues
If you’re a user, you should:
1. Double-check that you’re on the right URL.
2. Clear your browser cache and cookies to remove old or expired browser data.
3. Clear or flush your DNS resolver cache using the Command Prompt (Windows) or Terminal app (Mac).
You can also try a few quick checks that often fix a 401 Unauthorized error:
1. Re-enter your login credentials to make sure nothing was typed incorrectly.
2. Log out of the website, then log back in to refresh your session.
3. Try opening the page in a different browser to rule out a browser-specific issue.
4. Disable any active VPN or proxy, since these can interfere with the authentication process.
A 401 Unauthorized error happens when the server can’t verify who you are because your request lacks valid authentication credentials. A 403 Forbidden error, on the other hand, occurs when the server knows who you are, but you don’t have permission to access the requested resource.
Yes, it can. Even with the correct login details, a 401 error can still happen due to:
– Expired authentication tokens or sessions
– Browser or server issues handling sessions
– Firewall or security blocks
– Misconfigured security or authentication settings
It can be either. A 401 error might come from your website or your browser, depending on the situation:
– On the website side, it’s usually misconfigured authentication or access settings
– On the browser side, it’s often incorrect login details, cached data, or settings issues
It varies. Sometimes, it’s just a temporary issue that you can fix with a quick refresh or by clearing your cache. But it can also be a recurring and persistent problem until you fix the underlying cause.
Yes. A 401 error can affect SEO and website performance, especially if it appears on public pages such as blog posts or product pages. Search engines may be unable to crawl or index those pages, which can hurt rankings and create a poor user experience.
Yes. An outdated browser can cause a 401 error if it can’t handle modern authentication methods or security tokens. In this scenario, your browser may be unable to send the correct credentials, resulting in a failed response.
To prevent 401 errors, make sure your login details are correct and clear your browser cache and cookies regularly. This helps avoid sending outdated credentials that can trigger a failed response or authentication exception.
Understanding error messages improves user experience
Errors 401, 403, and 404 are temporary and can be fixed. When they happen too often, they can frustrate users and may cause lower traffic. Knowing what these errors mean and how to fix them helps you respond faster and keep everything running smoothly.
Make your website perform at its best with SiteLock. It keeps your site secure and helps prevent issues that can trigger a failed response or access error. You can also check our SSL certificates and web hosting solutions to keep your server, authentication, and access settings running as expected. For quicker access, you can create direct links to your pages with our QR Code Generator, so users land where they’re supposed to, without errors.
Keep hackers out before they lock customers out.
Daily malware scans, automatic threat removal, and real-time protection help keep your website clean, trusted, and online.
- Detect malware before it spreads.
- Protect your site from cyberattacks
- Build trust with visible security seal