Key takeaways:
- Buying a domain name is only the beginning of creating and eventually owning a new website.
- Connecting your domain to a reliable web host is the first essential step to make your website accessible online.
- Set up a custom email address with a reputable web hosting company to boost brand credibility and streamline communication.
So, I bought a domain. Now what? Owning a domain name is just the beginning. From choosing the right hosting setup to planning your website, branding, and security, the actions you take next will determine how quickly and effectively you can establish your online presence.
In this guide, we’ll walk you through the essential steps: protecting your investment, finding a good web hosting provider, building your online presence, and even exploring ways to turn your domain into a profit.
Other than that, you’ll also gain insights from Network Solutions domain experts and industry specialists, who share practical advice based on years of experience helping businesses build their online presence.
You’ll hear from our incredible thought leaders: Michael Chattan (Senior Director of Domain Operations), Anthony Matera (Senior Director for Email Products), Nicole Cassis (Senior Vice President of Content and Communications), Alicia Pringle (Senior Director of Online Marketing), Kate Furnifer (Global Product Director), Joe Mueller (Senior Director of Product Management), Caroline Kay (Senior Manager, Platinum Success), and Michael White (Vice President for Product Management, Domain Aftermarket).
Find the perfect domain
Ready to register a domain name? Check domain availability and get started with Network Solutions today.
What’s in a domain name?
According to Michael Chattan, Senior Director of Domain Operations at Network Solutions, “Your domain is more than an address. It’s your online identity. And just like you wouldn’t open a storefront without a sign, you shouldn’t launch a brand with a confusing or unprofessional domain.”
So, what is a domain name, and how does it impact your brand online? Every domain name carries potential; it’s what you do with it that counts.
You’ve probably heard common tips: “Keep it short, relevant, and memorable.” While helpful, those don’t fully address how your domain fits into your bigger business picture.
Your domain name influences how people perceive your brand and how you should market it. Most fall into one of two categories:
- Discoverable domains: Use real words or phrases and often include keywords. These are more likely to attract organic search traffic from users looking for related products or services.
- Brandable domains: Unique or invented terms that may not include keywords. They require stronger branding and marketing efforts, but they can become memorable and iconic—think Google or Apple.
Consider which type you’ve registered. If it’s brandable, do you have the strategy and resources to raise awareness? Whether you’re building a blog, launching a business, or growing your brand, understanding your domain’s role is the first step to making it work for you.
8 steps to take after buying a domain
Buying a domain is just the beginning. To turn your idea into a functioning website or online business, there are a few important steps you’ll need to take next. Here are key actions to get you started:
- Connect your domain to a web hosting service
- Protect your domain
- Set up a professional email address
- Create a website or blog with your domain
- Secure your website
- Claim your brand on social media
- Develop a content and marketing strategy
- Set up analytics and monitoring tools
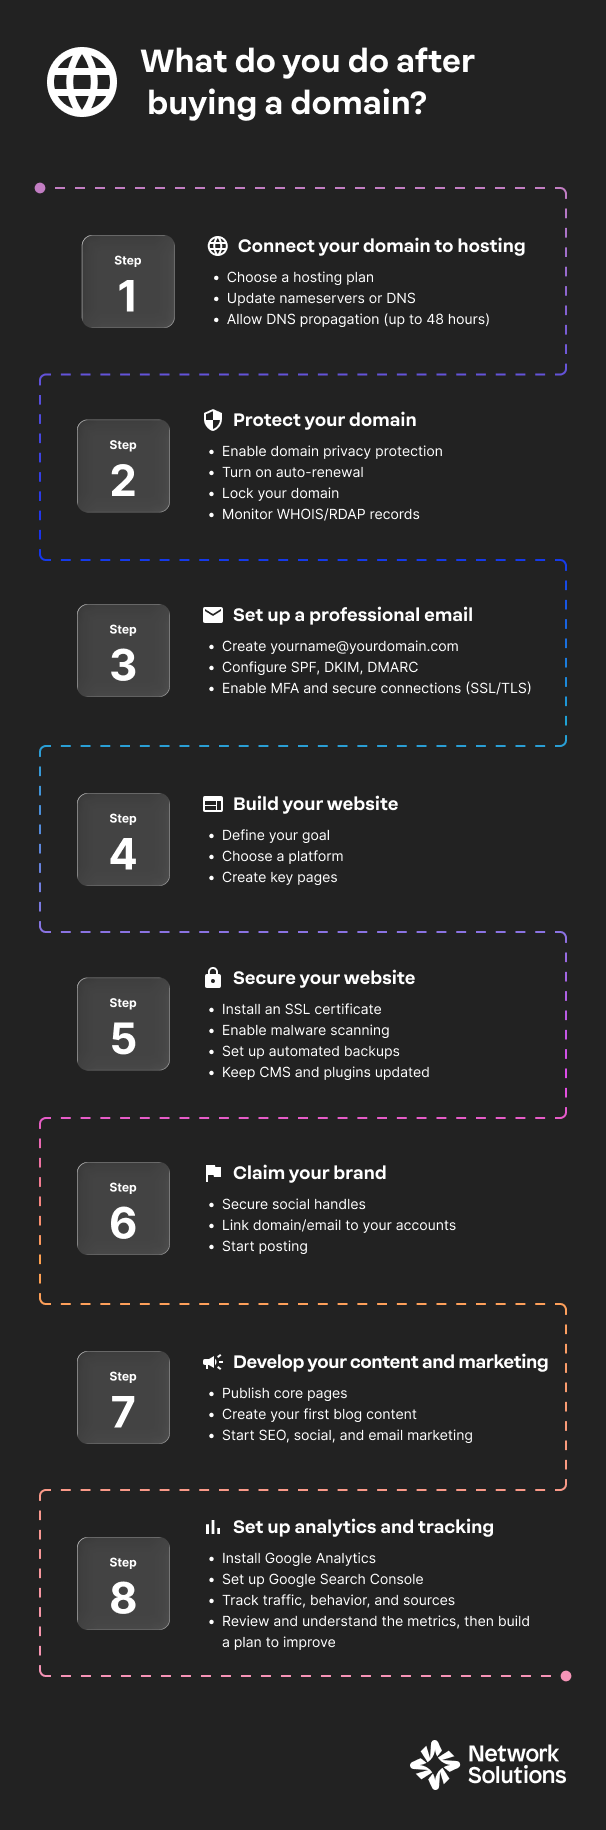
Step 1: Connect your domain to a web hosting service
Your domain needs a home. This is where web hosting comes in. Hosting providers store your website’s content and deliver it to users when they type your domain into their browser.
Once you’ve purchased a domain, the next step is choosing a hosting provider for your website. Your hosting provider stores your website’s content and delivers it to visitors when they enter your domain in their browser. The hosting environment you choose can affect your website’s performance, scalability, and ease of management as it grows.
If you’re still deciding which provider is right for your needs, check out our guide on what to look for in a web hosting provider, which explains the key features to consider when selecting a hosting service.
Before connecting your domain, it also helps to understand the different types of web hosting options available:
- Shared hosting: The most affordable and beginner-friendly option. Your site shares a server with many other websites. Doing so keeps costs low and minimizes technical setup. The trade-off is that performance can dip if neighboring sites suddenly get high traffic. Also, customization options are limited, but for early-stage businesses with modest traffic, shared hosting is usually more than enough.
- Virtual private server (VPS) hosting: VPS hosting is a step up for businesses that expect growth. While you still share a physical server, VPS hosting would mean you get your own dedicated slice of resources. This would mean better performance and more stability than shared hosting.
- Dedicated hosting: One physical server is fully yours. This option is built for businesses with high traffic, custom applications, or complex operations—like large online stores or platforms. You get maximum performance, flexibility, and security, but you also need more technical expertise (or a managed service) to maintain it.
- Cloud hosting: Pulls resources from multiple servers instead of just one. It’s highly reliable during scenarios where one server fails, because another one picks up the load. Cloud hosting is also extremely scalable, making it perfect for businesses experiencing fluctuating traffic or rapid growth. You pay for what you use, and your own website can grow seamlessly.
- WordPress hosting: Designed specifically for businesses planning to build WordPress sites, which many small and medium businesses use. WordPress hosting comes optimized, so you can install WordPress quickly in your web hosting account, manage updates easily, and keep your site running smoothly with minimal technical work. It’s especially helpful for WordPress users who want faster performance, built-in security, and automatic backups without having to configure everything manually. Many plans also include features that support WordPress plugin installations, making it easier to customize your site with tools for search engine optimization (SEO), e-commerce, security, bookings, and more.
- Reseller hosting: Designed for agencies, web designers, or freelancers who want to sell hosting plans to their own clients. It’s not for typical business owners, but it’s valuable for service providers who want to add hosting to their offerings.
- Colocation hosting: For businesses that own their own servers but want them housed in a professional data center for better security, cooling, power, and uptime. This is typically for larger enterprises or tech-heavy businesses. The upside is complete hardware control; the downside is cost and maintenance responsibilities.
Once you’ve chosen a hosting provider, the next step is connecting your domain so your website becomes accessible online.
Chattan once again sheds light on connecting a domain to a server. He says that connecting a domain to hosting is usually straightforward, especially when both services are managed by the same provider. However, when your domain and hosting are purchased from different companies, the setup may require manually updating nameservers or DNS settings so the services can communicate correctly.
He explains that “changing your nameservers is pretty easy, but if you mistype a character, the change will be rejected. If you are manually setting up DNS, then one number change, or a misplaced dot or extra comma, can cause configuration issues. Make sure to copy-paste exactly as it was sent to you.”
How to connect your domain to hosting through Network Solutions
Many hosting providers, including Network Solutions, offer hosting plans designed for small businesses, blogs, and growing brands.
To connect your domain name to a hosting plan through Network Solutions, you can follow these steps:
- Log in to your Network Solutions account.
- Select the domain you want to connect.
- Choose a hosting plan and follow the prompts to assign it to your domain.
- Set up nameservers or DNS records as needed.
If you’re using a third-party host, you can also update your DNS settings from your Network Solutions dashboard.
Chattan reminds that after updating your nameservers or DNS records, the changes need time to propagate across the internet. This process, known as DNS propagation, can take up to 48 hours for the updates to be fully recognized worldwide. During this time, your website may load intermittently while servers across the internet update their records.
He adds, “To verify that everything is working correctly, try visiting your domain in a browser to see if your website loads properly. You can also test connected services, such as sending an email if email hosting is configured. These checks help confirm that your domain and hosting are connected successfully.“
To see the process step by step, watch this video on how to connect your Network Solutions domain to your website.
Step 2: Protect your domain
After purchasing a domain, take a few steps to keep it secure and under your control. Domains are valuable digital assets, and simple protections can help prevent unauthorized transfers, accidental expiration, and exposure of personal information.
Here are a few important safeguards to enable:
- Domain privacy protection
- Auto-renewal
- Lock your domain
- Domain monitoring
Turn on domain privacy protection
When you register a domain, your contact details may appear in public WHOIS databases. Network Solutions offers Domain Privacy + Protection, which replaces your personal information with proxy contact details to help protect your identity and reduce spam.
Enable auto-renewal
Auto-renewal ensures your domain registration renews automatically before it expires. This helps prevent losing your domain if you forget to renew it manually.
Many registrars offer a grace period (30 days) and a redemption period (often 30 additional days) in case renewal is missed.
Lock your domain
Domain locking prevents unauthorized transfers to another registrar and adds an extra layer of protection to your domain registration.
Monitor your domain settings
Chattan emphasizes that domain owners should regularly monitor their domain status to prevent unexpected issues. Checking your domain records through services such as WHOIS or RDAP helps confirm that your registration details and expiration dates remain accurate and up to date.
Simplify domain management
Give yourself one less thing to worry about by enabling auto-renew on your domain(s). If not, you risk losing your domain name when it expires. If you maintain a large domain portfolio, consider Platinum, an exclusive domain management service designed to maximize your portfolio investment. Additionally, ensure your domain is properly configured by updating the DNS settings to point to your hosting server, which is crucial for keeping your website accessible online.
If a new domain owner can only implement one domain protection measure today, what should they prioritize and why?
Chattan reminds, “You are your own best protection. Use auto-renewal, get domain expiration protection, and check in on your domain. Just renewed? Perform a WHOIS/RDAP search to make sure that renewal went through.”
What about Private Domain Registration?
Chattan explains, “WHOIS protection is incredibly important to protect your personal information, but if you fail to do this once, then your information is already out there, and the spam calls have started. Always make sure to get Domain Privacy + Protection with every domain purchase. In addition to protecting your domain expiration, we also include SMS alerts so that if a change is done to your domain information, you get notified via SMS. This update over SMS is important, because generally if a bad actor does want to steal your domain, then getting access to your email is the first step. Having SMS alerts prevents someone from deleting the notice before it gets to you.”
Don’t leave your personal information for everyone to see.
Domain Privacy + Protection can help make sure your domain and your personal information don’t make it into the wrong hands. Add DPP to your domain order today.

Step 3: Set up a professional email address
Once your domain is connected and protected, the next step is creating a professional email address using your domain name.
Instead of using a personal email like [email protected], a domain-based email, such as [email protected], helps establish credibility and reinforces your brand identity when communicating with customers, partners, or clients.
Many hosting providers and domain registrars offer domain-based email services, allowing you to create custom email addresses tied to your domain.
If you’re managing your domain through Network Solutions, you can easily create and manage domain-based email accounts directly from your account dashboard. You can check out our blog article on how to set up an email from a domain to know how.
To see what’s included or select a plan, visit our Professional Email plans.
When setting up your professional email, consider these best practices:
- Create role-based email addresses: Use addresses like [email protected], [email protected], or [email protected]. These are easier for customers to remember and make your business appear more established.
- Use email for brand consistency: A domain-based email address reinforces your brand every time you send a message, helping build trust with recipients.
- Organize communication early: Setting up email accounts early helps you manage inquiries, customer support requests, and partnerships as your website begins attracting visitors.
Keep your email secure and reliable
Setting up a professional email address is only the first step. Maintaining strong security and proper configuration helps ensure your messages reach recipients and protect your business communications.
According to Anthony Matera, Senior Director for Email Products at Network Solutions, new domain owners should configure authentication and security protocols early to prevent deliverability issues and unauthorized access.
Matera recommends implementing the following protections:
- Email authentication protocols: Configure SPF, DKIM, and DMARC records to help email providers verify that messages sent from your domain are legitimate. These protocols reduce the risk of spoofing and phishing attacks.
- Encrypted email connections: Use SSL or TLS to protect email messages from interception.
- Multi-factor authentication (MFA): Enable MFA on your email accounts to add an extra layer of protection beyond passwords.
- Secure access practices: Avoid accessing business email from unsecured public Wi-Fi networks unless you are using a VPN.
Don’t risk your credibility with customers. Lock down a professional email.
When businesses send emails from generic email addresses, users ignore or send straight to spam. Don’t risk your credibility or visibility. Create a professional email today and start growing.

Step 4: Create a website or blog with your domain
As a starting point, determine your site’s purpose and goals.
Defining the purpose of your website helps clarify your requirements. For example, if you intend to start a personal blog, you likely won’t need a site equipped with e-commerce capabilities.
If you’re launching an online retail business, you’re going to need e-commerce functionality, pages for ‘Terms of Service’, and more. A robust inventory management system will also be crucial for tracking orders and managing stock levels.
Once you’ve outlined your requirements, consider how they’ll shape your site’s design and functionality. A basic website builder might be enough for a simple online presence, while an e-commerce builder could better support product listings and transactions. If your needs are more complex, working with a professional developer may be a worthwhile consideration.
You can also explore content management systems like WordPress, which offer flexibility, customization, and user-friendly setup options.
For beginners deciding where to start, choose the option that best matches your technical comfort level and site complexity. Website builders are often the fastest way to launch a simple site, while platforms like WordPress offer more flexibility for blogs and content-driven websites.
If you’re not ready to build your full website yet, you can still make use of your domain by setting up a Coming Soon Page. This gives visitors a place to learn about your upcoming website while you continue working on the design and content.
10 things to keep in mind when creating a site requirements list
- Be honest with yourself: Do you have the time and expertise needed to create the site you envision?
- How many pages will your site need? Sit down and map out the user experience you hope to achieve.
- Site storage: Your content needs a repository. Make sure you have enough bandwidth for your current needs and for growth.
- Details are your friend: Think about all the ways you want a visitor to interact with your site. Do they need the option to email you or fill out forms? Will you need product listings or transaction tools? Will you provide a map to help people find your physical location?
- Plan for a comprehensive online presence: Secure your social media handles and your professional email address. Your website should have links or integrations to your social media accounts.
- Optimize for device type: Not everyone navigates the web from their desktop. Make sure your site looks good on mobile devices, too. Ensuring your site is mobile-friendly is crucial for enhancing user experience and improving search engine rankings.
- Security, security, security: Plan on purchasing SSL and SiteLock to give your visitors peace of mind.
- Build with SEO in mind: Effective SEO helps your site and content appear in the SERPs. Make sure your strategy is comprehensive and addresses on-page, off-page, and technical SEO elements.
- Measure success: Determine what KPIs you’ll use to measure the success of your site. You’ll never know if you’re reaching your goals if you can’t measure performance.
- Plan: Where do you see your online business or blog in 1 year? How about in 5 years? Are you doing what you need to know to succeed, then?
Now it’s time to bring your domain to life. You have several options depending on your needs and technical skills:
- Website builders: Ideal for beginners with easy drag-and-drop tools.
- Content management systems (CMS) like WordPress: Great for flexibility, plugins, and blog integration.
- Web design service: Best for complex needs, custom branding, or a fully tailored design.
Tips for choosing the right platform:
- Use a website builder if you need something quick and simple.
- Choose WordPress for blogging, content-rich sites, or advanced customization.
- Work with a web developer for unique, scalable business sites.
You’ve already got the domain, let’s launch that site.
Your online identity starts with a domain name, but your website builds your presence. Launch your website in minuntes with Network Solutions’ Website Builder. No code, no tech, no frustration.
Step 5: Secure your website
Once your website is live, protecting it from security threats becomes essential. Website security focuses on safeguarding the files, systems, and data stored on your hosting environment. This is separate from the protections applied to your domain itself.
One common mistake new website owners make is assuming their site won’t be targeted. In reality, automated attacks often scan the internet for vulnerable websites, which is why basic protections should be implemented from the start.
Here are a few ways you can secure your website:
Enabling SSL encryption
A good starting point is enabling SSL encryption, which secures the connection between your website and its visitors. An SSL certificate encrypts sensitive information such as login credentials, contact form submissions, and payment details, and displays the HTTPS padlock in browsers to signal trust.
We offer SSL certificates to safeguard your site from day one.
To implement these features:
- Log in and go to your Domain or Security settings.
- Add an SSL Certificate to your domain.
- Enable Private Registration under your domain settings.
Malware scanning and protection
Another important step is implementing malware scanning and protection tools. These tools help detect malicious code or vulnerabilities before they affect your visitors or damage your website’s reputation.
Keep website backups
Matera also shares how website owners should also ensure they maintain regular backups. If a security issue or malware attack occurs, having a clean backup lets you restore your site quickly and minimize downtime.
Maintain ongoing website security
Website security isn’t a one-time setup. Maintaining a secure environment requires ongoing monitoring and routine updates.
Matera explains that many successful attacks happen because website owners overlook basic maintenance tasks. Keeping your site updated and access tightly controlled can significantly reduce vulnerabilities.
To maintain a secure website:
- Use strong, unique passwords for hosting accounts, CMS dashboards, and admin logins.
- Enable multi-factor authentication (MFA) whenever possible.
- Keep your CMS, plugins, and themes updated to patch known vulnerabilities.
- Regularly review user permissions so only trusted individuals have administrative access.
Matera also emphasizes that website owners should understand the difference between domain security and website security. While domain protection focuses on controlling your domain registration and DNS settings, website security protects the files, software, and user data stored on your hosting server.
Security measures to protect your domain and website
Securing your domain goes beyond SSL certificates and malware protection. Physical security plays a major role in protecting your online presence, especially as cyberattacks increasingly target the infrastructure supporting your website.
These measures help ensure that the servers, systems, and access points tied to your domain remain fully protected.
- Choose a reputable hosting provider with a secure data center: Look for providers that use guarded facilities, biometric access controls, 24/7 surveillance, and redundant power systems.
- Use domain registrar accounts with strong access protection: Enable multi-factor authentication (MFA), hardware security keys (like YubiKey), and IP whitelisting to prevent unauthorized logins.
- Secure password: Make sure to gatekeep your password. Only your most trusted team members should know the passwords of all your accounts.
- Lock your domain at the registrar: Domain locking prevents unauthorized transfers—one of the most common forms of domain hijacking.
- Use a secure workstation for domain management: Manage your domain only from trusted devices protected by updated antivirus, anti-malware, and encrypted storage.
- Keep offline backups of important credentials: Store registrar login details, DNS configs, and recovery codes in a secure physical location (safe, locked drawer).
- Limit who has physical or account access: Only authorized team members should have access to login credentials or devices used for domain management.
- Monitor account activity logs: Some registrars allow you to monitor login attempts or changes—use these to detect suspicious physical or account-based breaches.
Don’t leave your website unprotected
Secure your site with essential tools like SSL, privacy protection, and domain locking—all in one place.

Step 6: Claim your brand on social media
After setting up your website, the next step is protecting your brand across social media platforms.
According to Nicole Cassis, SVP of Content and Communications, securing your handles should happen as soon as you purchase your domain. “The moment you buy a domain, go claim your matching handles on every social platform—even the ones you don’t plan to use right away. If you wait, someone else might grab them, and getting them back can be expensive or impossible.”
If you plan on trademarking your name, you’ll also want to invest in a tool like AdultBlock to keep your name out of adult-themed spaces.
Claiming your handles typically takes less than an hour and helps customers easily recognize and find your brand online. Social profiles also often appear in search results alongside your website, reinforcing your online presence.
Start by registering your brand name on major social media platforms such as:
- YouTube
- X (Twitter)
- TikTok
You can customize your social media account names to include your business and domain name. You can even have your professional email address linked to your social media accounts.
Even if your website is still under construction, you can begin building momentum by sharing your journey. Introduce your brand, explain your mission, or post behind-the-scenes updates as you prepare for launch. This helps build trust and community before your site even goes live.
As your social presence grows, managing multiple accounts can become time-consuming. Tools like Network Solutions’ Social App help streamline this process by allowing you to connect platforms such as Facebook, Instagram, X, and LinkedIn in a single dashboard. From there, you can create posts, publish updates, and respond to engagement while keeping your brand messaging and visuals consistent across channels.
Kate Furnifer, Network Solutions’ Global Product Director, explains that managing multiple social platforms from a single dashboard helps businesses maintain consistent messaging and brand identity across channels. Instead of switching between different platforms, teams can schedule posts, respond to engagement, and monitor reviews in one place.
Furnifer also notes that tools like the Social App can help prevent common branding mistakes, such as inconsistent messaging or delayed responses to customer feedback.
Step 7: Develop a content and marketing strategy
Once your website is live, the next step is attracting visitors and building your online presence. A simple content and marketing strategy helps people discover your site, understand your brand, and take action.
Start by planning your key pages: Home, About Us, Services, and Contact. Then, consider building a blog or resource hub to improve SEO and provide value to visitors.
According to Alicia Pringle, Network Solutions’ Senior Director of Online Marketing, new website owners should begin with the fundamentals before expanding their marketing efforts. “Start by setting up consistent listings across key directories, creating social media profiles, and writing website copy that clearly explains what you do and why you’re different. That SEO groundwork builds momentum over time.”
There are several effective ways to start promoting your new website:
- SEO: Optimize your website content so search engines like Google can understand and rank your pages. This includes using relevant keywords, publishing helpful blog posts, and making sure your website structure is easy to navigate. Tools like Yoast SEO can help guide on-page optimization, while premium WordPress themes and plugins can further improve performance.
- Social media marketing: Share updates, behind-the-scenes content, and helpful posts across your social media accounts to build relationships with your audience and drive traffic to your site.
- Email marketing: Encourage visitors to subscribe to your mailing list so you can share updates, promotions, and new content directly with your audience.
- Paid advertising: If you want faster visibility, campaigns such as pay-per-click (PPC) ads can drive immediate traffic while your organic reach grows.
For beginners, the key is to keep your marketing strategy simple and consistent. Nicole Cassis suggests focusing on a few core themes during your first month online. “Don’t overthink your first 30 days. Talk about why you started your business, the problem you’re solving, and share helpful advice related to your niche.”
Example of a simple 30-day marketing plan
- Week 1: Publish your core website pages and your first helpful blog post.
- Week 2: Publish another article or update and share it on two social media platforms.
- Week 3: Add a lead capture form and send your first email newsletter.
- Week 4: Review your performance, see what content resonates most with your audience, and continue building on those topics.
If you want a hands-off approach, our experts on SEO and PPC advertising campaigns can help you develop a strategy tailored to your business goals.
Step 8: Set up analytics and monitoring tools
Once your website is live and your marketing efforts are underway, the next step is tracking how visitors interact with your site. Analytics tools help you understand where your traffic comes from, which pages people visit, and how users engage with your content.
According to Joe Mueller, Network Solutions’ Search Engine and AI Optimization Manager, beginners should start with two essential tools:
- Google Analytics: Tracks traffic sources, behavior, and conversions.
- Google Search Console: Monitors search visibility, indexing issues, and keyword rankings.
Both tools are free and provide valuable insights that can help you improve your website over time.
Key metrics to track from the start
When reviewing your analytics data, focus on a few core metrics:
- Sessions (visits): how many people are coming to your website
- Pageviews: which pages are attracting the most attention
- Traffic sources: where visitors are coming from (search engines, social media, or direct visits)
These metrics can help you identify what content resonates with your audience and where your marketing efforts are working best.
It’s also important to define clear goals for your website. For example, if you run a service business, your goal might be to generate leads through a contact form. Monitoring how visitors reach that form and complete it can help you improve your website’s performance over time.
As Mueller explains, analytics data should guide your decisions: “Define your goals, understand the metrics that represent those goals, and build a plan to improve those metrics.”
What else to do after buying a domain name
Once your website, email, and marketing basics are in place, your domain can serve more than just a web address. Many businesses treat domains as long-term digital assets that help protect their brand, expand their online presence, and even create potential investment opportunities.
Caroline Kay and Michael White share their expert advice on what else you can do after buying a domain:
- Register domain variations to protect your brand
- Consider domains as digital assets
- Future-proof your domain identity
Register domain variations to protect your brand
Registering additional domain variations is one of the easiest ways to protect your brand identity online. If you only own one version of your domain, competitors, scammers, or typosquatters may register similar names and divert your traffic.
According to our Senior Manager, Platinum Success, Caroline Kay, securing common variations can prevent competitors, scammers, or typosquatters from exploiting similar domain names.
Kay recommends focusing on these key categories:
- Common misspellings and typos
- Alternate domain extensions
- Hyphenated or look-alike variations
Common misspellings and typos
Identify the most likely spelling mistakes of your brand name.
- Register the top 2–4 misspellings customers might type
- This helps capture traffic from simple typing errors
- It also prevents bad actors from creating look-alike scam sites
Alternate domain extensions (TLDs)
Beyond your primary domain extension, consider registering other relevant options.
Examples include:
- .net
- .org
- .co
- .biz
- country-specific domains such as .us or .uk
Choose 2–3 extensions that are most relevant to your industry or audience.
Hyphenated or look-alike variations
Sometimes small formatting differences can send visitors to the wrong site.
Examples include:
- brand-name.com vs brandname.com
- shortened versions of your brand name
How many variations should you register?
Kay recommends avoiding unnecessary purchases and focusing on the versions that matter most. “Typically, five to ten well-chosen domain variations are enough to provide broad brand protection without unnecessary costs.”
Why this matters
Failing to secure domain variations can lead to serious brand issues. For example:
- Tesla originally didn’t own tesla.org; it was formerly controlled by a third party that used the domain for unrelated content.
- Nissan operates its U.S. website at nissanusa.com because nissan.com is owned by someone else. This confused many users, especially international buyers.
- Facebook bought fb.com, a valuable short domain, in 2010 for $8.5 million after it was owned by a third party.
These situations can confuse customers, redirect traffic, and weaken brand control.
Registering key variations early helps protect your reputation, reduce phishing risks, and ensure customers always reach the correct website
Common threats when domain variations aren’t secured
If businesses fail to register important domain variations, several risks can emerge:
- Typosquatting and phishing: attackers register common misspellings to trick visitors into fake websites.
- Competitor hijacking: competitors may register alternate extensions (.net or .org) and capture traffic intended for your brand.
- Hyphen confusion: visitors may land on another website if hyphenated versions aren’t secured.
- Malicious look-alike domains: fake domains designed to resemble your brand can be used for fraud or scams.
Consider domains as digital assets
Beyond building a website, some domain owners explore domains as long-term digital assets. While this approach isn’t necessary for most website owners, understanding how the domain marketplace works can open additional opportunities.
Michael White, Network Solutions’ Vice President for Product Management, Domain Aftermarket, explains that domain investing can be rewarding but requires realistic expectations. “Domains can serve as valuable digital assets, but sales often require time and patience. Typically, a small percentage of domains generate the majority of profits.”
Successful domain investors usually focus on quality over quantity. Instead of purchasing large numbers of random domains, they concentrate on names that businesses may eventually want to acquire.
How investors evaluate domain resale potential
Before buying a domain for investment purposes, experienced investors often consider:
- Commercial relevance: Could a real company benefit from owning this domain?
- Industry demand: Does the name relate to a growing market or popular service?
- Brand clarity: Is the domain easy to remember, pronounce, and market?
- Market activity: What types of domains are currently selling in auctions?
White recommends studying domain marketplaces and auctions to understand what buyers are actively looking for.
Understanding premium domains vs aftermarket auctions
If you want to expand your domain portfolio, you may encounter premium domains and aftermarket auctions.
Michael White explains the difference clearly: “Buying a premium domain is like purchasing a property at a listed price. Whereas bidding on aftermarket domains is like competing in a real estate auction where the highest bidder wins.”
Here are more definitions on their difference:
Premium domains:
- Listed at a fixed price
- Typically high-value names
- Purchased directly without bidding
Aftermarket auctions:
- Domains are sold to the highest bidder
- Prices can fluctuate based on demand
- Often used by investors searching for undervalued domains
Future-proof your domain identity
As your brand grows, protecting your online identity becomes an ongoing process. Beyond registering your primary domain and a few variations, businesses can take additional steps to stay ahead of emerging threats and protect their online reputation.
Kay once again explains that proactive domain protection can help prevent bad actors from registering confusing or harmful look-alike domains. And here is her expert advice on how you can protect your domain identity:
Use domain blocking services
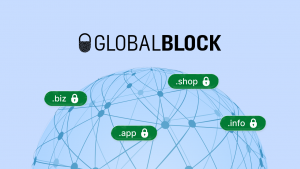
Tools like GlobalBlock help prevent others from registering domains that contain your brand name. This proactive approach can help protect customers from fraudulent websites that mimic your brand.
With GlobalBlock:
- Your brand keywords are automatically blocked across hundreds of domain extensions
- Potential scammers or competitors cannot register confusing variations of your brand
- You stop harmful registrations before they happen
Protect your brand from sensitive domain spaces
Some businesses also choose to block their brand name from being used in adult-themed domains.
Services like AdultBlock ensure your brand cannot be registered under adult-related domain extensions, helping safeguard your brand reputation in sensitive contexts.
Review your domain portfolio as your brand grows
As your business expands into new markets, products, or services, it’s important to periodically revisit your domain portfolio.
You may want to register:
- new product-related domains
- geographic variations
- additional brand names tied to new offerings
Frequently asked questions
After buying your domain, you can connect it to a hosting service, set up a professional email, and start building your website. Even if you are not a web developer, you can use CMS like WordPress to create a functional site. These foundational steps help establish your online presence.
Yes. You can use your domain for email, redirect it to an existing social media page, or “park” it until you’re ready to launch a site. When you are ready, ensure your new website is properly structured and user-friendly to achieve better organic traffic.
Use your hosting or domain provider’s email service to set up a custom address (like [email protected]). Many platforms offer easy setup tools and integrations with popular email clients, such as Gmail or Outlook.
Choose a hosting provider, install your preferred website builder or CMS, and begin designing your pages. If you’re on a tight budget, you can look for free hosting services, keeping in mind that while it can work for temporary experiments, paid hosting is strongly recommended for business websites.
Point your domain’s DNS settings to your hosting provider so your website can go live.
Use it for your website, business email, branded links, or redirect it to an existing site or landing page.
Turn your domain into a powerful online presence
Owning a domain name is your key to establishing a genuine online presence. By taking these simple but important steps, you’re turning that domain into a valuable digital asset. With a well-planned marketing strategy and continuous optimization efforts, your business can thrive online.
Explore our hosting and Professional Email plans to establish a solid foundation for your website and effective communication. We’re here to support you every step of the way as you grow your presence online.
Still looking for the perfect domain?
Start with Network Solutions. Get your domain plus free apps to help you take the next steps with confidence.