Key takeaways:
- Most GoDaddy domain transfers to other registrars take between five and seven days, but you can avoid delays by confirming your registrant email access, reviewing DNS settings, and checking for domain locks before starting the process.
- Transferring your domain does not automatically move your hosting service, website files, or business email. If you plan to switch hosting providers, too, you may need to update your name servers and DNS records after the transfer.
- You’ll need an authorization code (EPP code) from GoDaddy to transfer your domain to another registrar. Keep the code accessible and respond promptly to approval emails to speed up the transfer process.
Transferring your domain away from GoDaddy is a fairly straightforward process, but there are a few important steps you’ll need to complete before the transfer can begin. Most domain transfers take between five and seven days, though some may finish sooner depending on your registrar and domain settings.
This guide walks you through preparing your domain for transfer, initiating the transfer from GoDaddy, and completing the process with your new registrar. You’ll also learn how to manage your website, DNS settings, and email services during the transition to help avoid unnecessary downtime.
Find the perfect domain
Ready to register a domain name? Check domain availability and get started with Network Solutions today.
How to prepare your domain name for transfer
Before you transfer your domain away from GoDaddy, make sure your account and domain settings are ready for the transfer. Taking a few minutes to review your domain info ahead of time can help you avoid delays, failed transfer requests, or unnecessary downtime.
Before you continue, check the following:
- Make sure at least 60 days have passed since your domain was registered or transferred to GoDaddy. ICANN policy prevents domain transfers during this period.
- Verify that you still have access to your GoDaddy account and the registrant email address connected to the domain. You may need to approve transfer requests through email during the process.
- Review your DNS records, hosting provider settings, and connected services like email or WordPress before making changes. This can help you keep your website connected and reduce the risk of downtime after the transfer.
- Confirm that your domain contact information is accurate and up to date. Recently changed registrant info may temporarily delay your transfer request for security purposes.
- Check your domain’s expiration date before starting the transfer. Some registrars may not allow expired domains to transfer until they are renewed.
Note: If you’re unfamiliar with some of these terms, our domain glossary can help clarify key domain and hosting concepts mentioned in this guide.
How to transfer a GoDaddy domain to a new registrar
Disclaimer: The process(es) described here are current at the time of writing but may change without prior notice.
Once your domain is ready for transfer, you can begin moving it to your new registrar. The process is usually straightforward and can often be completed in just a few minutes, though the full transfer may take several days to finalize, depending on your domain settings and approval process.
To make the instructions easier to follow, we’ve divided the process into two parts. First, you’ll initiate the domain transfer in your GoDaddy account by unlocking the domain and requesting your authorization code (EPP code). Then, you’ll continue the transfer process with your new registrar by submitting the transfer request and approving the transfer when prompted.
Part 1: Initiate the domain transfer at GoDaddy
The first part of the process happens inside your GoDaddy account. During this stage, you’ll unlock your domain, request an authorization code, and prepare the domain for transfer to your new registrar.
Before you begin, make sure you still have access to the registrant email connected to the domain. GoDaddy may send approval or security verification emails during the transfer process.
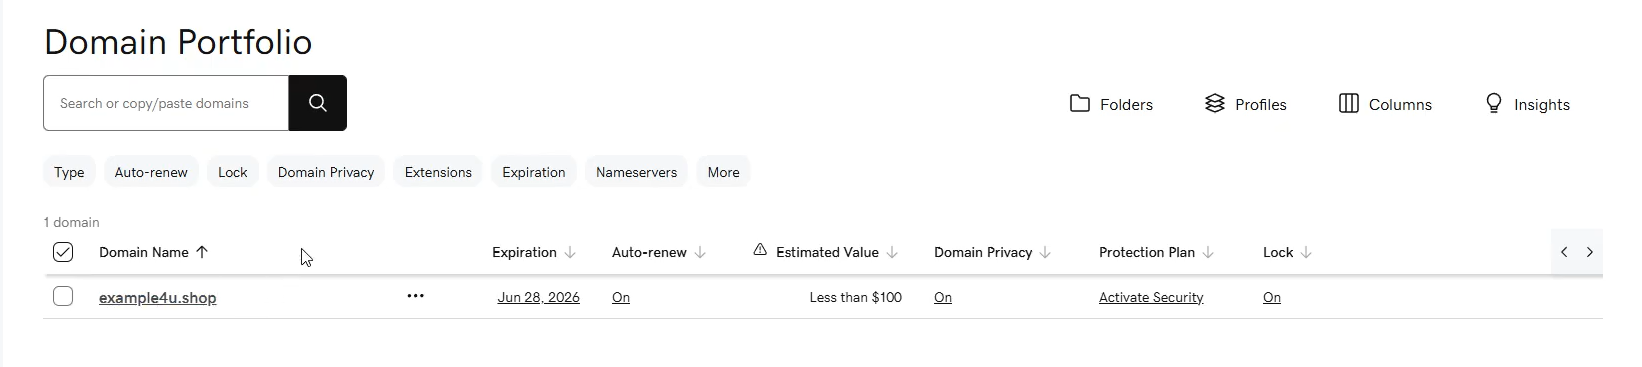
Step 1: Sign in to your GoDaddy account
Log in to your GoDaddy account and head to your Domain Portfolio. From there, select the domain name you want to transfer to another registrar.
Step 2: Unlock your domain
Before you can transfer your domain away from GoDaddy, you’ll need to disable the domain lock. This security feature helps prevent unauthorized domain transfers, so it must be disabled before the transfer request can proceed.
In your domain settings page:
- Scroll to the Transfer section.
- Locate the Domain Lock setting.
- Toggle it from On to Off.
Once unlocked, the option to transfer your domain to another registrar should become available.

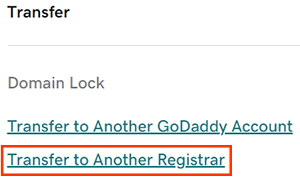
Step 3: Start the transfer process
In your domain settings page, locate the Transfer section and select Transfer to Another Registrar. If your domain is not eligible for transfer, GoDaddy will display additional information explaining why.
Step 4: Review the transfer checklist
GoDaddy will display a transfer checklist with important details about your domain. Review the information carefully before you continue.
At this stage:
- Your domain should be unlocked.
- Your domain privacy settings may automatically be turned off.
- GoDaddy may ask you to complete additional security verification depending on your account settings.
If your registrant contact info was recently changed, your domain may still be under a temporary 60-day transfer lock.
Step 5: Request your authorization code
Select Continue with Transfer to generate your authorization code or transfer key. This code confirms domain ownership and is required by your new registrar to continue the transfer request.
GoDaddy will display the authorization code on-screen and send a copy to your registrant email address.
Step 6: Save the code and prepare for approval emails
Copy and securely save your authorization code since you’ll need to enter it when starting the transfer with your new registrar.
Over the next few days, GoDaddy may send confirmation emails requesting your approval of the transfer request. Responding promptly can help avoid unnecessary delays and reduce the total transfer time. Most domain transfers complete within five to seven days.
Part 2: Begin the domain transfer at the new registrar
Once you have your authorization code from GoDaddy, you can begin the transfer process with your new registrar. While the exact steps may vary depending on the provider you choose, most registrars follow a similar process.
For this example, we’ll use Network Solutions to show how a typical domain transfer works from your GoDaddy account.
Step 1: Enter your domain name
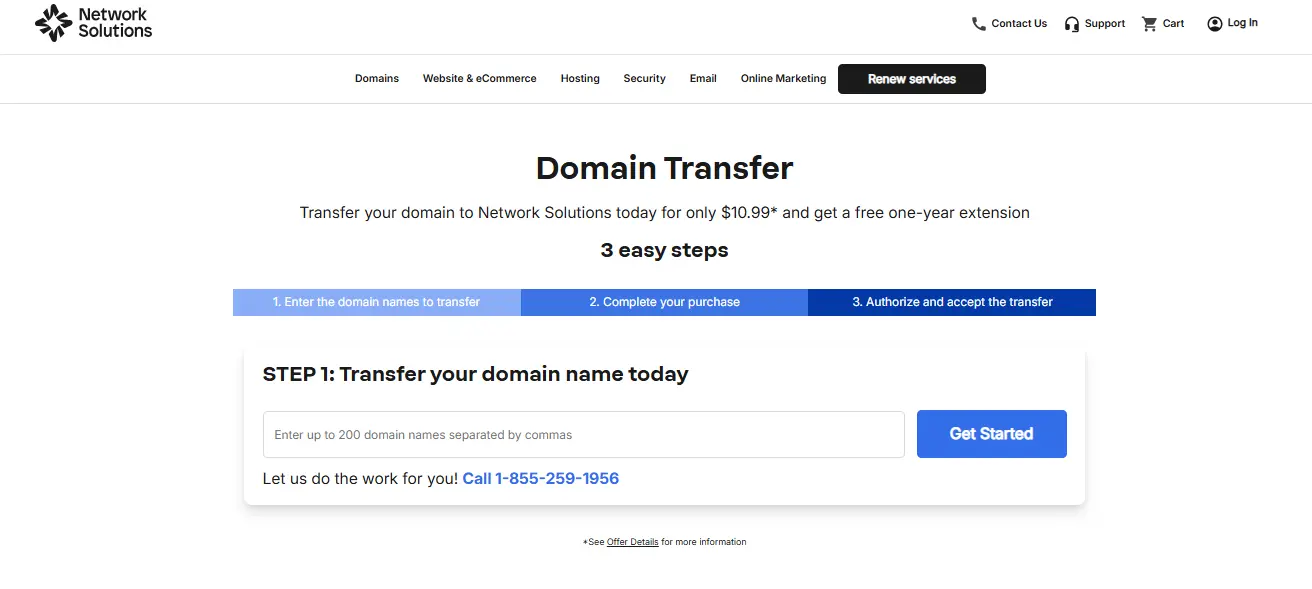
Go to the Network Solutions domain transfer page and enter the domain name you want to transfer. If you’re moving multiple domains, you can usually enter them together during the same request.
After entering your domain, the system will check whether the domain is eligible for transfer and prompt you to continue.
Find the perfect domain
Ready to register a domain name? Check domain availability and get started with Network Solutions today.
Step 2. Complete your purchase
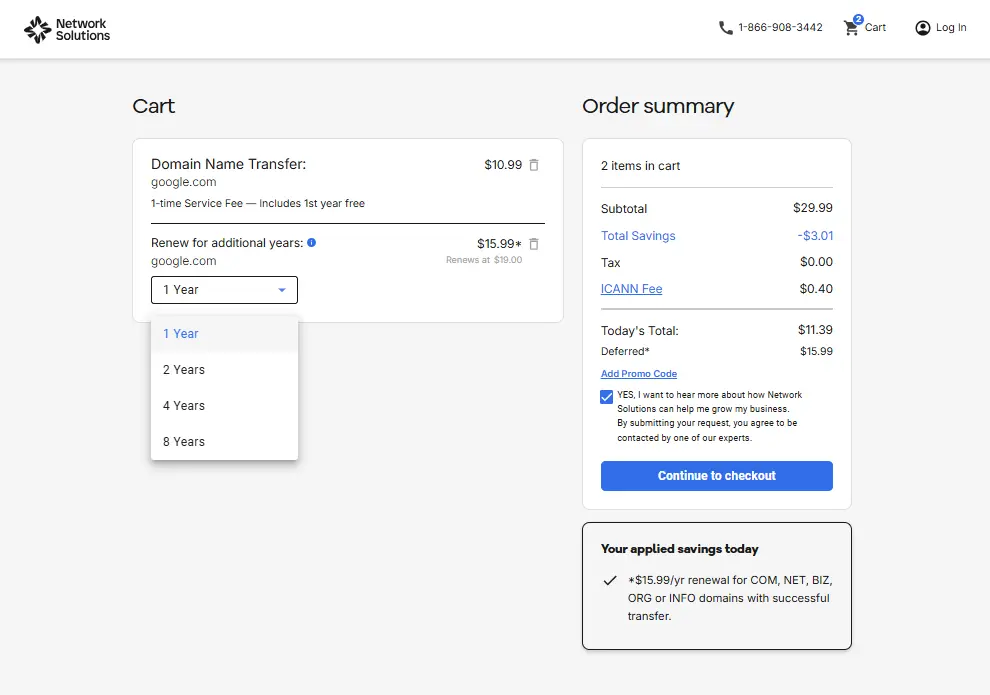
After entering your domain name, Network Solutions will display a summary of your transfer order. At this stage, you can review the transfer cost, confirm the domain you’re moving from your GoDaddy account, and choose whether you want to extend your registration for additional years.
During checkout, you may be able to:
- Add extra registration years using the dropdown menu.
- Review any promotional savings automatically applied to your order.
- See the ICANN fee included in the total cost.
Some domain transfers also include a one-year renewal fee.
Once you’ve reviewed your order, click Continue to checkout to proceed.
Step 3. Create or sign in to your account
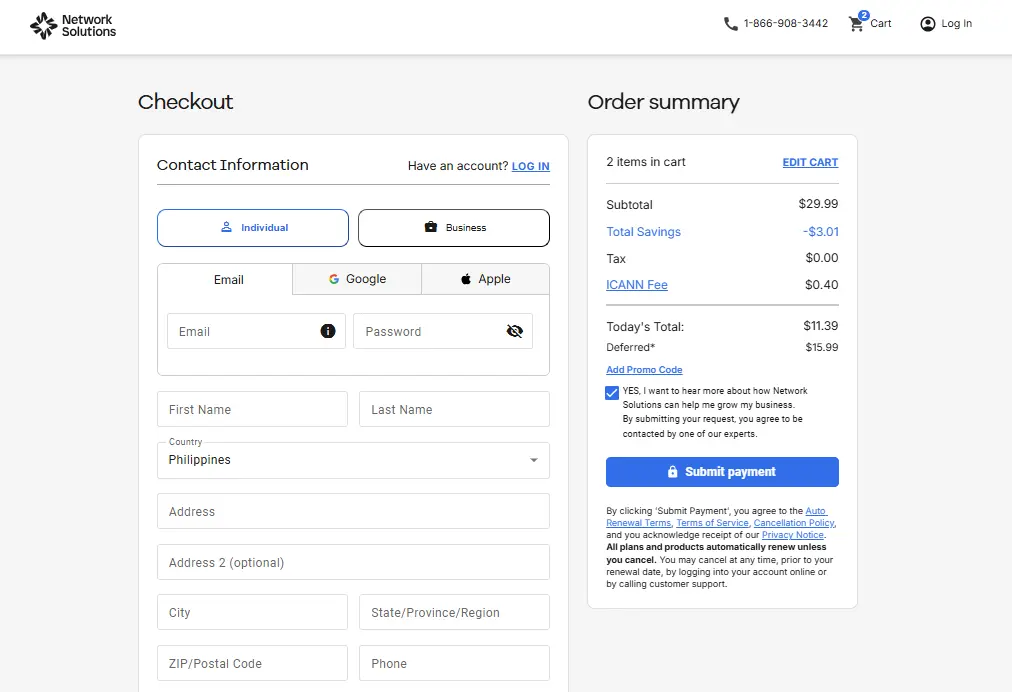
To continue the transfer, you’ll need to either create a new account or sign in to your existing registrar account.
Before submitting the transfer request, you may be asked to provide your:
- Registrant information
- Billing address
- Payment details
Make sure to use the same registered email address you used with GoDaddy.
Step 4. Approve and complete the transfer request
After you submit your order, the domain transfer process will begin. Network Solutions and GoDaddy may send confirmation or authorization emails to the registrant email address connected to your domain.
Check your inbox carefully and approve any transfer-related requests as soon as possible. In some cases, you may also need to enter the GoDaddy authorization code in your Network Solutions Account Manager to continue the transfer.
Most domain transfers take between five and seven days to complete, though some may finish sooner depending on how quickly approvals are completed.
During this transition period, keep your existing website, DNS settings, access to your hosting provider, and connected services available until the transfer is fully finalized.
How to manage the transition period after a domain transfer
Once your domain transfer request is approved, your domain will begin moving to the new registrar. While the transfer itself is usually straightforward, the transition period is still important. This is the stage where DNS settings, website connections, and email services may need to be reviewed to make sure everything continues working properly.
Most people experience little to no downtime during a domain transfer, especially if their DNS settings remain unchanged. Still, taking a few extra minutes to test your services and confirm your domain info can help you avoid unexpected issues after the transfer is complete.
Update DNS settings and name servers, if necessary
A domain transfer does not automatically transfer your hosting service. Your domain registrar and hosting provider can remain completely separate, so what happens next depends on whether you plan to keep your current hosting setup or move to a new hosting provider.
If you’re keeping your existing hosting provider, your website should continue working normally as long as your DNS settings and name servers remain unchanged during the transfer. In most cases, there’s no need to update anything immediately after the domain transfer is complete.
However, if you plan to move your website, WordPress installation, business email, or other connected services to a different hosting provider, you’ll likely need to update your name servers or DNS records after the transfer.
Depending on your setup, this may include updating:
- Name servers: Update your name servers if you’re transferring your website, hosting service, email, and other connected services to a completely different hosting provider.
- A records: Update your A records if you need your domain to point to a new website server or hosting provider after the transfer.
- MX records: Update your MX records if you’re moving your business email service or reconnecting email accounts tied to your domain.
- CNAME records: Update your CNAME records if your domain uses third-party services, custom subdomains, or platforms like WordPress.
- Other DNS settings: Review any additional DNS settings connected to your domain to ensure your security tools, email platforms, and external services continue to work properly after the transfer.
Before making changes, make sure your new hosting account is fully set up and ready to receive traffic. This can help reduce downtime and prevent visitors from landing on a broken or incomplete website during the transition.
DNS updates can take anywhere from a few minutes to several days to fully propagate worldwide. During this time, some people may temporarily see your old website while others see the updated version.
If you’re unsure whether your hosting service is connected to your current registrar or an external hosting provider, review your DNS settings carefully before making any changes. This is important if your domain is connected to services such as WordPress or a custom email platform.
Test website functionality
After the transfer is complete, test your website and connected services to confirm everything still works as expected.
Check the following:
- Website pages, functionality, and navigation
- Contact forms
- SSL certificates
- Business email accounts
- WordPress connections
- Third-party services tied to the domain
If something appears broken, double-check your DNS settings and registrant info first. In many cases, website or email issues after a transfer are caused by missing or changed DNS records rather than the transfer itself.
It’s also a good idea to log in to your new registrar account and review your domain settings, renewal preferences, and security options so you maintain full control over your domain moving forward.
Frequently asked questions
A domain lock is a security feature offered by domain registrars to prevent unauthorized changes to your domain name. This usually includes preventing it from being transferred to another registrar without your permission. It acts as a safeguard against domain theft or accidental transfers.
To unlock your domain name, you typically need to:
1. Log in to your account at your current domain registrar’s website (e.g., GoDaddy, Namecheap, etc.).
2. Navigate to the domain management section or similar.
3. Find the settings for your specific domain name.
4. Look for an option related to “Domain Lock,” “Registrar Lock,” or “Transfer Lock.”
5. Disable or turn off the lock.
The exact steps can vary slightly depending on your registrar. If you can’t find the option, the registrar’s customer support team can help unlock your domain.
In some cases, yes. However, the cancellation process depends on how far along the transfer request is and which registrar currently has control of the domain.
If you’ve changed your mind before the transfer is complete:
– Keep your domain locked at your current registrar if possible. This may help prevent the transfer from continuing.
– You may also receive a transfer approval email from your current registrar. If you no longer want to proceed, ignore or decline the request.
If you already submitted the transfer request with the new registrar:
– Contact the new registrar’s customer support team as soon as possible and request cancellation.
– Be prepared to provide your domain name, account info, and order details for verification purposes.
If you suspect the transfer request was unauthorized or fraudulent:
– Contact both your current and new registrars immediately.
– Some registrars may temporarily pause the transfer while they review the request for security reasons.
If your domain transfer is already in progress:
– In many cases, the gaining registrar must initiate the cancellation request.
– Depending on the transfer stage, cancellation may no longer be possible once the registrant approves the transfer or the authorization code has been processed.
Important: If not completed immediately, transfer requests may automatically be canceled after a certain period (e.g., 90 days).
First, identify the reason for the failure, take the necessary steps to resolve it with your current registrar, and then contact your registrar’s support team for further assistance if you’re still having trouble.
Transferring your GoDaddy domain might fail if your domain has one of the following:
– A recent 60-day registration or transfer
– A domain lock
– Active privacy settings
– Inaccurate contact information
– An unresolved dispute
Always make sure to prepare your domain prior to initiating the transfer.
The cost to transfer a domain to GoDaddy is typically a flat fee that often includes a free year of registration. For a .com domain, this fee is generally around $9.99.
Other domain extensions may have different transfer costs. It’s best to check the new registrar’s domain transfer page for the most accurate pricing for your specific domain.
Transferring your domain typically doesn’t take your website offline since your files and hosting stay the same. The transfer only changes the domain registrar. However, if you’re also switching hosting or updating DNS settings, temporary downtime may occur. To avoid interruptions, ensure your DNS records remain intact.
Make the switch to Network Solutions
A domain transfer is more than just moving your registration from one provider to another. It’s a chance to build a setup that gives you more control over your website, branding, and future growth online.
When you transfer your domain to Network Solutions, you get more than domain management. Every eligible domain includes access to marketing tools designed to help you launch faster, stay connected with customers, and keep your business moving forward.
This includes a Coming Soon Page to help you establish your online presence early, a Link in Bio tool for your social channels, a Social App to manage your online activity, a Customers App to organize customer interactions, and a Marketing Calendar App to help plan campaigns and content more efficiently.
Whether you’re building a new website, connecting your domain to a hosting provider, or expanding your business online, the right tools can make the process easier to manage and easier to scale. Make the move with a provider built to help you break through and keep progressing forward.
Your domain should work harder for your business.
Transfer your domain and unlock access to email, security, and marketing solutions designed to grow with you.