Key takeaways
- A URL blacklist means a browser, search engine, or security service has flagged part of your website as unsafe, often because of malware, phishing, spam, or hacked content.
- Blacklisting can reduce traffic, damage user trust, and weaken your SEO performance through warning labels, lower click-through rates, and possible visibility loss.
- The best recovery path is to confirm where you’re flagged, remove the root cause, request review where needed, and strengthen your site so the issue does not come back.
If you’re here, you probably feel something off on your website, and you’re trying to figure out the cause. Maybe visitors are seeing a browser warning, traffic suddenly dropped, a customer flagged your site as unsafe, or rankings started slipping.
A URL blacklist can cause all of that.
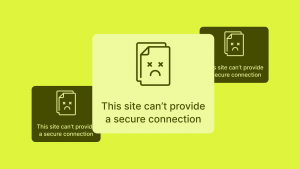
When a page, folder, or domain is flagged as suspicious, browsers, search engines, and security tools may warn users before they even reach your site. But a URL blacklist doesn’t only affect security.
In this guide, you’ll learn what a URL blacklist is, how it works, how to check if your site is affected, how to get removed, and how to help prevent it from happening again.
Keep your site off URL blacklists
URL blacklists often start with security problems. Network Solutions SSL certificates help protect visitor data and support blacklist prevention.

What a URL blacklist is
A URL blacklist is a list of URLs that flags a website as potentially unsafe. If a URL is blacklisted, the warning may come from:
- Search engines and browser security features
- Security tools and antivirus software
- Workplace, school, or parental filtering systems
In simple terms, it means a security service believes a page, section of a site, or full domain could put visitors at risk.
Sites are usually flagged for problems like:
- Malicious content or malicious software
- Phishing attempts or fake pages
- SEO spam
- Harmful redirects
- Hacked or compromised files
For website owners, a blacklist warning can affect visibility, trust, and website traffic.
URL blacklist vs IP blacklist vs email blacklist
Not every blacklist warning means the same thing. A URL blacklist, IP blacklist, and email blacklist each affect a different part of your online presence. They’re easy to confuse, so we’ll break down each type:
Type | What gets flagged | What it affects | Common cause |
|---|---|---|---|
URL blacklist | A page, path, or domain | Website traffic, browser trust, SEO | Malware, phishing, hacked pages, spam |
IP blacklist | A server IP address | Server reputation, access, sometimes email | Abuse, spam, suspicious server activity |
Email blacklist | A sending IP or domain used for mail | Email deliverability and inbox placement | Spam complaints, poor sending practices, compromised mail accounts |
MXToolbox is most useful for checking email blacklists and IP blacklists, not browser-based URL blacklist warnings. If the problem involves email deliverability or server reputation, it can help you see whether your domain or IP has been flagged.
But if users are seeing a browser warning like “Dangerous site” or “Deceptive site ahead,” that usually points to a URL blacklist issue, which is better checked through browser and website security services.
Why blacklisting exists
Blacklisting exists to protect users from harmful websites and other online threats. Security systems, search engines, and other security providers use it to flag pages linked to malicious software, phishing attempts, scams, spam, or other malicious content that could put visitors at risk.
In many cases, these warnings are meant to stop people before they enter a dangerous site, give up login credentials, or interact with content tied to security threats. For website owners, that distinction matters. Blacklisting is not just a penalty. Its main purpose is to warn users away from risky web addresses and reduce the chance of harm.
How URL blacklisting works
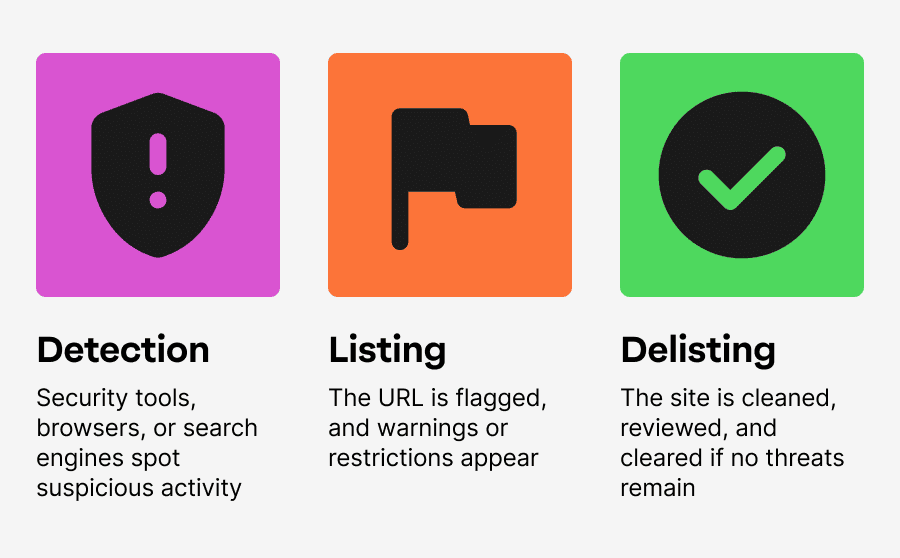
URL blacklisting usually happens in three stages: detection, listing, and delisting.
You can think of the process like this:
- Detection: Security tools, browsers, or search engines spot suspicious activity
- Listing: The URL is flagged, and warnings or restrictions appear
- Delisting: The site is cleaned, reviewed, and cleared if no threats remain
It starts when a browser, search engine, or other security service detects signs of malicious content or suspicious behavior tied to a website URL. That can include malware or phishing attempts, SEO spam, deceptive downloads, spammy redirects, or compromised code. Once those security issues are detected, the affected page, folder, or domain may be added to one or multiple blacklists.
From there, users may see a warning message, a security warning, or blocked access before reaching the site. In some cases, the issue can also affect search engine results and reduce website traffic.
If the site owner fixes the problem, removes the malicious code or other harmful elements, and submits a review or request removal, the flagged URL can be rechecked. Once the site is verified as safe, the warning may be lifted.
What gets blacklisted
Not every blacklist issue affects an entire website. A warning can apply to a single page, a folder, or the full domain, depending on where the malicious content or other security issues are found.
For example, a blacklist may apply to:
- A single page, like yourdomain.com/checkout
- A directory, like yourdomain.com/account/
- The entire domain, if the problem is widespread across the site
This usually depends on the scope of the threat. If a fake login page, hacked checkout page, or one piece of malicious code is isolated to a specific URL, only that page may be flagged. If multiple pages are compromised, or if the site is serving broader malware or phishing attempts, the warning can expand to a larger section of the site or the full domain.
That distinction matters for both cleanup and recovery. A single flagged page may point to a more contained issue, while a domain-level warning often signals deeper security problems, such as infected files, risky redirects, or broader weaknesses in your website files and access controls.
Knowing exactly what part of the site is affected helps website owners focus their investigation, remove the root cause faster, and submit a more accurate review or request removal.
Common reasons a URL gets blacklisted
Most blacklist issues start with a compromise, a vulnerability, or suspicious content that makes the site look unsafe.
- Malware or injected code
- Phishing pages or credential harvesting
- SEO spam and spammy redirects
- Hosting or supply chain issues
- Hacked admin accounts and weak access controls
Malware or injected code
One of the most common reasons a site gets flagged is malware or unauthorized code added without the owner’s knowledge. This often happens through outdated plugins, vulnerable themes, insecure scripts, or stolen admin credentials.
In practice, that can look like:
- Hidden JavaScript
- Injected iframes
- Malicious downloads
- Suspicious redirects
- Hacked or modified site files
Some infections go further and install software designed to monitor activity, steal data, or quietly collect information from users. That type of malicious software is often spyware.
Phishing pages or credential harvesting
Some sites get flagged because attackers create fake login screens, spoofed payment pages, or copycat account forms meant to steal credentials. Google includes deceptive pages and possible phishing on login pages in its security issue categories.
These pages often imitate trusted brands, banks, or internal login systems, which is exactly why they get flagged so quickly.
SEO spam and spammy redirects
Blacklisting can also happen when a compromised website starts serving spam.
That may include hidden text, doorway pages, injected links, auto-generated junk pages, or redirects that send users to unrelated or harmful destinations. Mobile-only redirects are especially tricky because they may not show up when the site owner checks the page from a desktop device.
Hosting or supply chain issues
Sometimes the problem is not your original content at all. It may come from:
- A compromised third-party script
- Infected ad tags
- Unsafe chat widgets
- Shared hosting issues
- External resources loading malicious code
That is why blacklist investigations need to look beyond your visible pages and into the scripts, services, and environments connected to them.
Hacked admin accounts and weak access controls
Weak passwords, outdated accounts, and too many admin-level users can make a site much easier to break into. That’s why basic access controls matter so much.
Two simple but important steps are to review user permissions regularly and enable two-factor authentication. If too many people have high-level access, or old accounts are still active, it becomes easier for attackers to get in and harder for site owners to trace what happened.
How a blacklisted website can hurt your SEO efforts
A blacklisted website can hurt more than security. It can also make it harder for people to find and trust your site in search.
If security issues are detected, your pages may show warnings in search results or in the browser. That can lead to lower rankings, less website traffic, and in some cases, removal from search engine results until the issue is fixed.
Let’s discuss three points you have to consider:
- Immediate SEO symptoms
- Business impact beyond SEO
- User behavior signals that compound SEO damage
Immediate SEO symptoms
The first signs often show up in your search performance. A site blacklisted by Google or other search engines can lose visibility quickly, especially if the issue affects important pages or creates a visible security warning for users.
Common SEO symptoms include:
- Sudden ranking drops
- Lower visibility for key pages
- Possible deindexing of affected URLs
- Reduced crawling or slower reprocessing of pages
- Branded searches showing warning labels instead of trust signals
- Loss of rich results, when applicable
If search engines detect hacked content, malicious content, phishing attempts, or other security issues, they may treat the site more cautiously in search results. That can make your pages harder to rank, harder to trust, and easier for users to avoid.
User behavior signals that compound SEO damage
A security warning doesn’t just affect visibility. It also changes how people respond to your site. When users see a message like Dangerous site ahead or Deceptive site ahead, many will leave immediately or avoid clicking in the first place.
That can lead to:
- Higher bounce rates from warning pages
- Lower click-through rates from search results
- Fewer visits from branded searches
- Lost trust before users even reach your content
Over time, those behavior shifts can put more pressure on your SEO by reducing web traffic, weakening engagement, and making it harder for your site to recover once it is blacklisted.
Business impact beyond SEO
The impact of a blacklisted website usually goes beyond search engine results. Once users see a security warning or lose trust in your website URL, the damage can affect leads, sales, and your broader brand reputation.
A site blacklisted for malicious content, phishing attempts, or other security issues can lead to:
- Fewer leads
- Fewer sales
- More support requests from concerned customers
- Lower trust in your brand
- Long-term damage to your reputation
If email is affected too, the impact can grow even wider. An IP blacklist or email blacklist can hurt deliverability at the same time your website is losing web traffic, which is why it helps to separate URL blacklist issues from email and server reputation problems.
How to check if your site or URL is blacklisted
If you think your website has been flagged, start by confirming what users are seeing and which system is doing the flagging. That helps you avoid fixing the wrong problem.
Quick checklist
Start with the basics before you move into deeper checks.
- Look for browser warning screens
- Test the site in another browser, device, or network
- Run a reputable external scan or URL reputation check
- Note whether the issue affects one page or the whole site
Browser warnings are often the clearest first sign. Users may see messages like Dangerous site ahead, Deceptive site ahead, or another warning message that signals possible malicious content, phishing websites, or other security threats.
Testing the site in a second environment helps rule out local causes, such as cached warnings, browser extensions, device-specific settings, or filtering from internet service providers or workplace networks. It also helps confirm whether the problem is widespread or limited to one setup.
Running external online tools can give you a second opinion. A reputable scan may detect signs of malicious code, hidden redirects, suspicious scripts, or other security problems that could explain why the URL is blacklisted.
It also helps to note the scope of the issue early. If only one page is affected, the problem may be more contained. If multiple pages or the full site trigger warnings, that often points to broader security vulnerabilities, compromised website files, or more serious malicious activity.
Check for security alerts in Google tools
If Google is involved, Google Search Console is one of the best places to start. Its reports can help website owners see whether Google has detected security issues such as malware, hacked content, deceptive pages, harmful downloads, or other signs of malware or phishing attempts.
You should also check the Manual Actions report. A manual action is not the same as a browser-based security warning, but it can still affect rankings, visibility, and website traffic in search engine results.
This step is especially useful because it helps separate a true security problem from a search visibility issue. If your site is showing warnings in Google-related systems, Google Search Console will usually give you the clearest starting point for cleanup and review.
Check whether it’s actually an IP or email blacklist
Sometimes the issue isn’t a URL blacklist at all. If your main problem is poor email deliverability, bounced messages, or trouble sending mail, the issue may be tied to an IP blacklist or email blacklist instead of your website itself.
That is where MXToolbox-style checks are more useful. These tools are built mainly for email and server reputation, so they can help confirm whether your sending domain or server IP has been flagged. They are less useful for checking browser-based unsafe-site warnings tied to search engines, security software, or other website-focused security systems.
In other words, if users are seeing a browser warning when they visit your site, start with website and browser security tools. If the bigger issue is email delivery, then IP and email blacklist checks make more sense.
[INSERT PRO EMAIL CTA IN WP]
How to check if your website is blacklisted using Google Search Console
Google Search Console is one of the most useful tools for checking whether Google has flagged your site for security issues or manual actions. It gives site owners a clearer view of problems that may affect search results, trust, and website traffic.
Before you start
Make sure you have:
- A Google Search Console account
- Access to the right property
- The correct setup, whether that is a domain property or URL-prefix property
If you check the wrong property, you could miss issue reports or security alerts for the version of the site you actually need to review.
Step-by-step: Find security issues
Step 1: Open Google Search Console and select the correct property
Log in to your Google Search Console account and choose the property linked to the affected website. Double-check that you are in the right property before you go further.

If your site has multiple versions set up, such as http, https, www, or non-www, opening the wrong one can make you miss important reports.
Step 2: Go to Security and Manual Actions
From the left navigation, open Security and Manual Actions, then select Security issues. This section shows whether Google has detected malware, hacked content, deceptive pages, harmful downloads, or other security-related problems that may affect how your site appears to users.
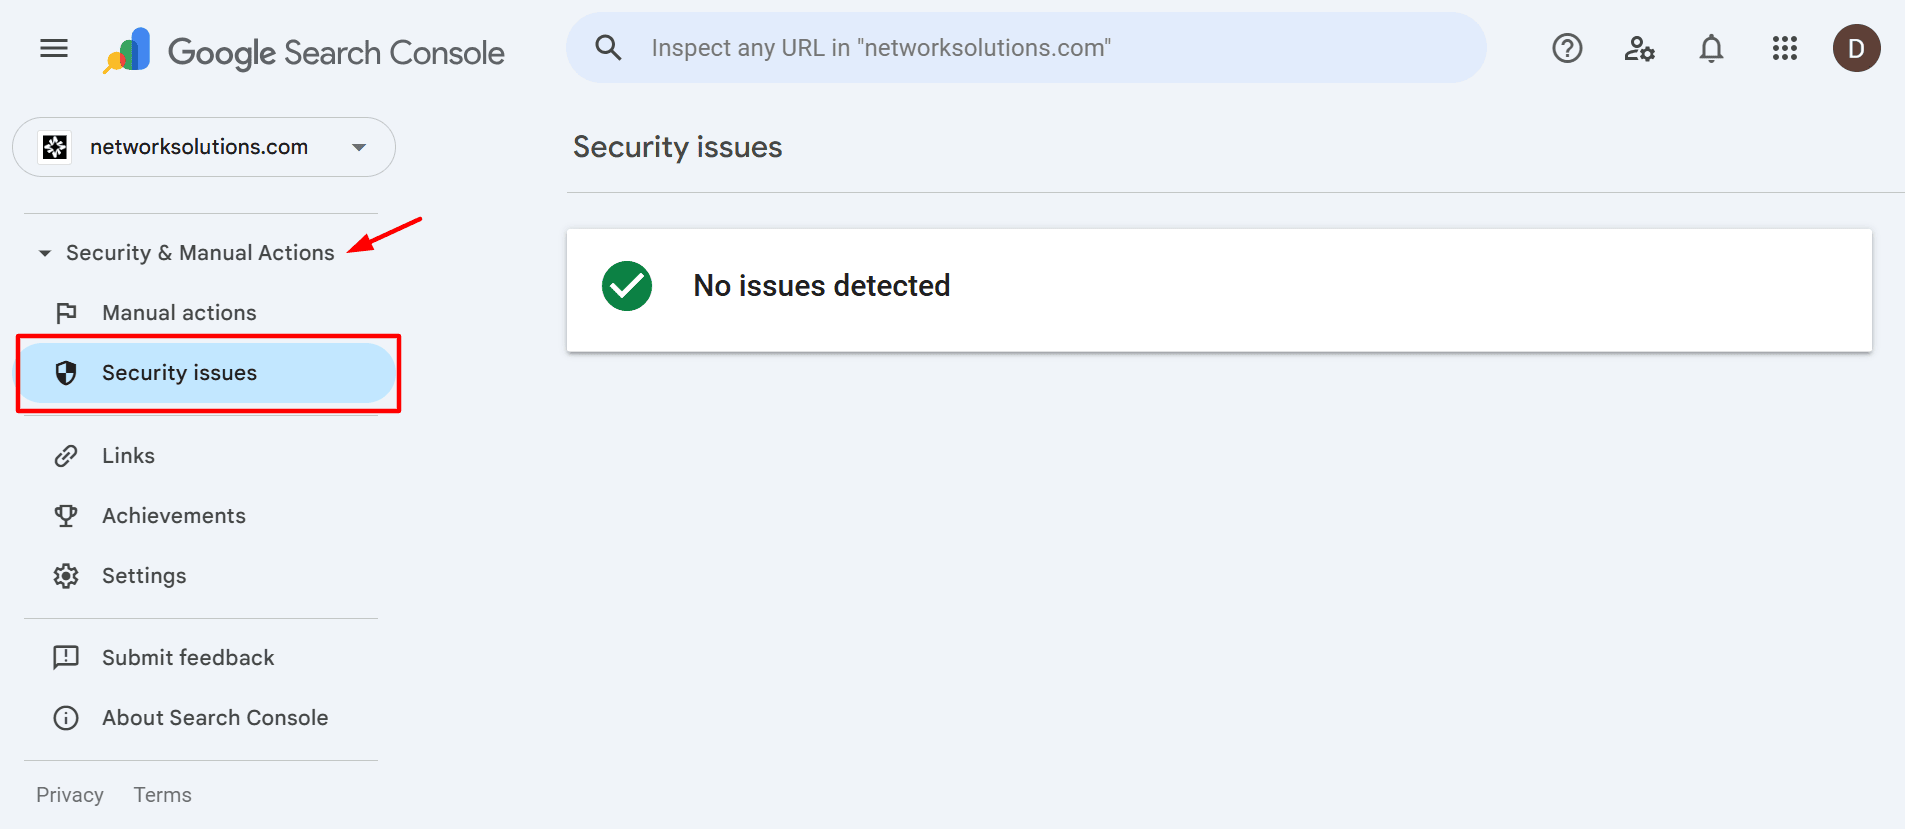
However, if your website doesn’t have any flagged issues, it will show a No issues detected sign just like the image above. If that appears, then there’s no problem. However, if there are issues present, proceed to the next step.
Step 3: Review the flagged issue type and the example URLs
Check the issue name first, then look at any example pages listed in the report. These examples can help you narrow down what kind of problem Google found and where it may be happening. Pay attention to whether the warning points to one isolated URL or suggests a larger issue across multiple pages.
Step 4: Document the details before starting clean-up
Save the affected URLs, issue categories, and the date you found them. You may also want to take screenshots of the report and note whether users are seeing a warning in the browser, in Google search, or both. This gives you a clean reference for investigation, helps organize your fixes, and makes the review request easier later
Step-by-step: Check manual actions
Step 1: Go to Security and Manual Actions
In Google Search Console, open Security and Manual Actions, then click Manual actions. This report is separate from the Security issues section and shows whether Google has applied a manual penalty to your site for policy violations.
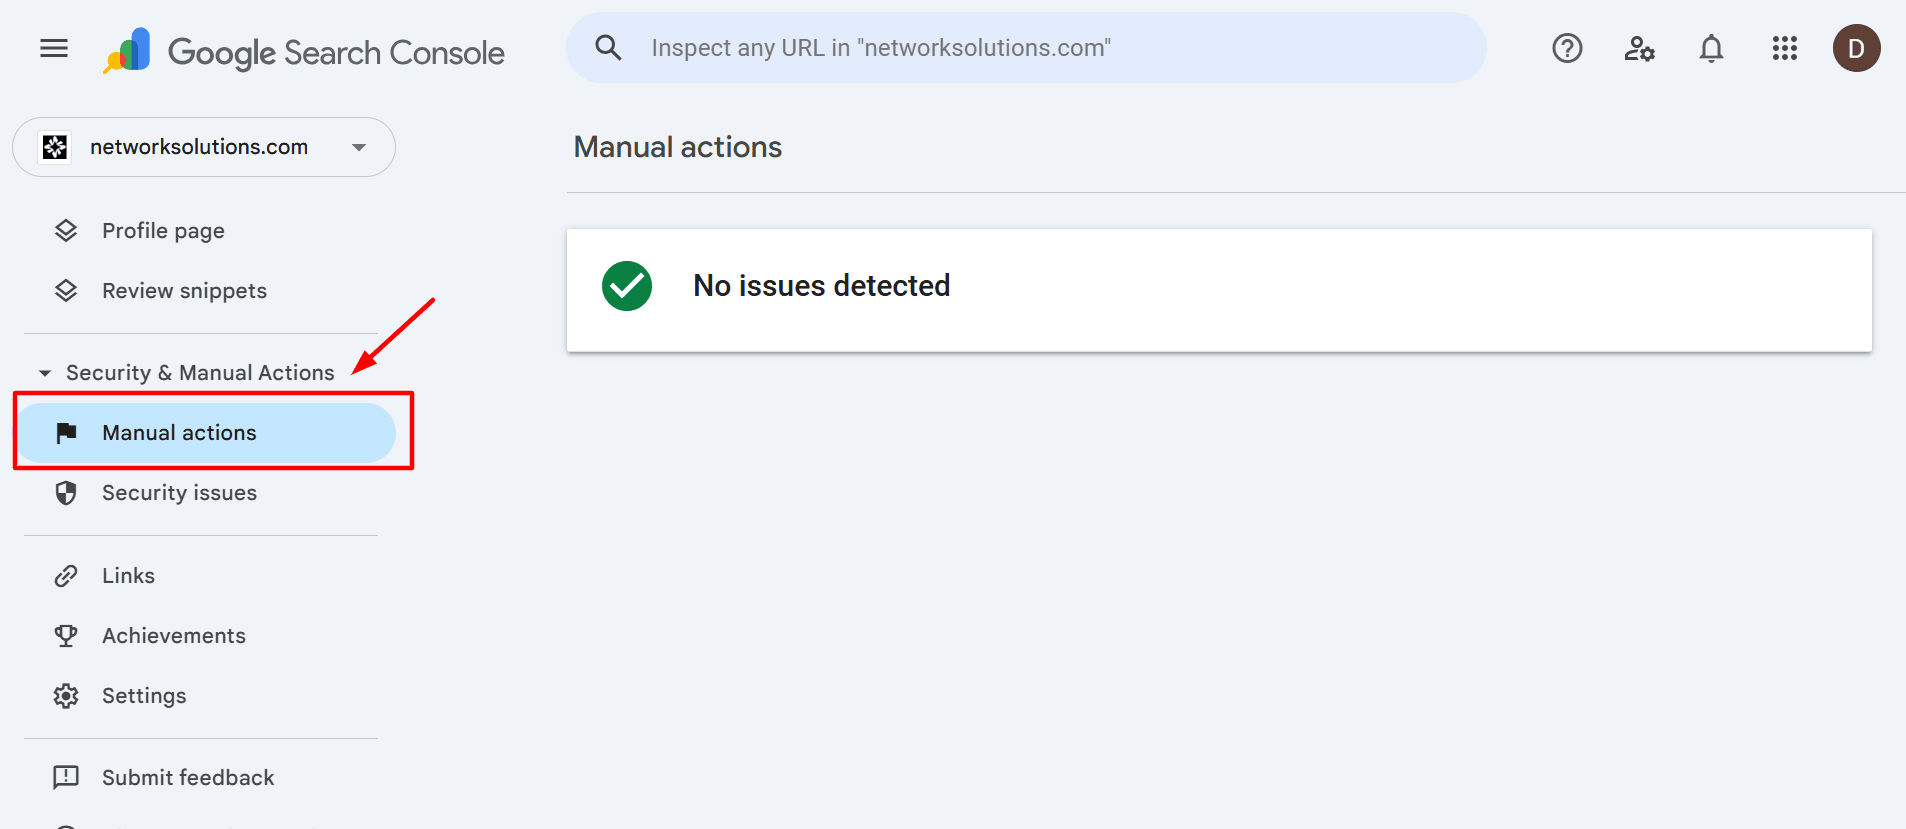
Once again, if your website is clean, it will show the same No issues detected sign. If there are issues, you should see a list there instead. If you do, proceed to the next step.
Step 2: Check whether the action is site-wide or partial
Read the report closely to see how broad the issue is. Some manual actions affect only specific pages or sections of a site, while others apply more widely. Knowing the scope helps you understand whether the problem is limited or likely to affect your overall visibility in search results.
Step 3: Save the examples and notes for cleanup
Record any example URLs, issue descriptions, or behaviors mentioned in the report. These details can help you find patterns, fix the root problem more accurately, and prepare a stronger review request once the issue has been resolved.
Step-by-step: Inspect a specific URL
Step 1: Open the URL Inspection tool in Google Search Console
Sign in to your Google Search Console account and use the URL Inspection bar at the top of the screen. Paste in the full website URL you want to check, including the correct version of the page. This tool helps you see how Google views a specific URL and whether there are signs that the page is affected by broader security issues.
Step 2: Inspect a flagged URL first
Start with a URL that appears in the Security issues report or one that users have flagged after seeing a security warning. This gives you the clearest starting point because you are checking a page already connected to possible malicious content, phishing attempts, or other security problems.
Step 3: Review what Google shows for that page
Look closely at the page details in the inspection results. You want to confirm that you are checking the right URL and see whether the page appears to be indexed, reachable, and recognized correctly by Google. If the page has been involved in suspicious behavior, this helps you understand whether the issue may be limited to that URL or tied to something larger.
Step 4: Inspect the homepage next
After checking the flagged page, inspect the homepage. This is an important comparison point because it can show whether the problem is isolated or whether it may affect the main entry point of the site, too. If the homepage also appears to be affected, that may point to broader security vulnerabilities, risky redirects, or compromised website files.
Step 5: Inspect a known-clean page for comparison
Choose a page you believe is unaffected, such as a blog post, contact page, or another stable page that has not changed recently. Running a known-clean page through the same tool gives site owners a baseline for comparison and makes it easier to spot whether the warning is limited to one area of the site.
Step 6: Compare the results across all three URLs
Look at the flagged page, the homepage, and the clean page side by side. If only one page appears affected, the issue may be more contained. If multiple pages show signs of trouble, the problem may be broader and tied to a larger site blacklisted event or deeper security gaps across the site.
Step 7: Save your notes before moving on
Document what you found for each URL, especially if the results suggest different levels of impact across the site. Keeping notes at this stage helps you narrow your cleanup work, confirm the scope of the issue, and prepare a more accurate review request later.
How to remove your URL from a blacklist
Getting removed from a blacklist is not just about filing a request. First, the site needs to be genuinely clean.
- Confirm where you’re blacklisted
- Stabilize the site before cleaning
- Remove malware and unwanted changes
- Lock down access
- Fix the root cause so it doesn’t come back
- Request delisting or a review
- Monitor after delisting
Step 1: Confirm where you’re blacklisted
Start by identifying exactly which service is showing the warning. This is one of the most important first steps, because not every blacklist works the same way, and not every warning is reviewed in the same place.
The warning may come from:
- A browser warning
- A Google-related security issue
- An antivirus software or security vendor alert
- A third-party reputation system
- A filtering service used by workplaces, schools, or parental controls
Try to pin down the source as clearly as possible. Look at the wording of the warning message, where it appears, and whether it shows up in the browser, in search results, or inside a security product. A message shown directly in the browser may point to Google safe browsing or a similar browser-based security service, while an alert from security software may come from one of several security providers that maintain their own lists of risky web addresses.
It also helps to test the issue in more than one environment. If the warning appears across multiple browsers or devices, that may suggest a broader blacklist issue. If it only appears in one tool or network, the warning may be tied to a specific vendor, filtering system, or local security tools setup.
This step matters because cleanup alone may not remove every warning right away. In some cases, the same site can appear on multiple blacklists, which means website owners may need to submit more than one review or request removal through more than one platform.
Step 2: Stabilize the site before cleaning
Before you remove files or change settings, take a moment to stabilize the site. This helps protect your website files, preserve evidence, and reduce the risk of worsening the problem during cleanup.
Start with these steps:
- Contain: Put the site in maintenance mode, if feasible. This can help limit exposure while you work, especially if users are being redirected, seeing a security warning, or landing on pages with malicious content.
- Back up: Create a full backup of your site files and database before making changes. This gives site owners a restore point if something breaks during cleanup and makes it easier to compare clean files against compromised ones later.
- Preserve evidence: Save your server, access, and application logs before they rotate or get overwritten. These records can help you trace the entry point, spot suspicious logins, identify malicious activity, and see whether attackers were trying to steal login credentials or redirect users.
Taking these steps first makes the cleanup process safer, more organized, and more useful for finding the root cause instead of only fixing the visible symptoms.
Step 3: Remove malware and unwanted changes
Check both your site files and your database. Some threats hide in theme files, plugins, uploads, or core files, while others show up as spam pages, injected links, fake users, or altered settings stored in the database.
As you clean up, look for and remove:
- Malicious scripts or injected code
- Unauthorized admin accounts or fake users
- Rogue cron jobs or scheduled tasks
- Spam pages, hidden links, or suspicious redirects
- Altered files tied to malicious content or other security issues
This is also the best time to review your site for signs of SEO spam, hidden malware, and compromised website files that may be helping attackers redirect users or serve harmful content without your knowledge.
Once the malicious changes are removed, update everything that could have helped create the problem in the first place. That includes your CMS or core platform, plugins, themes, extensions, and other dependencies. Outdated plugins and unsupported software are common sources of security vulnerabilities, so patching them is a key part of preventing the issue from coming back.
Don’t think of this as just deleting what looks suspicious. Think about cleaning the site thoroughly, removing the source of the security problems, and making sure the same weakness cannot be used again.
Step 4: Lock down access
Once the visible damage is gone, tighten access right away. This step helps stop attackers from getting back in through the same account, weak password, or overlooked permission.
Start by updating every credential tied to the site, including:
- CMS or admin logins
- Hosting account passwords
- SFTP and SSH credentials
- Database passwords
- API keys and connected service logins
Next, review user permissions carefully. Remove unknown, inactive, or unnecessary admin accounts, and limit user access to only what each person actually needs. If too many people have high-level access, it becomes easier for attackers to move around the site and harder for site owners to trace what happened.
You should also enable two-factor authentication on all important accounts. This adds another layer of protection if passwords are stolen, reused, or guessed.
To reduce repeated login abuse, add protections that help prevent brute force attacks, such as:
- Rate limiting
- Login attempt restrictions
- CAPTCHA where appropriate
- A web application firewall
- Tools that can block malicious traffic
This is one of the most important recovery steps because a site with weak access controls can be compromised again quickly, even after the visible security problems are cleaned up.
Step 5: Fix the root cause so it doesn’t come back
A blacklist warning is usually a symptom, not the full problem. Cleaning up the visible damage matters, but it is only part of the fix. If the original weakness stays open, the site can be compromised again.
That means going beyond deleting a spam page or removing one piece of malicious code. You need to find and fix the actual entry point.
That may include:
- Patching a known vulnerability
- Replacing an outdated or unsafe plugin
- Fixing a compromised script
- Removing risky third-party assets
- Auditing redirects and outbound links
- Deleting unused software, themes, plugins, or accounts
- Correcting unsafe settings or other security gaps
This step is especially important when the issue started with outdated plugins, weak configurations, or other overlooked security vulnerabilities. A site may look clean at first, but if the underlying problem is still there, attackers can return, add new malicious content, or quietly reopen the same path later.
The goal here is to close the gap that allowed the compromise in the first place. That is what helps prevent repeat infections, protects future website traffic, and gives site owners a better chance of staying off multiple blacklists.
Step 6: Request delisting or a review
Once the site is clean and the root cause has been fixed, the next step is to request a review from the service that flagged it. This is where you show that security issues have been resolved and the warning should be removed.
Use the path that matches your situation:
- If the issue appears in Google Search Console: Submit a review only after the cleanup is complete. Make sure the malicious content, harmful redirects, fake pages, or other flagged problems are fully removed before you send the request. If Google finds the same issue again during review, the process can take longer.
- If the warning comes from another security provider or vendor blacklist: Follow that platform’s review or appeal process. Different security companies use different systems, so website owners may need to complete this step in more than one place, especially if the site appears on multiple blacklists.
- If you think the warning is a false positive: Submit an appeal or false positive request. This can happen when a legitimate website is flagged because of a third-party script, an old reputation issue, or another misread signal.
The key is to avoid requesting delisting before the site is actually fixed. A solid cleanup record makes it easier to request removal, rebuild trust, and recover website traffic.
Step 7: Monitor after delisting
Do not treat delisting as the finish line. A warning may be gone, but that doesn’t always mean the site is fully secure. If the root cause was missed or access is still weak, the same security problems can come back.
For the next 1 to 2 weeks, keep a close eye on the site by:
- Re-scanning regularly for malicious content, hidden malware, or other security threats
- Watching for unexpected file changes in your website files
- Monitoring for new or unauthorized admin accounts
- Checking for unusual drops or spikes in website traffic
- Reviewing redirects, outbound links, and external script behavior
This follow-up period helps site owners catch reinfection early, confirm that cleanup worked, and spot signs of new malicious activity before the site ends up on multiple blacklists again.
This is also where ongoing protection matters most. Regular scans, backups, and alerts can help you catch repeat issues early and recover faster if the site is compromised again. If you’re thinking about longer-term protection, reading our article about SiteLock vs. CodeGuard is a useful next step.
False positives: Why you might be flagged when your site looks clean
Sometimes a site looks fine on the surface but still gets flagged. That doesn’t always mean the warning is wrong, but it does mean you may need to investigate beyond the obvious.
Common causes of false positives
In some cases, a legitimate website can be flagged because a browser, security tool, or other security service sees something suspicious that turns out to be misleading or no longer active.
Common causes of false positives include:
- Shared hosting reputation issues: If your site shares infrastructure with other websites, problems on a neighboring site can sometimes affect how your domain or server is viewed by certain security systems or security providers.
- A previously compromised domain history: A domain that was hacked, abused, or tied to malicious activity in the past may continue to raise concerns even after ownership changes or cleanup.
- Flagged third-party scripts or widgets: Ads, chat widgets, embedded tools, or other outside resources can trigger warnings if one of those services starts serving risky code or gets flagged by security software.
- Unusual behavior that triggers automated detection: Sudden redirects, obfuscated JavaScript, aggressive pop-ups, or pages that behave in unexpected ways can look similar to phishing sites, scam websites, or other harmful pages.
- Misclassified content or broken page flows: Login, checkout, or account pages with errors, missing assets, or odd redirects can sometimes resemble phishing websites, especially if they ask for login credentials but do not load as expected.
- Cached warnings after cleanup: Even after the issue is fixed, some warnings may remain visible for a period of time while systems recheck the site and update their status.
False positives can also happen when a page looks suspicious to an automated systems even though the intent is harmless. That’s why it’s important to compare findings across Google Search Console, external scans, and other online tools before assuming the site is still compromised.
What to do if you think it’s a false positive
If you believe the site is clean, slow down and verify that before you submit an appeal. A warning that looks wrong at first can still point to a real issue hiding in your website files, third-party scripts, or redirects.
Start by validating the warning from more than one source:
- Check Google Search Console: Look for any reported security issues, flagged URLs, or related alerts.
- Run at least one external scan: Use reputable online tools or other security tools to look for malicious content, suspicious redirects, or hidden problems.
- Test from a clean environment: Check the site from another browser, device, or network to rule out cached warnings, local filtering, or extension-related issues.
- Review recent changes: Think about anything recently added or updated, including plugins, scripts, redirects, checkout flows, or third-party widgets that may have triggered the warning.
Before you appeal, gather clear evidence that supports your case. Helpful details include:
- Affected URLs
- Timestamps
- Screenshots of the warning
- Scan results
- Notes on recent fixes or changes
- Any signs that the warning appears only in certain environments
Once you have confirmed the site is clean, submit a review or appeal through the platform that flagged it. Be specific about what you checked, what you fixed, and why you believe the warning is a false positive. The clearer your evidence, the easier it is for that security service or provider to review the case.
Proactive tips for keeping your website safe long term
The best way to handle blacklisting is to reduce the chance of it happening in the first place. A few steady habits can make your site harder to compromise and easier to recover if something goes wrong.
- Keep everything updated
- Enforce strong authentication
- Control access carefully
- Block common attacks
- Use HTTPS everywhere
- Back up your site and prepare for fast recovery
- Monitor continuously
Keep everything updated
Keep your CMS, plugins, themes, dependencies, and scripts up to date. Outdated plugins, unsupported themes, and old software are some of the most common sources of security vulnerabilities.
Regular updates help patch known weaknesses before attackers can use them to inject malicious code, add malicious content, or exploit other security gaps. If you use WordPress, it also helps to review whether each extension is still maintained and whether you are relying on a trusted WordPress security plugin rather than outdated or unnecessary tools.
Enforce strong authentication
Weak logins make it easier for attackers to steal login credentials or break into accounts through reused passwords and other common methods.
Focus on the basics:
- Enable two-factor authentication on admin and high-access accounts
- Use a password manager
- Create strong, unique passwords for every account
These steps make account takeover much harder and reduce the chance that one compromised login turns into a full-site security issue.
Control access carefully
The more people with high-level access, the more ways something can go wrong. That is why it is important to review access regularly instead of only when there is a problem.
A good access-control routine should include:
- Review user permissions regularly
- Remove unused or outdated accounts
- Limit admin access to only the people who need it
- Avoid giving full privileges unless necessary
- Check for old developer, contractor, or temporary accounts that no longer need access
Managing user access carefully can reduce the risk of accidental changes, insider mistakes, and unauthorized logins that expose your site to security threats.
Block common attacks
Many attacks are repetitive and automated. That means basic defenses can go a long way.
To help prevent brute force attacks and block other common threats, consider using:
- Rate limiting
- CAPTCHA on login forms where appropriate
- A web application firewall
- Login monitoring and alerting
- Lockout policies after repeated failed attempts
- Tools that can block malicious traffic
These measures help stop repeated login attempts, suspicious bot activity, and other forms of malicious traffic before they become bigger security problems.
Use HTTPS everywhere
HTTPS helps secure data in transit and support user trust. It will not fix malware or other security issues by itself, but it is still a basic safeguard that helps protect visitors and strengthen your site’s credibility.
If your site still needs HTTPS, readers can start by enabling HTTPS to understand how to set it up properly. And because browser trust warnings can often confuse visitors during or after a security issue, How to fix “Your connection is not private” is a helpful next read for understanding how those errors affect the way your site appears.
Back up your site and prepare for fast recovery
A clean, recent backup can save a lot of time during a security incident. Backups do not replace cleanup, but they can make recovery much faster if your site is compromised, your website files are altered, or you need to restore a clean version of the site quickly.
To make backups more useful:
- Back up both files and databases
- Store backups securely
- Test restores occasionally
- Keep enough backup history to recover from older infections that were not caught right away
If a blacklist issue leads to compromised files or unwanted site changes, having a recent backup can make recovery much easier.
Monitor continuously
Ongoing monitoring helps site owners catch trouble earlier, before a site ends up on multiple blacklists or starts losing trust and web traffic.
Useful areas to monitor include:
- Uptime and availability
- File integrity changes
- Malware scans
- Unusual website traffic spikes or drops
- Admin account changes
- Redirect behavior
- Suspicious outbound links
- Unexpected changes to key pages
Regular monitoring helps you spot security alerts, unusual behavior, and possible reinfection before those issues grow into larger problems.
Here’s a simple way to think about the most important long-term security habits and what each one helps prevent:
Prevention step | Description | What it prevents | How often to do it |
|---|---|---|---|
Update regularly | Keep your CMS, plugins, themes, and dependencies current | Known vulnerabilities, outdated software exploits, unsafe plugins | As updates are released |
Strengthen logins | Use strong passwords, a password manager, and enable two-factor authentication | Stolen login credentials, account takeovers, unauthorized access | Ongoing |
Review access | Audit user roles and remove unused accounts | Excess admin access, old accounts, permission-related security gaps | Monthly |
Block attacks | Use rate limiting, CAPTCHA, login monitoring, and a web application firewall | Brute force attacks, bot traffic, repeated login abuse, malicious traffic | Ongoing |
Use HTTPS | Secure your site with HTTPS and maintain valid SSL settings | Browser trust issues, unsecured data in transit | Ongoing |
Back up consistently | Save clean copies of your files and database | Slow recovery, data loss, longer downtime after an incident | Daily or weekly |
Monitor your site | Track uptime, file changes, malware scans, redirects, and traffic anomalies | Hidden malware, suspicious changes, repeat infections, blacklist risk | Daily |
Audit security | Review your setup for outdated tools, unsafe scripts, and weak points | Overlooked vulnerabilities, recurring security problems | Quarterly |
Long-term protection comes down to consistency. Regular updates, stronger logins, access control, backups, monitoring, and security audits can all help lower the risk of future blacklist issues.
You’re not just fixing one problem. Your goal is to build better security habits over time, so your site is harder to compromise and easier to trust.
Frequently asked questions
A URL blacklist is a list or warning system used by browsers, search engines, and security tools to flag pages or websites that may be unsafe because of malware, phishing, spam, or hacked content.
Start by checking for browser warnings, testing the site in another environment, reviewing Google Search Console, and running a reputable external scan. If the issue seems tied to email delivery instead, check for IP or email blacklist problems separately.
First, identify where the warning is coming from. Then clean the site, remove malware or spam, fix the vulnerability, secure access, and request review from the service that flagged the site.
It depends on the platform and how thoroughly the issue was resolved before review. The important part is making sure the root cause is fixed before you submit a request, not just the visible symptoms.
Yes. Some issues are hidden from normal view, appear only on certain devices, come from third-party scripts, or remain cached after cleanup. That is why multiple checks are important.
A URL blacklist targets a page, section, or domain on the web, while an IP blacklist focuses on a server’s reputation, often in email or abuse contexts. MXToolbox is more relevant for the second case than the first.
Stay ahead of threats with stronger website protection
A URL blacklist can feel sudden, but it usually starts with a security issue that goes unnoticed until warnings, traffic drops, or trust problems appear. The key is to confirm the source, fix the root cause, and follow the right review process to get your site cleared.
Recovery shouldn’t stop at delisting. Regular updates, stronger access controls, HTTPS, backups, and ongoing monitoring can help lower the risk of it happening again.
Security issues can also damage the trust tied to your domain. When users see warnings or avoid your site, your web address and brand credibility take the hit. Explore our domain options to help support a safer, more credible online presence.
Find the perfect domain
Ready to register a domain name? Check domain availability and get started with Network Solutions today.